SpaceWalker Desktop
Overview
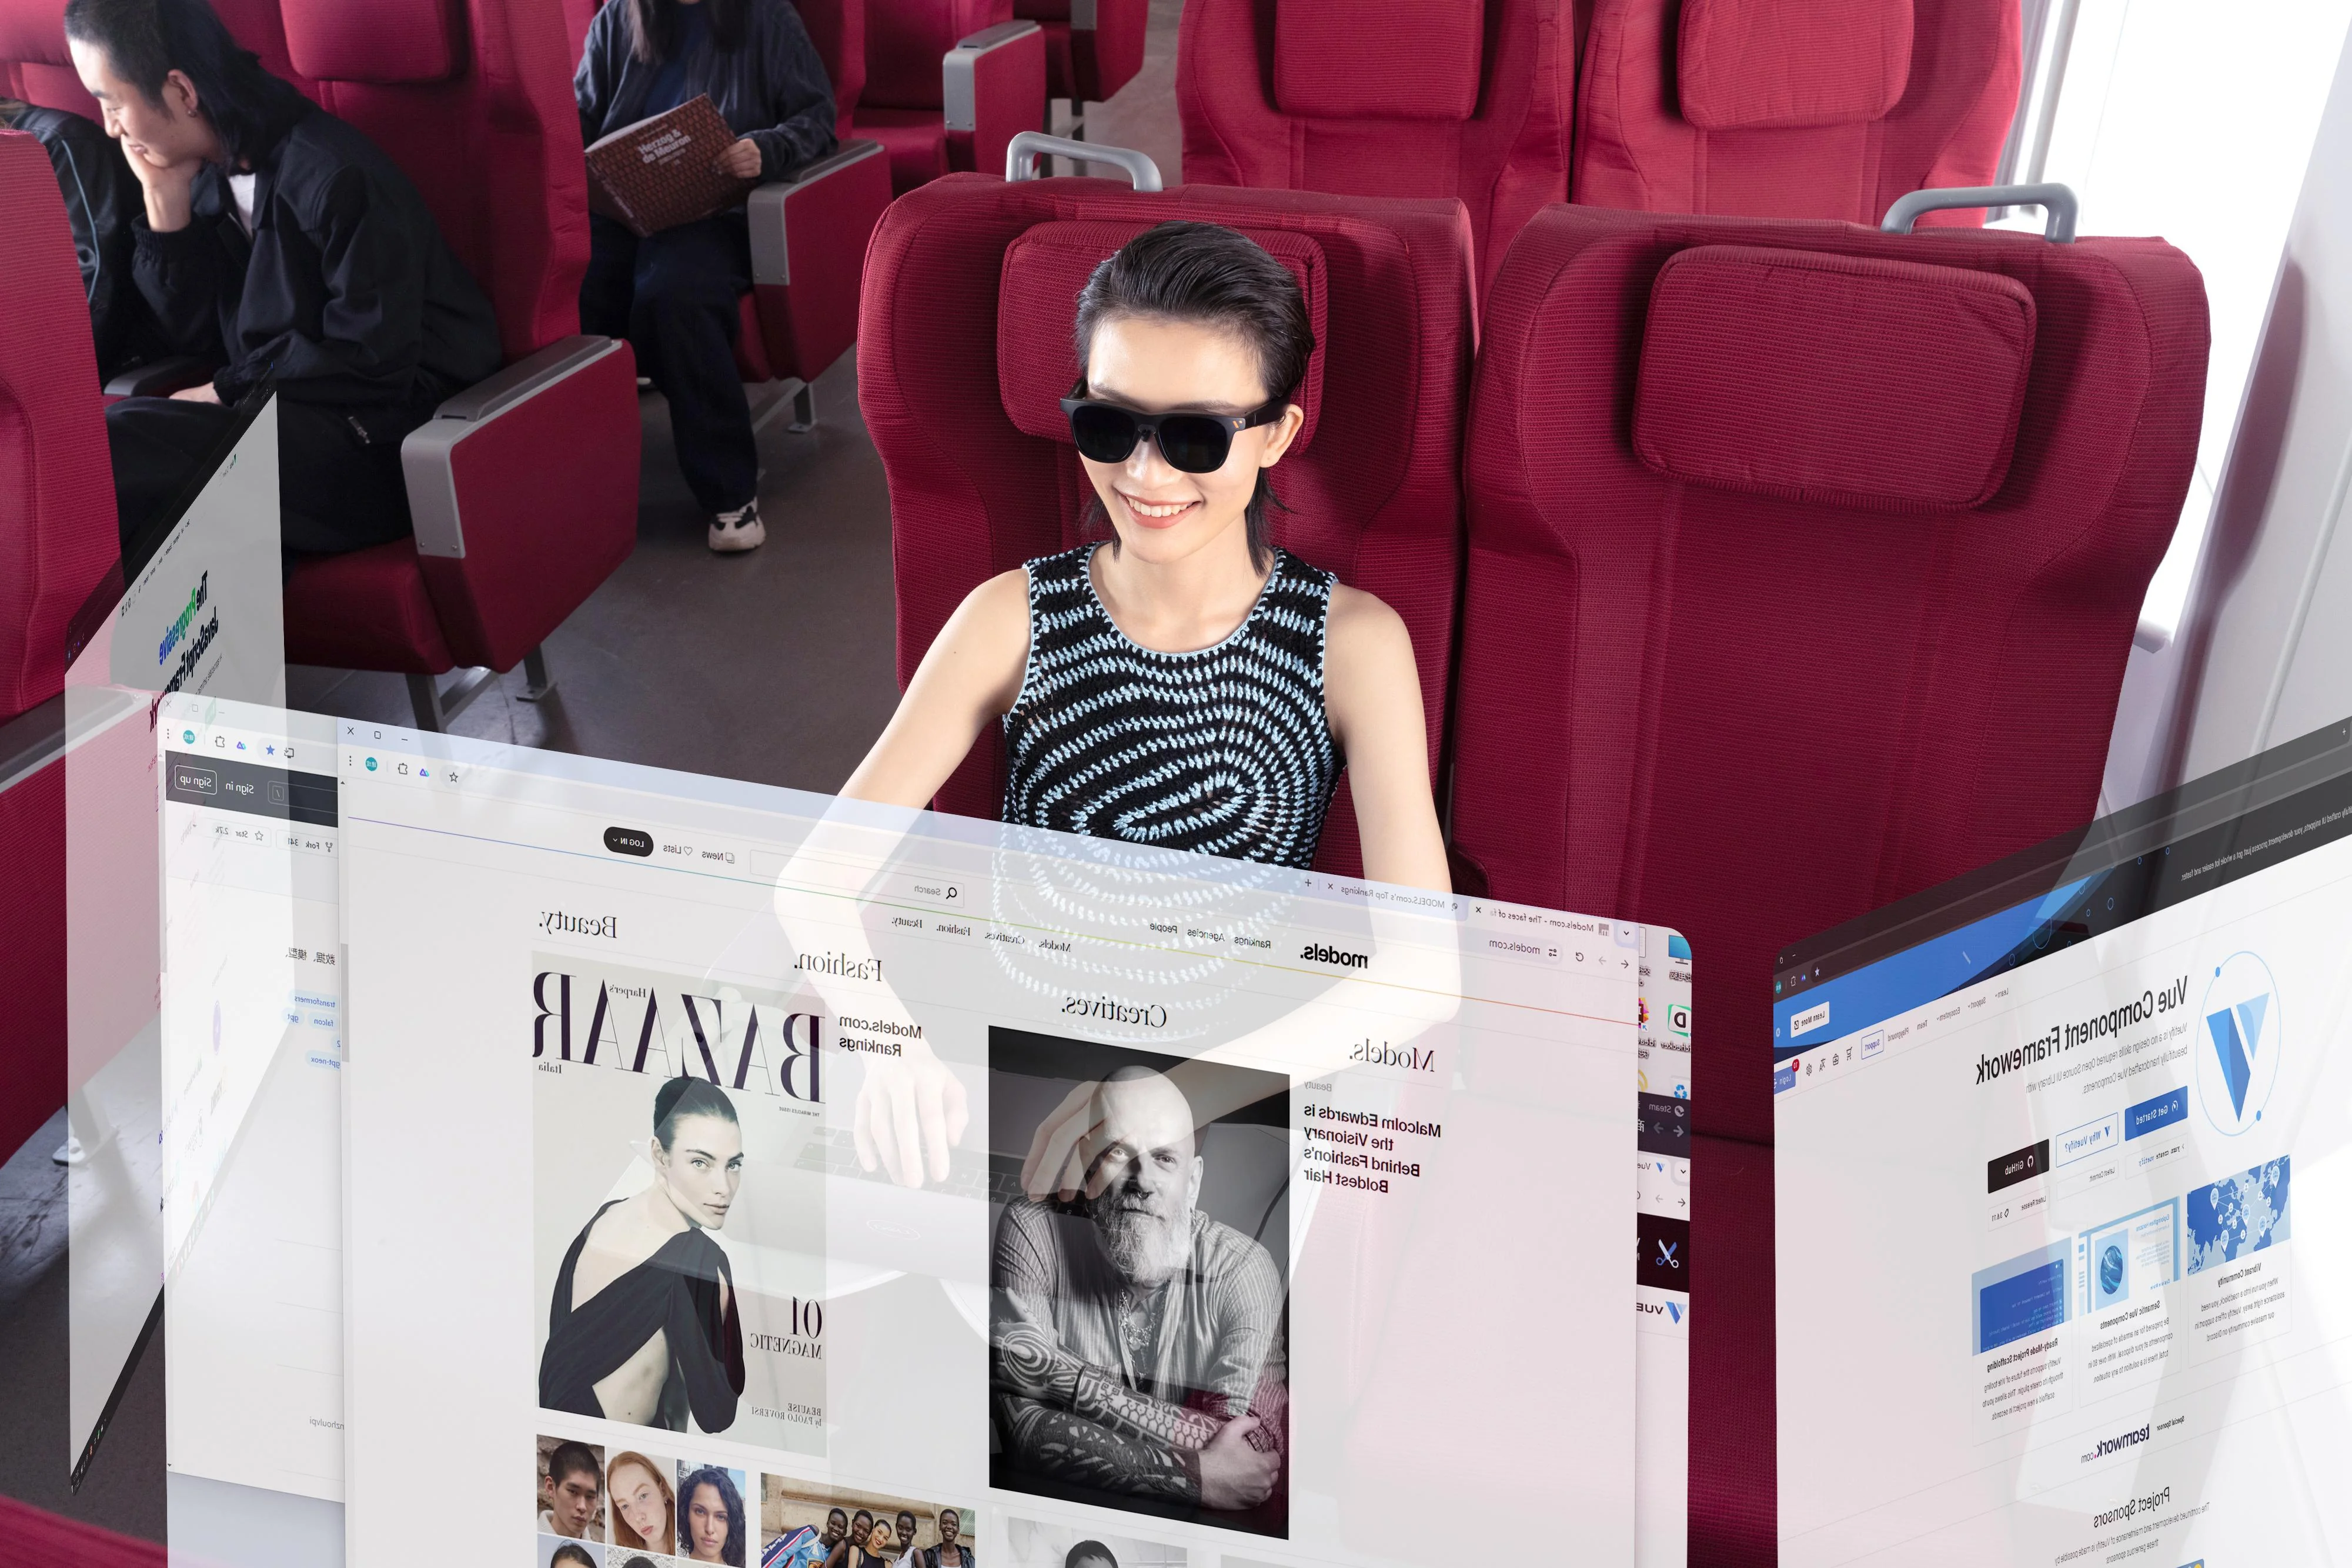
SpaceWalker Desktop is an application that works with XR Glasses manufactured by VITURE. It allows you to project multiple virtual screens onto your XR Glasses from your desktop device, and supports multiple layout switching to adapt to your operating habits.
By default, the virtual screen is locked in space (6DoF on Luma Ultra XR GLasses, 3DoF on our other XR Glasses). You can also unlock the fixation of a single direction according to your personal habits, so that the screen moves with your head.
Of course, you can also use keyboard shortcuts to adjust the size of the screen display, or reset the screen to the center of your field of view.
Key Features
- Virtual Screen: Enjoy multiple virtual screens that locked in space (6DoF on Luma Ultra XR GLasses, 3DoF on our other XR Glasses).
- Customizable Layouts: Switch between multiple screen arrangements to optimize your productivity.
- Single Display
- Dual Displays (Side-by-Side)
- Triple Displays (Side-by-Side)
- Stacked Triple Displays
- Ultrawide Panoramic Display
- Code Mode (Portrait-Landscape-Portrait) Note: The VITURE Beast XR Glasses support only the following display modes: Single Display, Ultrawide Panoramic, 2 Displays Side by Side, and 3 Displays Side by Side.
- Keyboard Shortcuts: Effortlessly resize and reposition screens with quick keystrokes for maximum comfort and efficiency.
- Swap between layouts, recalibrate and recenter the display, even quickly quit the app — more on shortcuts further below!
- Refresh Rate Options (120Hz, 90Hz, or 60Hz) : Select and save your preferred refresh rate on supported XR Glasses.
- Cursor Recentering: Quickly locate your cursor with a simple shake of your mouse.
- And More! Discover additional features designed to streamline your workflow and enhance your virtual desktop experience below.
Download
SpaceWalker for Mac
Download the lastest SpaceWalker for Mac.
Click here to view the SpaceWalker for Mac release notes and full update history.
SpaceWalker for Windows
Download the lastest SpaceWalker for Windows.
Click here to view the SpaceWalker for Windows release notes and full update history.
Requirements
Mac
Hardware: Mac with the USB-C port (with the Thunderbolt symbol), Thunderbolt 3, Thunderbolt / USB 4, and Thunderbolt 4.
Explore more at Identify the ports on your Mac.
Software:
SpaceWalker for Mac v1.2.3 and later requires macOS Ventura 13.0 or higher.
If you're using macOS Monterey 12.4 or later, the last compatible version is v1.2.2. Download v1.2.2.
Starting from v1.6.0, Intel-based Macs are no longer supported. If you're using a compatible macOS version but have an Intel-based Mac, please download the latest supported version: Download v1.5.0
Important: Luma Ultra support begins from version 1.7.0. Since v1.7.0 and above no longer support Intel-based Macs, Luma Ultra is not supported on any Intel-based Mac.
Windows
To ensure the best experience with SpaceWalker for Windows, make sure your system meets the following requirements:
- Operating System: Windows 10 x64 (version 1903 or later), Windows 11
- RAM: 16 GB or higher
- CPU: 13th Gen Intel Core i7-13620H (2.4GHz) or equivalent
- GPU: NVIDIA GeForce GTX 1060 or AMD Radeon RX 580 (or higher) recommended
- USB Type-C port with DP Alt Mode (Display over USB-C)
Currently, the VITURE HDMI XR Adapter and the USB-C XR Charging Adapter are not supported.
Note:
Since SpaceWalker requires significant graphics processing resources, playing games within SpaceWalker is not highly recommended. If you still wish to play games, we suggest running them at 1080p resolution or lower, and at 30fps or less. For devices that meet only the minimum system requirements, playing games within SpaceWalker is not recommended.
Preparation
Get Started with Your XR Glasses
Follow these steps to ensure the best experience with your XR Glasses:
- Update Your XR Glasses: Ensure optimal performance by updating the firmware to the latest version. Click the link to install the update.
- Calibrate Your XR Glasses: After updating, calibrate the IMU (Inertial Measurement Unit) for accurate motion tracking. Follow this step-by-step guide.
- Auto-Calibrate Your XR Glasses: Connect your XR Glasses to a compatible device and power them on. Then, place them on a flat, stable surface for about 5 seconds.
Note: Auto-calibration requires the latest firmware, so complete the first two steps before proceeding.
Reduce Screen Tearing on Windows
Enable VSync (Vertical Sync) on your GPU to reduce screen tearing and latency while using SpaceWalker:
For NVIDIA GPU:
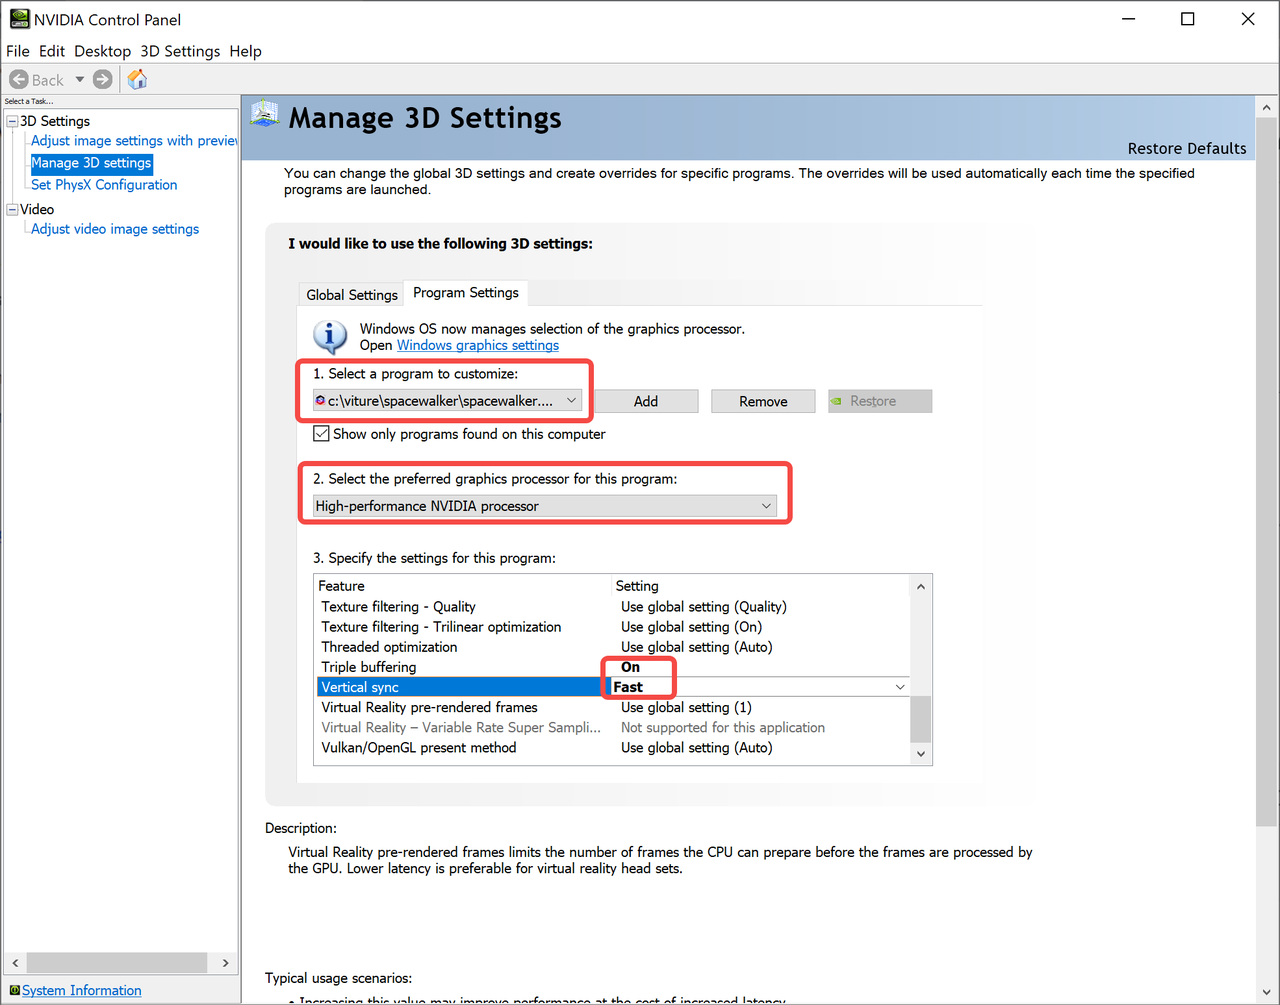
- Open NVIDIA Control Panel: Right-click on your desktop and select "NVIDIA Control Panel."
- Manage 3D Settings: Navigate to "Manage 3D Settings" > "Program Settings."
- Add SpaceWalker: Click "Add" and select "SpaceWalker.Unity.exe" from your SpaceWalker installation directory.
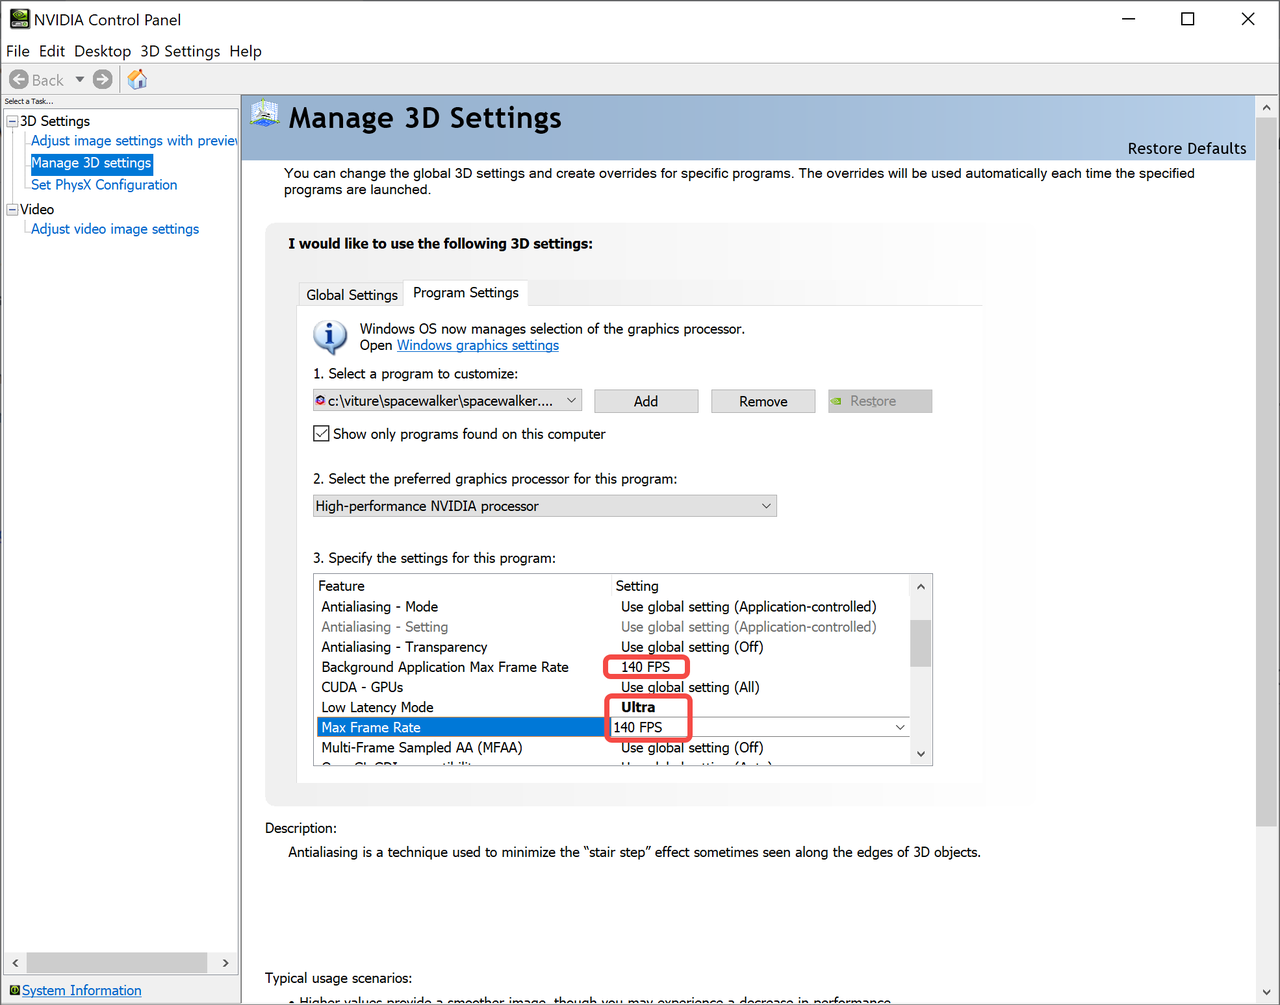
- Configure Settings: For SpaceWalker, set the following options:
- Preferred graphics processor: High-performance NVIDIA processor
- Vertical Sync: Fast
- Triple buffering: On
- Low Latency Mode: Ultra
For AMD GPU:
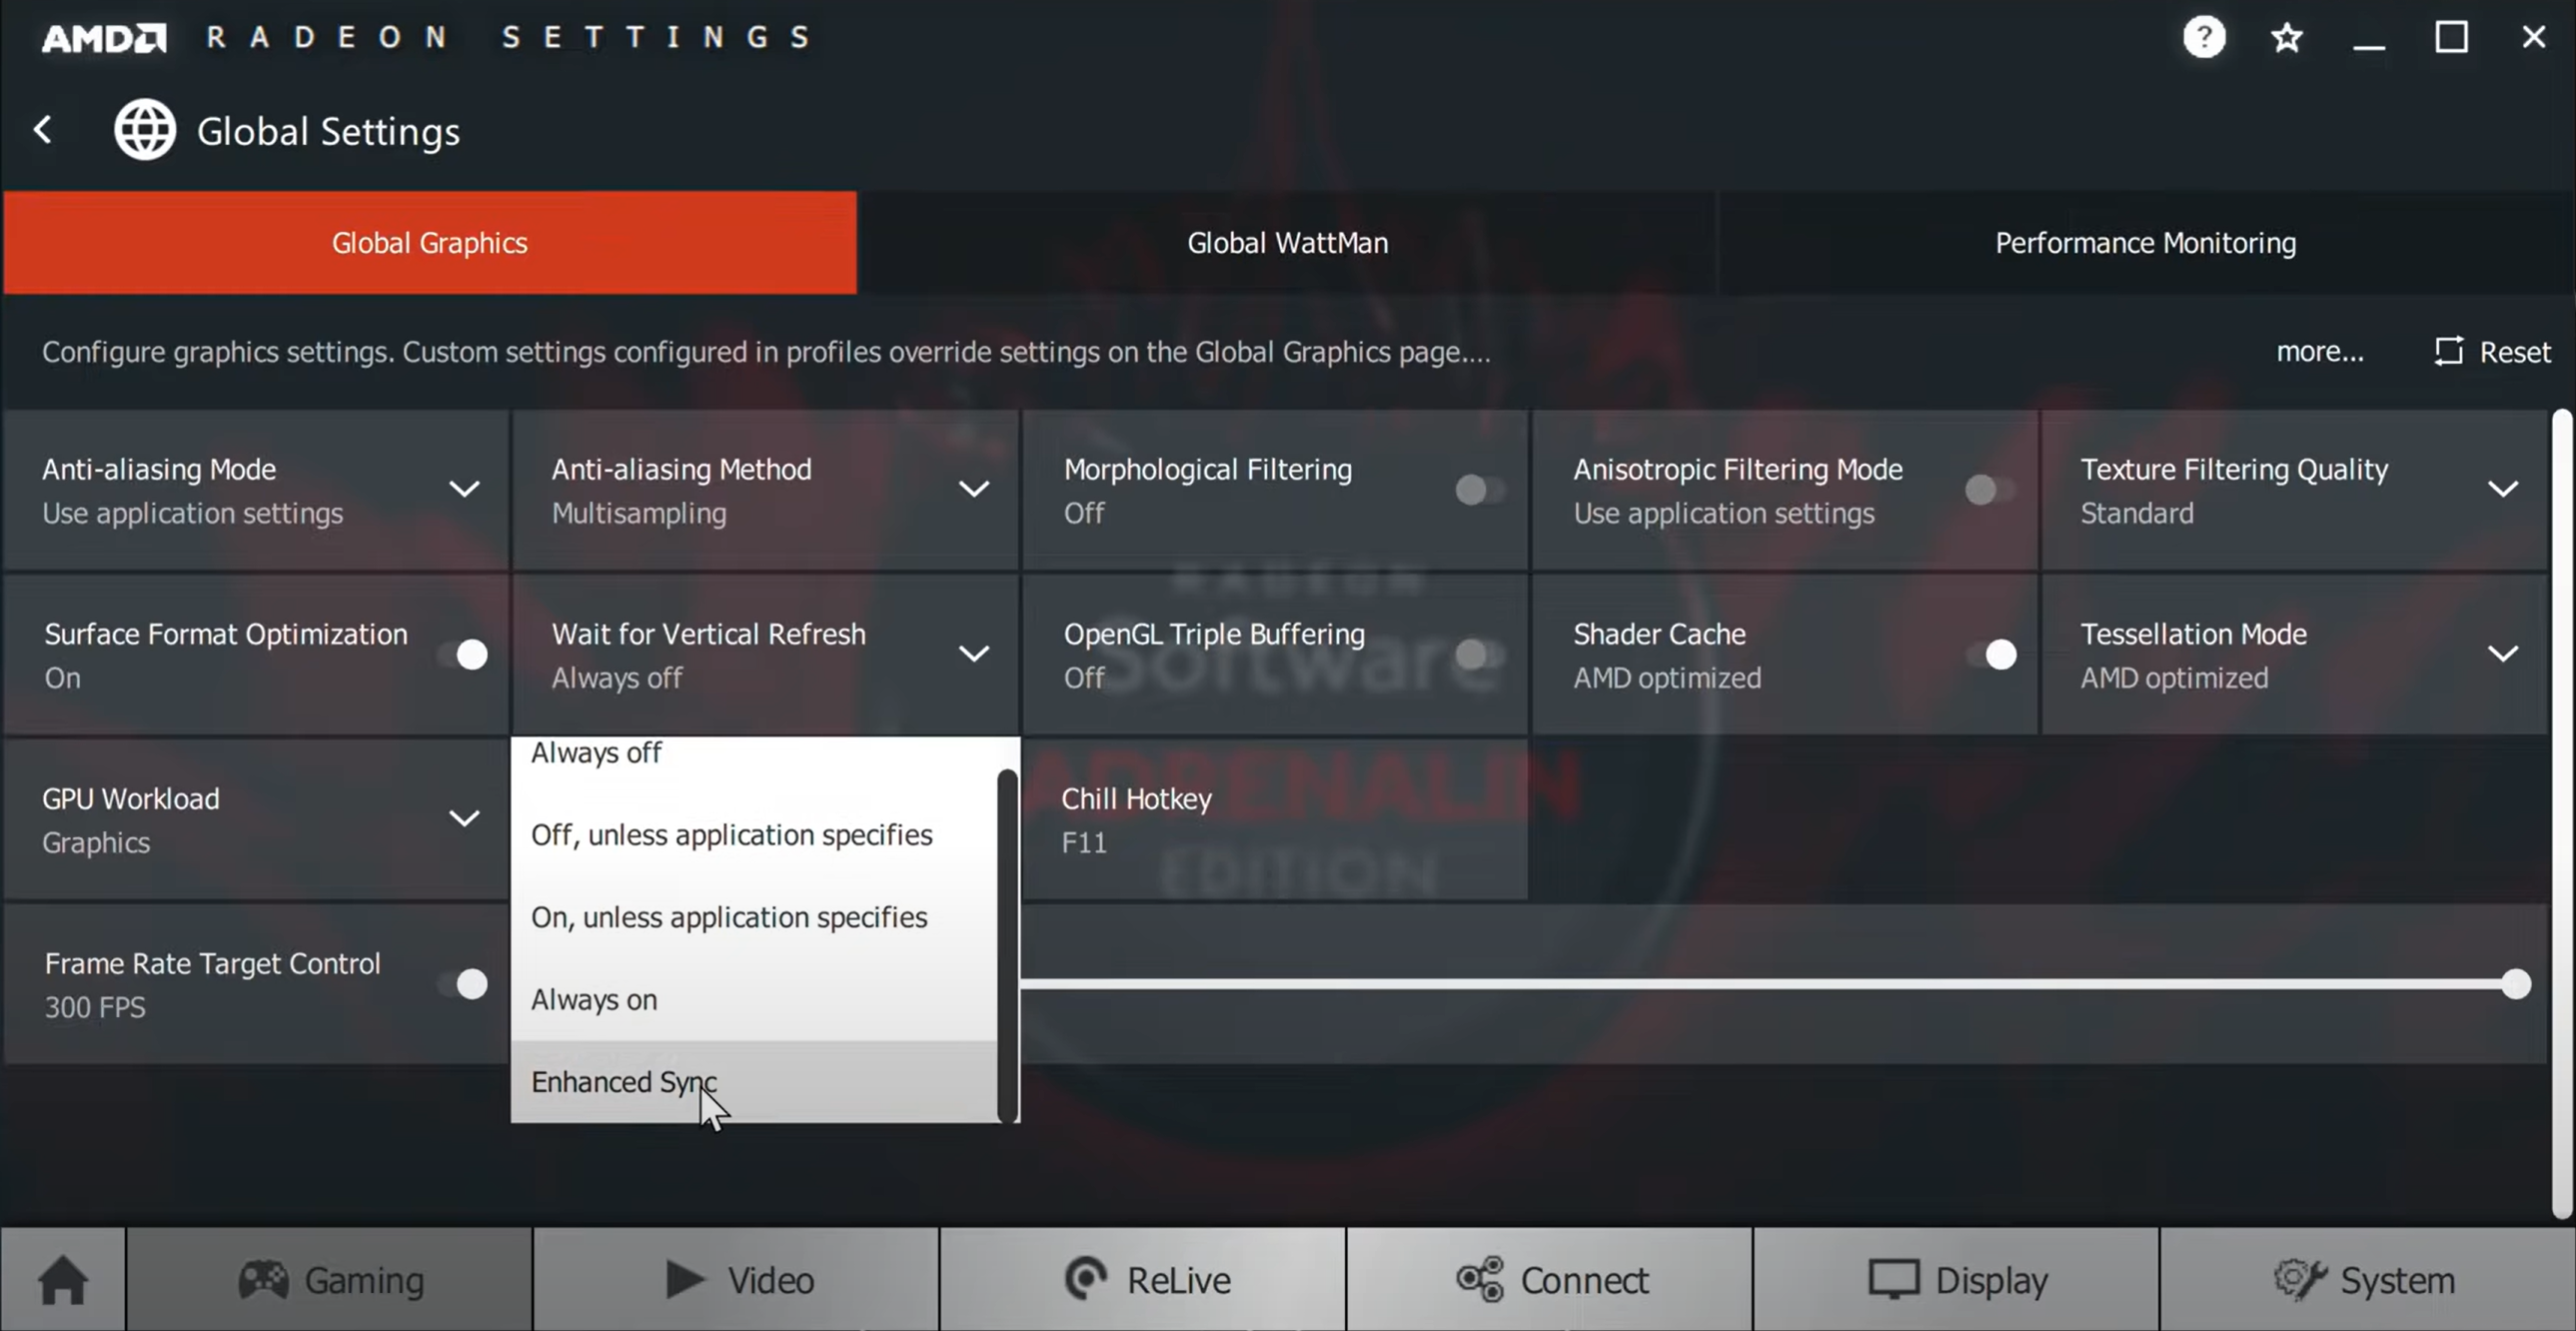
- Open AMD Radeon Settings: Right-click on your desktop and select "AMD Radeon Settings."
- Global Settings: Navigate to the "Gaming" tab and click "Global Settings."
- Wait for Vertical Refresh: Under the "Wait for Vertical Refresh" section, select "Enhanced Sync."
Connect Your XR Glasses
- Connect your XR Glasses according to your model:
- Magnetic Connector: Attach the magnetic connector to the XR Glasses.
- USB-C Connector: Plug the USB-C connector directly into the XR Glasses.
- Plug the USB-C cable into a port that supports DisplayPort Alt Mode.
- On Mac: a port with the Thunderbolt symbol ensures compatibility.
- On Windows: if your computer lacks a USB-C port with DisplayPort Alt Mode, you'll need a DP + USB-A to USB-C adapter or an HDMI + USB-A to USB-C adapter to create a full-featured USB-C connection.
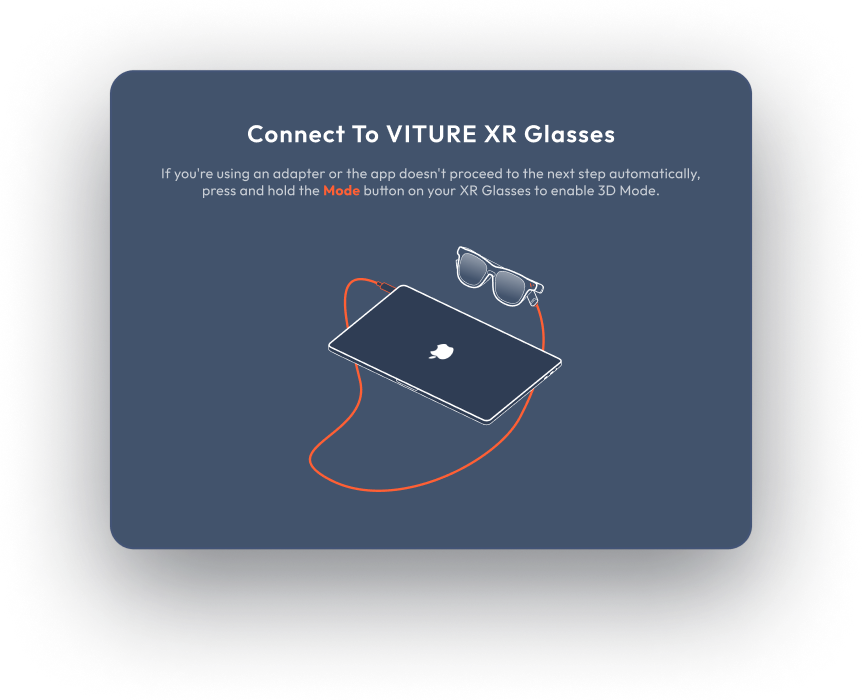
- The app will automatically detect the XR Glasses and proceed.
First time on Mac
Grant Screen Recording Permission
To display virtual screens on XR Glasses, grant Screen Recording permission:
- Open System Settings (Apple menu > System Settings).
- Click "Security & Privacy > Privacy > Screen Recording.
- Check the box next to "Immersive 3D." Unlock changes with your admin password if needed.
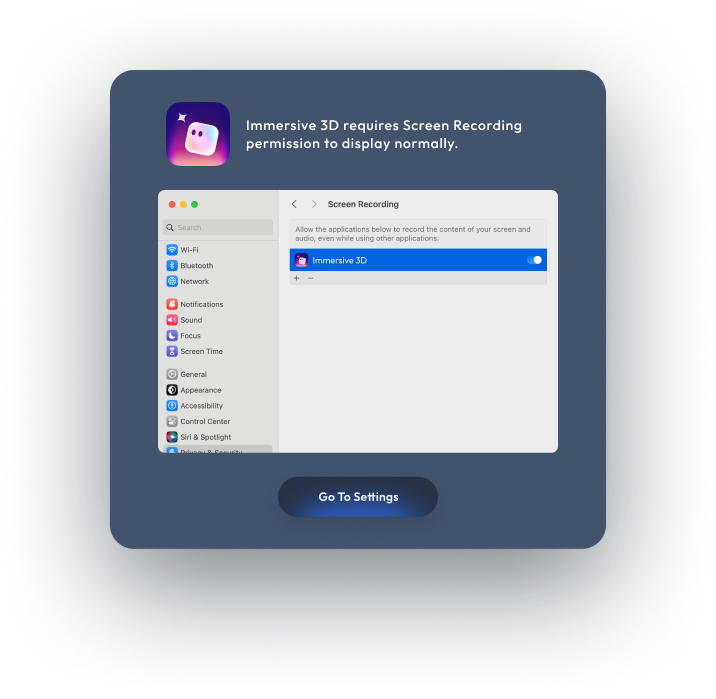
Settings
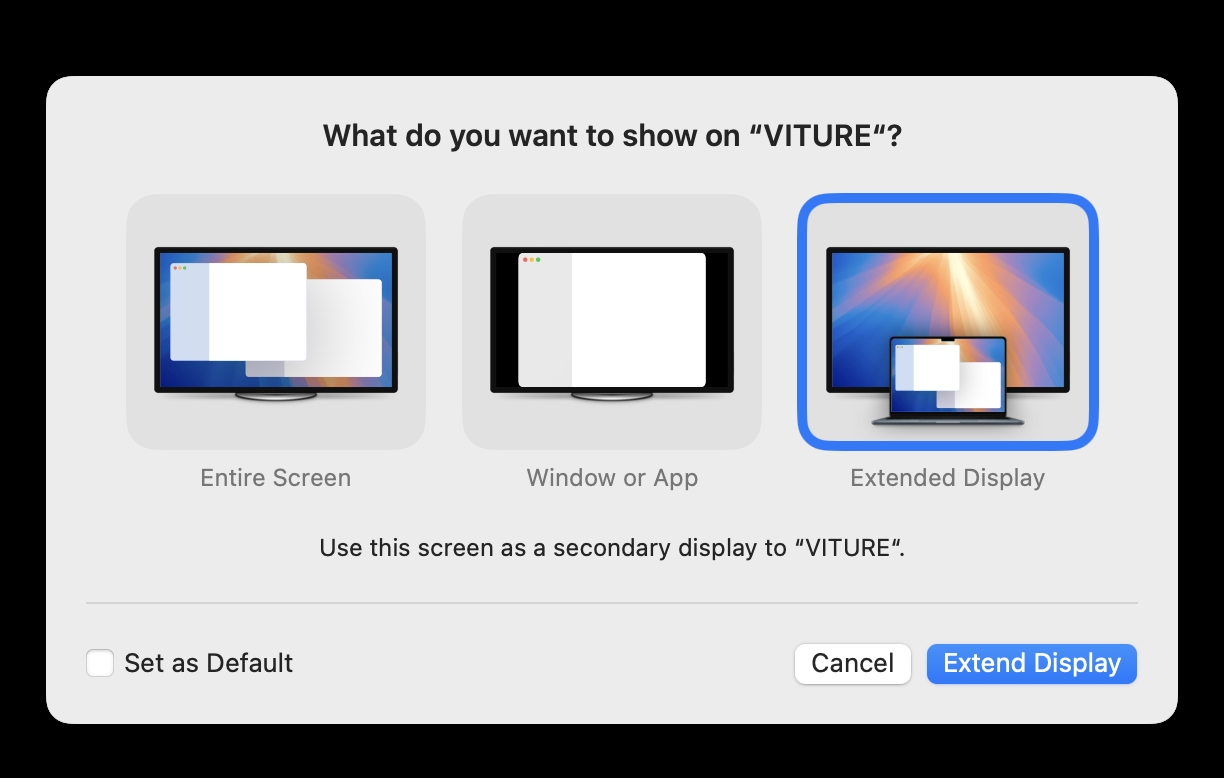
When connecting XR Glasses for the first time on Mac, a dialog may appear. Select "Extended Display" and check "Set as Default" in the bottom-left corner. This dialog may appear twice during the initial setup; follow the same steps each time.
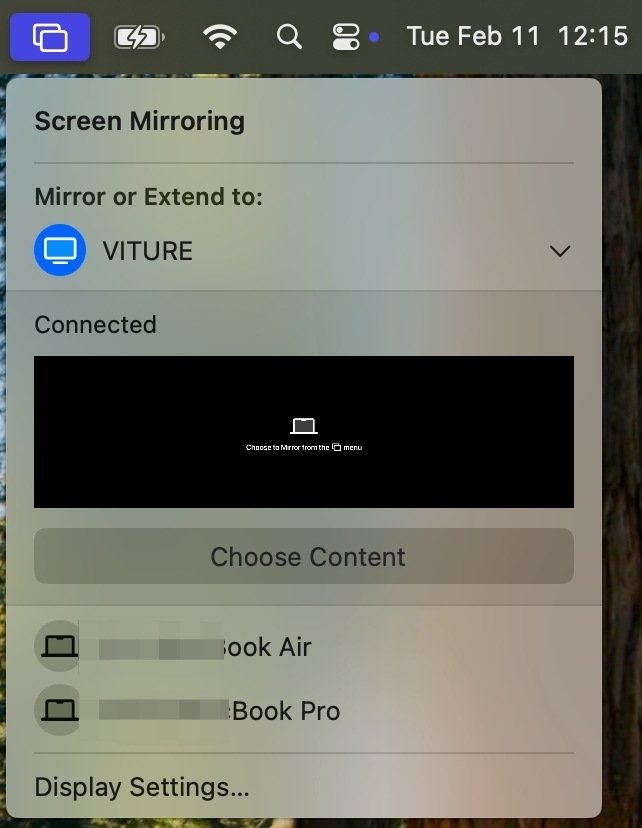
If the dialog above does not appear and the display on the XR Glasses shows a black screen with the text "Choose to mirror from the menu" (as shown in the image below), this typically occurs when enabling 3D Mode or switching to 120Hz. In this case, click the menu bar and select "VITURE" as the Extended Display.
Launch
If SpaceWalker is stuck on the "Connecting to VITURE XR Glasses" screen, refer to the Troubleshooting section to troubleshoot the connection.
Select a Display Layout
Choose from six available layouts to optimize your virtual workspace:
- Single Display
- Dual Displays (Side-by-Side)
- Triple Displays (Side-by-Side)
- Stacked Triple Displays
- Ultrawide Panoramic Display
- Portrait-Landscape-Portrait (Coding Mode)
Note: The VITURE Beast XR Glasses support only the following display modes: Single Display, Ultrawide Panoramic, 2 Displays Side by Side, and 3 Displays Side by Side.
Mirror or Extend Your Desktop
Decide how your virtual screens interact with your PC's display:
- Mirror Display: Duplicate your PC's screen onto your XR Glasses.
- Extend Desktop: Expand your workspace across multiple virtual monitors.
Select a Refresh Rate
Available for VITURE Luma, Luma Pro, Luma Ultra, and Pro XR Glasses
For supported models, SpaceWalker allows you to choose a refresh rate (120Hz, 90Hz, or 60Hz) each time you launch the app with your XR Glasses connected.
The app remembers your last chosen setting and applies it automatically on the next launch.
How It Works:
- SpaceWalker temporarily overrides your system's refresh rate settings while the app is running.
- Once you quit SpaceWalker, the display reverts to the refresh rate set in Windows Settings.
For instance, if Windows is set to 60Hz, but you choose 120Hz in SpaceWalker, your XR Glasses will run at 120Hz while SpaceWalker is active. After quitting the app, it returns to 60Hz.
On Mac: Refresh rate cannot be changed while the app is running. To apply a different refresh rate, please disconnect and reconnect your XR Glasses.
Settings on Mac
You can quickly access the settings by clicking the SpaceWalker icon in the menu bar / system tray icon or using shortcut keys.
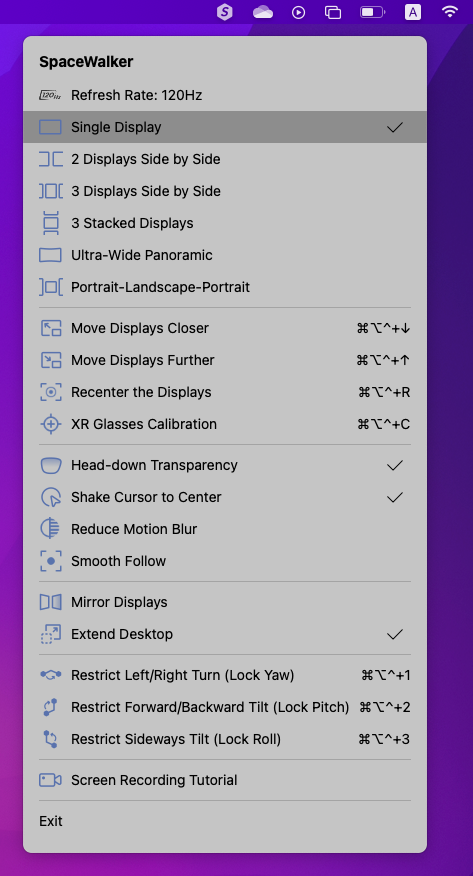
Switch Display Layouts
You can quickly switch between six display layouts. Open windows will remain open when you change layouts.
Move Displays
Use the settings or keyboard shortcuts to move displays closer or further apart (like making them bigger or smaller).
Recenter Displays
Use the settings or keyboard shortcuts to recenter the displays on your XR Glasses.
You'll receive a notification to recenter the displays if they move outside your field of vision.
Head Tracking Correction
Available on VITURE Luma Pro XR Glasses
When enabled, Head Tracking Correction uses real-time position data to enhance the 3DoF experience by improving stability and responsiveness.
If you're already satisfied with the current 3DoF performance, you can leave this option turned off.
Auto-Calibrate on Mac
Available on VITURE Luma Pro XR Glasses
The VITURE Luma Pro XR Glasses support automatic calibration to improve 3DoF stability. The calibration result is saved for a more consistent experience.
How to Auto-Calibrate:
- Keep your XR Glasses connected to your computer.
- Remove the XR Glasses and place them on a flat, stable surface.
- Wait for 3–5 seconds. Calibration will complete automatically.
- Put the XR Glasses back on and continue using them.
You may occasionally receive a message prompting you to auto-calibrate. If you notice display instability, you can repeat the steps above at any time.
XR Glasses Calibration
Calibration fixes drift, which is the gradual movement of the display over time. Unlike Recenter (Ctrl-Alt-Cmd-R) which adjusts the center point for your current position, calibration aims to improve long-term stability. If you plan to stay in a fixed position while using SpaceWalker, calibration is recommended.
Shortcut available on VITURE Pro, One, and One Lite XR Glasses
Calibration Steps:
- Find a comfortable spot: Set up in a comfortable position for using SpaceWalker.
- Start the app and Recenter (optional): Wear your XR Glasses and launch the app. If the displays aren't centered, use Recenter (Ctrl-Alt-Cmd-R) to adjust them.
- Calibrate: Use the calibration shortcut key (Ctrl-Alt-Cmd-C). Remember your current approximate position.
- Repeat for better results (optional): Continue using SpaceWalker for a while, then return to your initial position and perform calibration again. The frequency of calibration depends on your individual needs. Repeating steps 3 and 4 can further improve calibration.
Recentering or disconnecting your XR Glasses will clear the calibration data. You'll need to recalibrate following these steps again.
If you plan to stay in a fixed position while using SpaceWalker, calibration is recommended for long-term stability.
However, recentering remains useful for occasional adjustments based on your posture changes.
Control Panel on Windows
After you click Launch, SpaceWalker for Windows opens the main control panel. It's designed so your most-used controls are always easy click away, while one-time setup options live in the Settings menu.
Control Panel
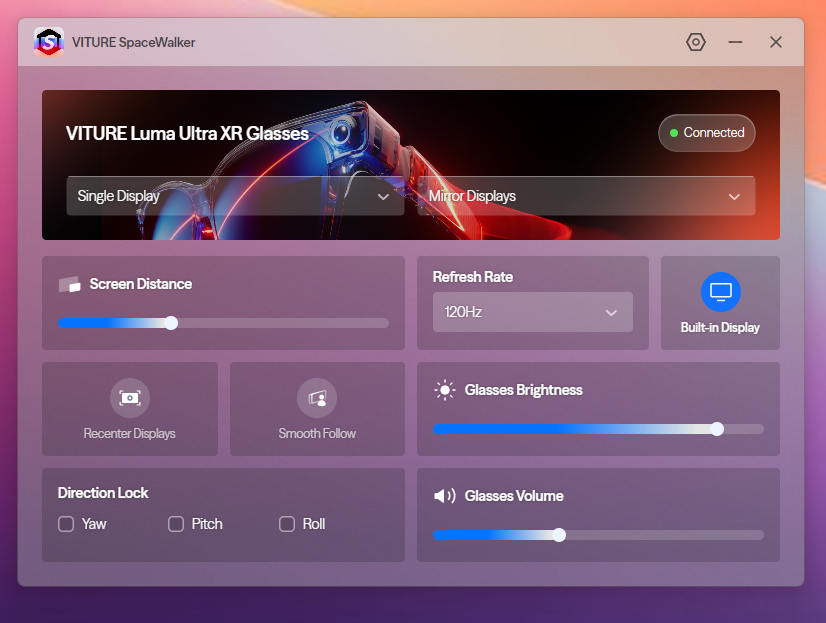
The panel adapts to your XR Glasses model.
- Glasses Status: The connected model and connection status are shown at the top.
- Display Layout: Switch layouts anytime from the dropdown. Open windows remain open when you change layouts.
- Mirror / Extend: Switch between Mirror Displays and Extend Desktop from the second dropdown.
- Screen Distance: Drag the slider to move the displays closer or further.
- Refresh Rate: Switch the refresh rate while the app is running (on supported XR Glasses). If switching fails, unplug and reconnect your glasses, then try again.
- Built-in Display: Turn your computer's built-in display on or off.
- Recenter Displays: Bring the displays back to the center of your view.
- Smooth Follow: When you turn your head and the displays are about to leave your field of view, they smoothly follow your head movement.
- Direction Lock: Lock Yaw, Pitch, or Roll individually to keep the displays fixed in those directions.
- Glasses Brightness / Glasses Volume: Adjust with the sliders.
- Visual Lock(Beast only): Uses the RGB camera on the glasses to improve the stability of the virtual displays. Currently in Beta, and only available on SpaceWalker for Windows.
- Screen Size(Beast ony): Adjusts the screen size — Small, Medium, Large, Extra Large, or Ultra Large — the same as the setting on the glasses.
One-Time Settings
Options you'll typically set once are in the Settings menu — click the gear icon in the title bar:
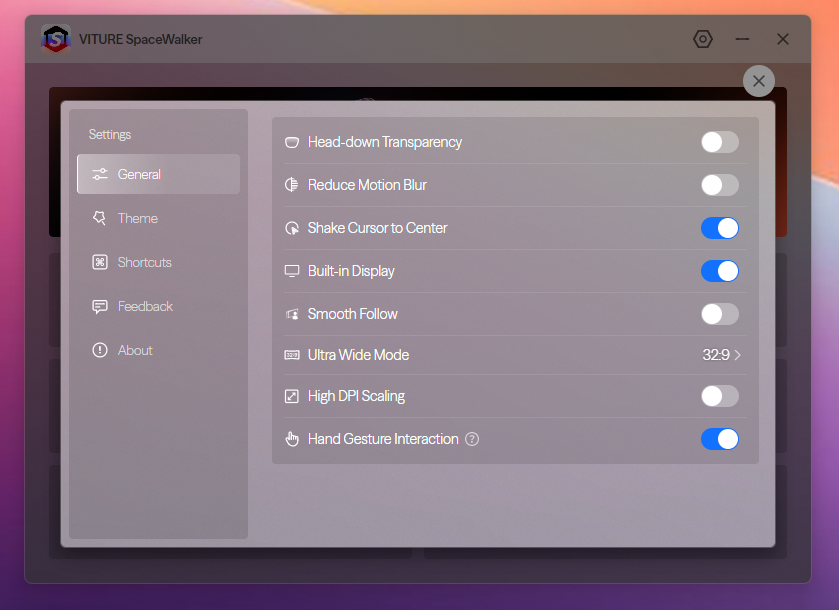
- General: Head-down Transparency (with adjustable Detection Angle), Reduce Motion Blur, Shake Cursor to Center, Built-in Display, Smooth Follow, Ultra Wide Mode aspect ratio (24:9 / 32:9), High DPI Scaling, and Hand Gesture Interaction. Available options vary by XR Glasses model.
- Theme: Choose a wallpaper — None, Everest, Blue Water, Northern Lights, Lake Elton, or upload a Custom image.
- Shortcuts: All keyboard shortcuts are customizable. Click a shortcut, press a new key combination, then click Apply Changes. Use Reset Defaults to restore.
- Feedback: Describe the issue with the steps to reproduce it, enter your email, and click Submit.
- About: App version, Check for updates, Restore Default Settings, Privacy Policy, Terms of Service, and FAQ.
Shortcut Keys
Switch Display Layouts
Quickly switch between six display layouts from the system tray. Open windows will remain open during layout changes.
We've included quite a few shortcuts to make SpaceWalker for Windows easy to navigate.
| Action | Shortcut Key |
|---|---|
| Ultrawide Panoramic | Ctrl + Shift + Alt + 0 |
| Single Display Mirrored | Ctrl + Shift + Alt + 1 |
| 2 Displays Mirrored | Ctrl + Shift + Alt + 2 |
| 3 Displays Mirrored | Ctrl + Shift + Alt + 3 |
| Single Display Extented | Ctrl + Shift + Alt + 4 |
| 2 Displays Extended | Ctrl + Shift + Alt + 5 |
| 3 Displays Extended | Ctrl + Shift + Alt + 6 |
| 3 Stacked Displays | Ctrl + Shift + Alt + 7 |
| Portrait-Landscape-Portrait Extented | Ctrl + Shift + Alt + 8 |
| Portrait-Landscape-Portrait Mirrored | Ctrl + Shift + Alt + 9 |
Other Shorcut Keys
| Action | Shortcut Key |
|---|---|
| Zoom In (Move Displays Closer) | Ctrl + Shift + Alt + ↑ |
| Zoom Out (Move Displays Further) | Ctrl + Shift + Alt + ↓ |
| Recenter Displays | Ctrl + Shift + Alt + R |
| Calibrate XR Glasses | Ctrl + Shift + Alt + C |
| Restrict Left/Right Turn (Lock Yaw) | Ctrl + Shift + Alt + X |
| Restrict Forward/Backward Tilt (Lock Pitch) | Ctrl + Shift + Alt + Y |
| Restrict Sideways Tilt (Lock Roll) | Ctrl + Shift + Alt + Z |
| Quit the App | Ctrl + Shift + Alt + Q |
Features For Ease of Use
Shake Cursor to Center
Lost your cursor? Shake your mouse or make circles on your trackpad to instantly bring it back to the center of the screen.
Head-Down Transparency
Enable this feature to temporarily see through your XR Glasses when you tilt your head downward—ideal for typing on a keyboard or viewing your surroundings without removing the glasses.
On SpaceWalker for Windows, you can also adjust the Detection Angle — the head-down angle that triggers transparency — in Settings > General after enabling this feature.
Note: This feature is only available on XR Glasses equipped with electrochromic film. It is not supported on models without it, such as the VITURE One Lite XR Glasses.
Lock Movements
SpaceWalker allows you to "pin" the displays in a specific position using three degrees of freedom. You can also lock movements if you want the displays to stay fixed regardless of your head movement.
Lock/Unlock Left and Right Directions (Yaw): Locks/Unlocks movement when turning your head left or right.
Lock/Unlock Up and Down Directions (Pitch): Locks/Unlocks movement when tilting your head up or down.
Lock/Unlock Head Side Rotation (Roll): Locks/Unlocks movement when tilting your head to your shoulder.
Disable Built-In Display
Turn off your built-in display while using SpaceWalker (except in Extend Desktop mode).
Note: Due to changes in macOS Sequoia, auto-disable built-in display is currently unavailable within SpaceWalker.
Reduce Motion Blur
If you experience discomfort while turning your head quickly, enable 'Reduce Motion Blur' to minimize motion blur and eye strain.
Be aware that this feature may slightly darken the display on your XR Glasses.
Smooth Follow
Enable 'Smooth Follow' for virtual displays to seamlessly follow your head movements, similar to a tripod.
However, this feature automatically disables 3DoF functionality. Therefore, we recommend using Smooth Follow only with single display layout, not layouts like 3 displays or the ultra-wide display.
Theme
You can choose and switch between different theme backgrounds to enhance your immersive experience — or even customize your own background.
Select the "Theme" option from the menu. You can choose from six available themes, including:
- None
- Everest
- Blue Ocean
- Aurora
- Lake Ellitron
- Custom Theme
After selecting "Custon Theme", you’ll need to choose and upload an image from your local device.
Tips: Only equirectangular projection format (360° panoramic format) is supported for image uploads. Other formats will cause stretching and distortion, which may affect your visual experience.
Screen Recording
SpaceWalker offers a variety of visually-appealing display layouts and built-in support for 3 degrees of freedom (3DoF). If you want to capture your point of view and share it with others, follow these steps:
Mac
Prepare Screen Recording
- Ensure you have QuickTime Player installed on your Mac.
- Recording System Audio (Optional): We recommend using Background Music to capture system audio. Download the latest version here.
After installation, connect to your XR Glasses, then click the menu bar on your Mac and select "VITURE" as the Output Device.
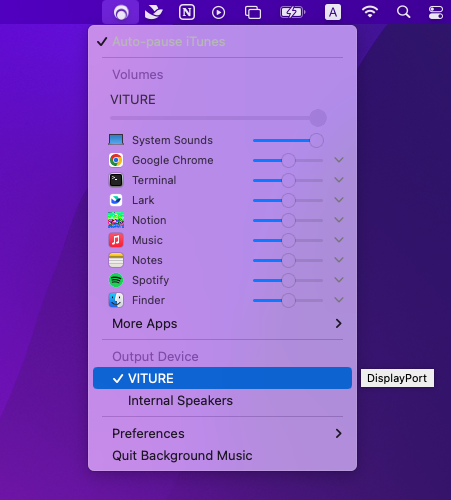
You can record system audio with Background Music. With Background Music running, launch QuickTime Player and select File > New Audio Recording (or New Screen Recording, New Movie Recording). Then click the dropdown menu (⌄) next to the record button and select Background Music as the input device.
You can record system audio and a microphone together by creating an aggregate device that combines your input device (usually Built-in Input) with the Background Music device. You can create the aggregate device using the Audio MIDI Setup utility under /Applications/Utilities.
Start Screen Recording
- Open QuickTime Player.
- Go to File > New Screen Recording from the menu bar, or use the shortcut Control-Command-N to start a new screen recording.
- If you have Background Music installed on your Mac, click "Options". Under Microphone, select "Background Music (UI Sounds)".
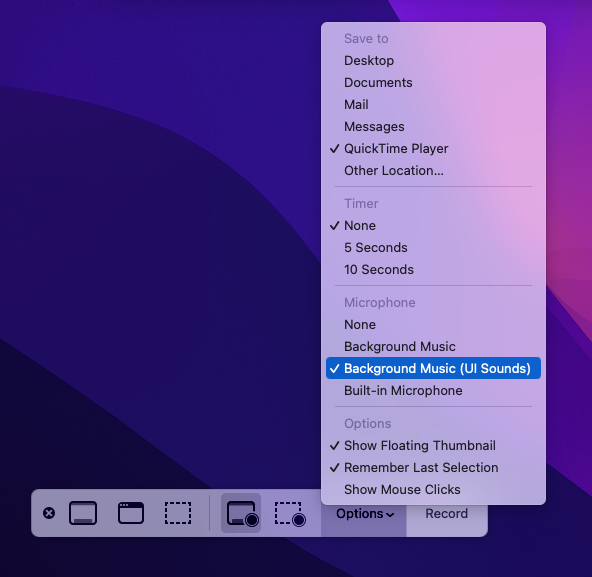
- Choose "Record the entire screen".
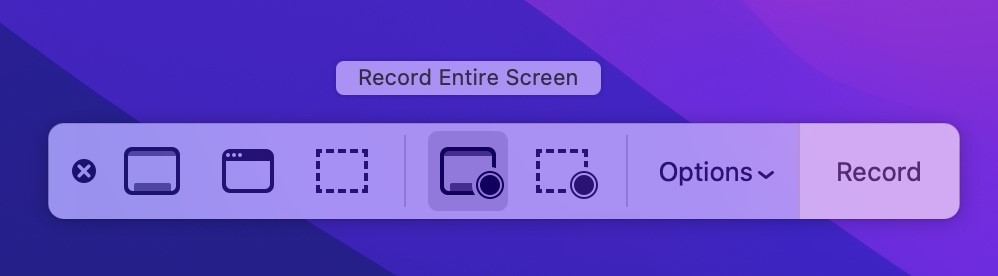
- Press the shortcut Control-Option-Command-0 (⌃ + ⌥ + ⌘ + 0) to begin recording.
- Double-click the center of your screen to confirm and start recording.
- To stop recording, click the red Stop Recording button in the menu bar (at the top right of your screen).
Windows
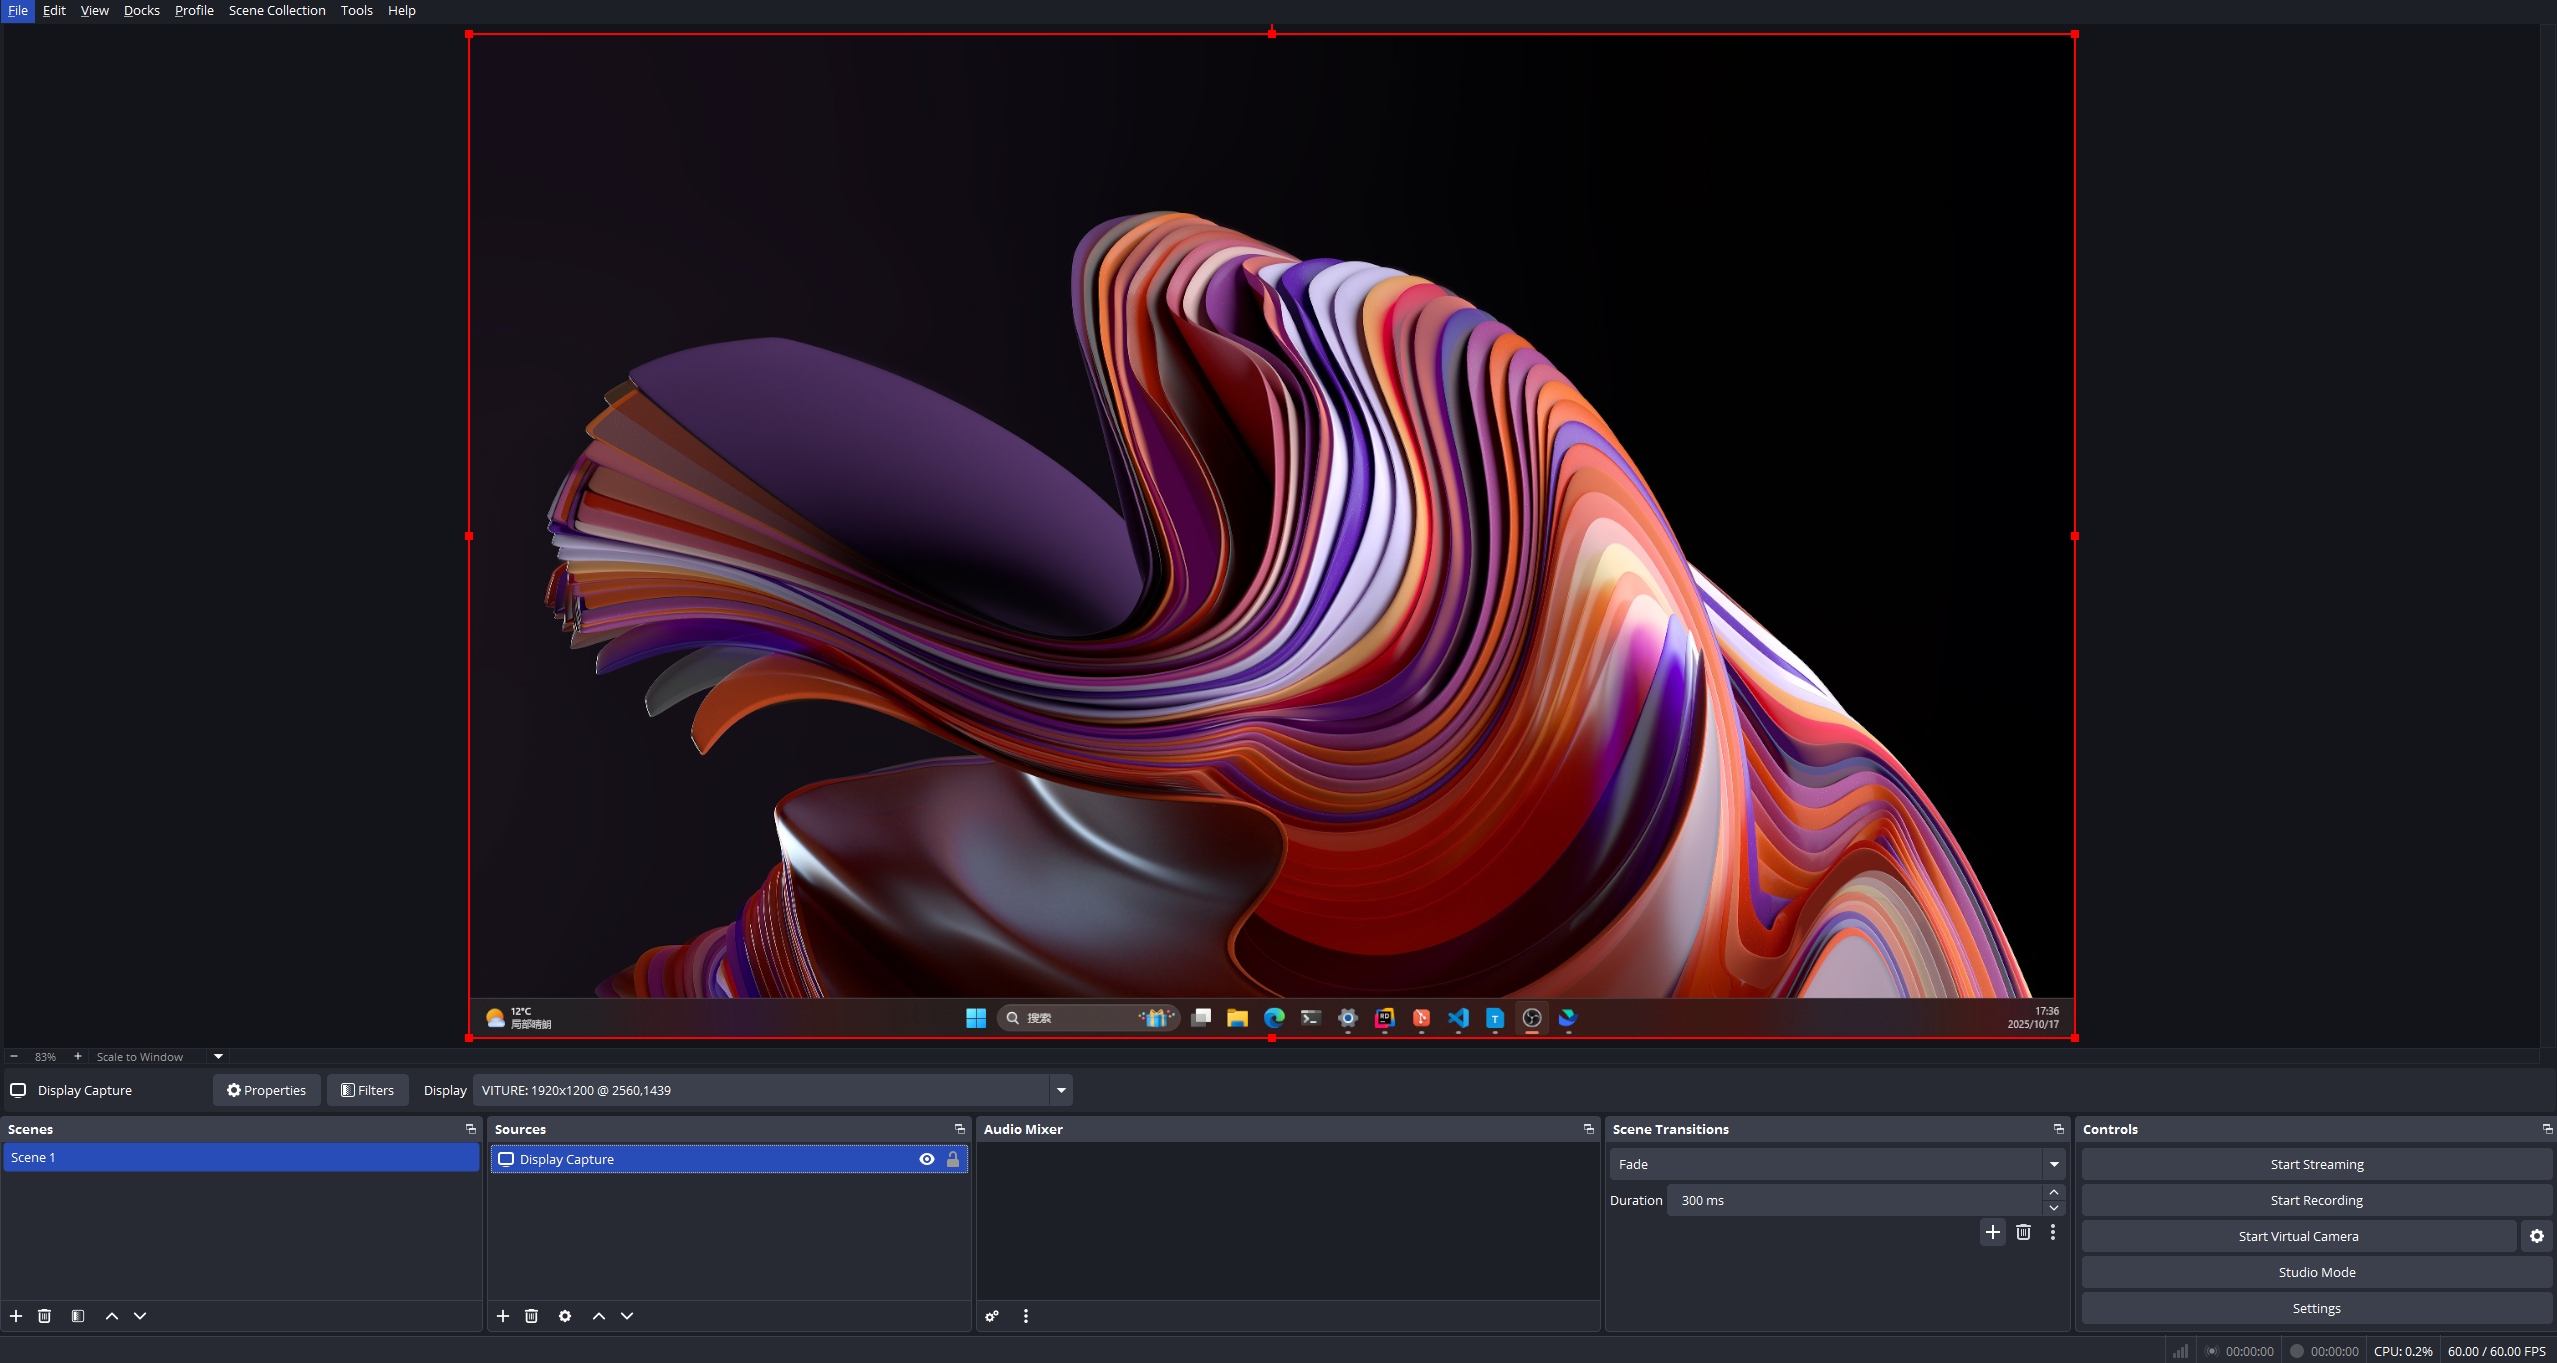
- Download the OBS screen recording software (Open Broadcaster Software).
- After connecting your XR Glasses and launching SpaceWalker, open the OBS screen recording.
- In the menu bar at the top of the page, select "Profile", then click "New" to create and name a new profile.
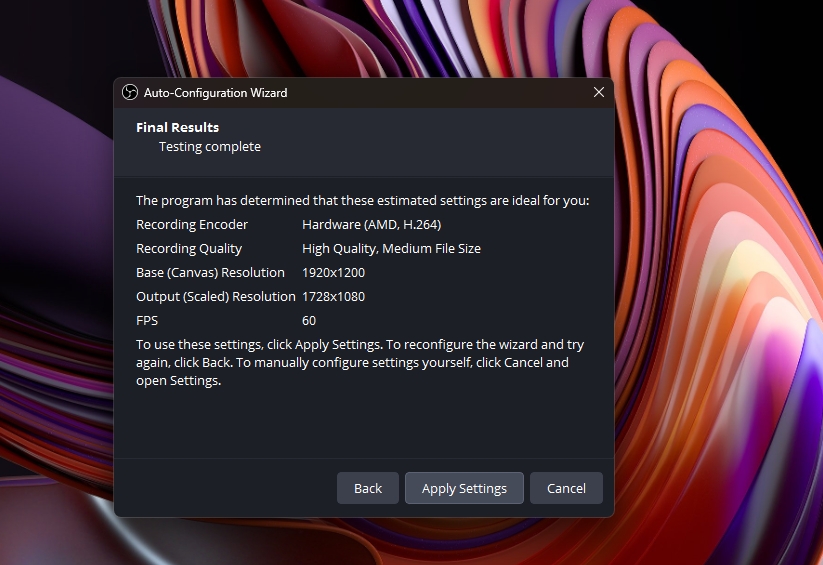
- In the Auto-Configuration Wizard window, select "Optimize just for recording, I will not be streaming", and click "Next".
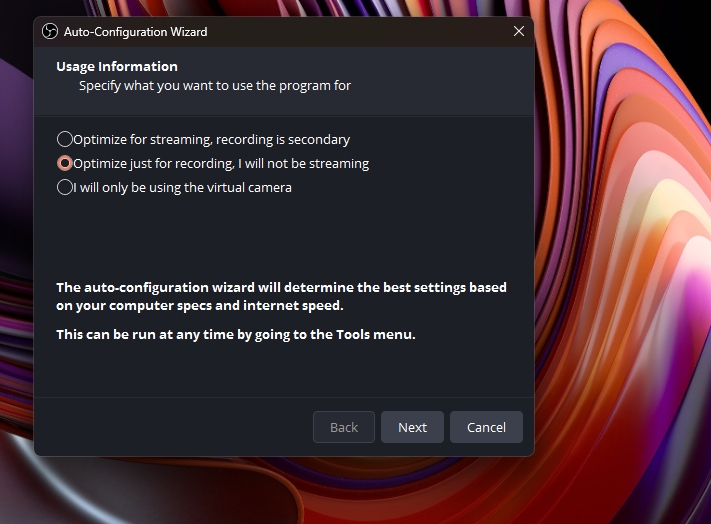
- For "Base (Canvas) Resolution", select the "1920×1200" resolution.
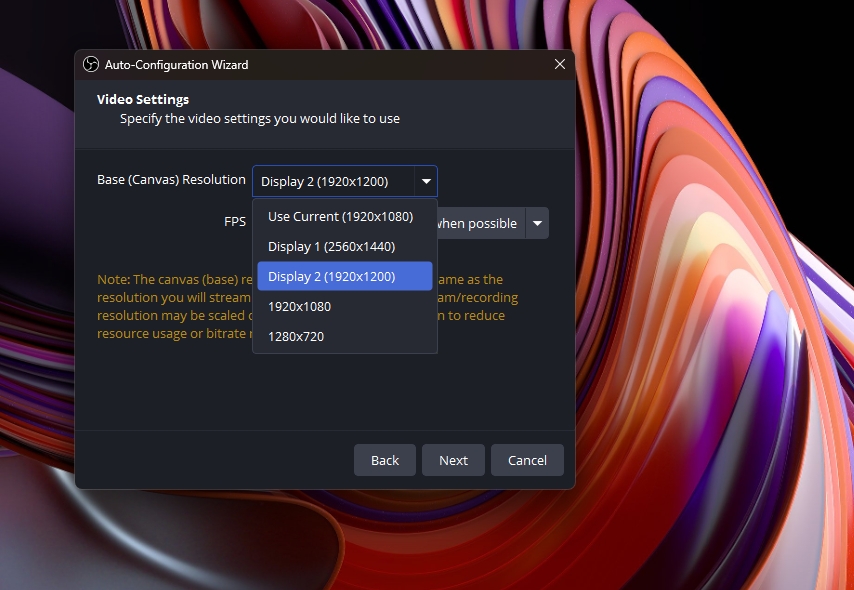
- Confirm the parameters and apply the settings (click "Apply Settings").
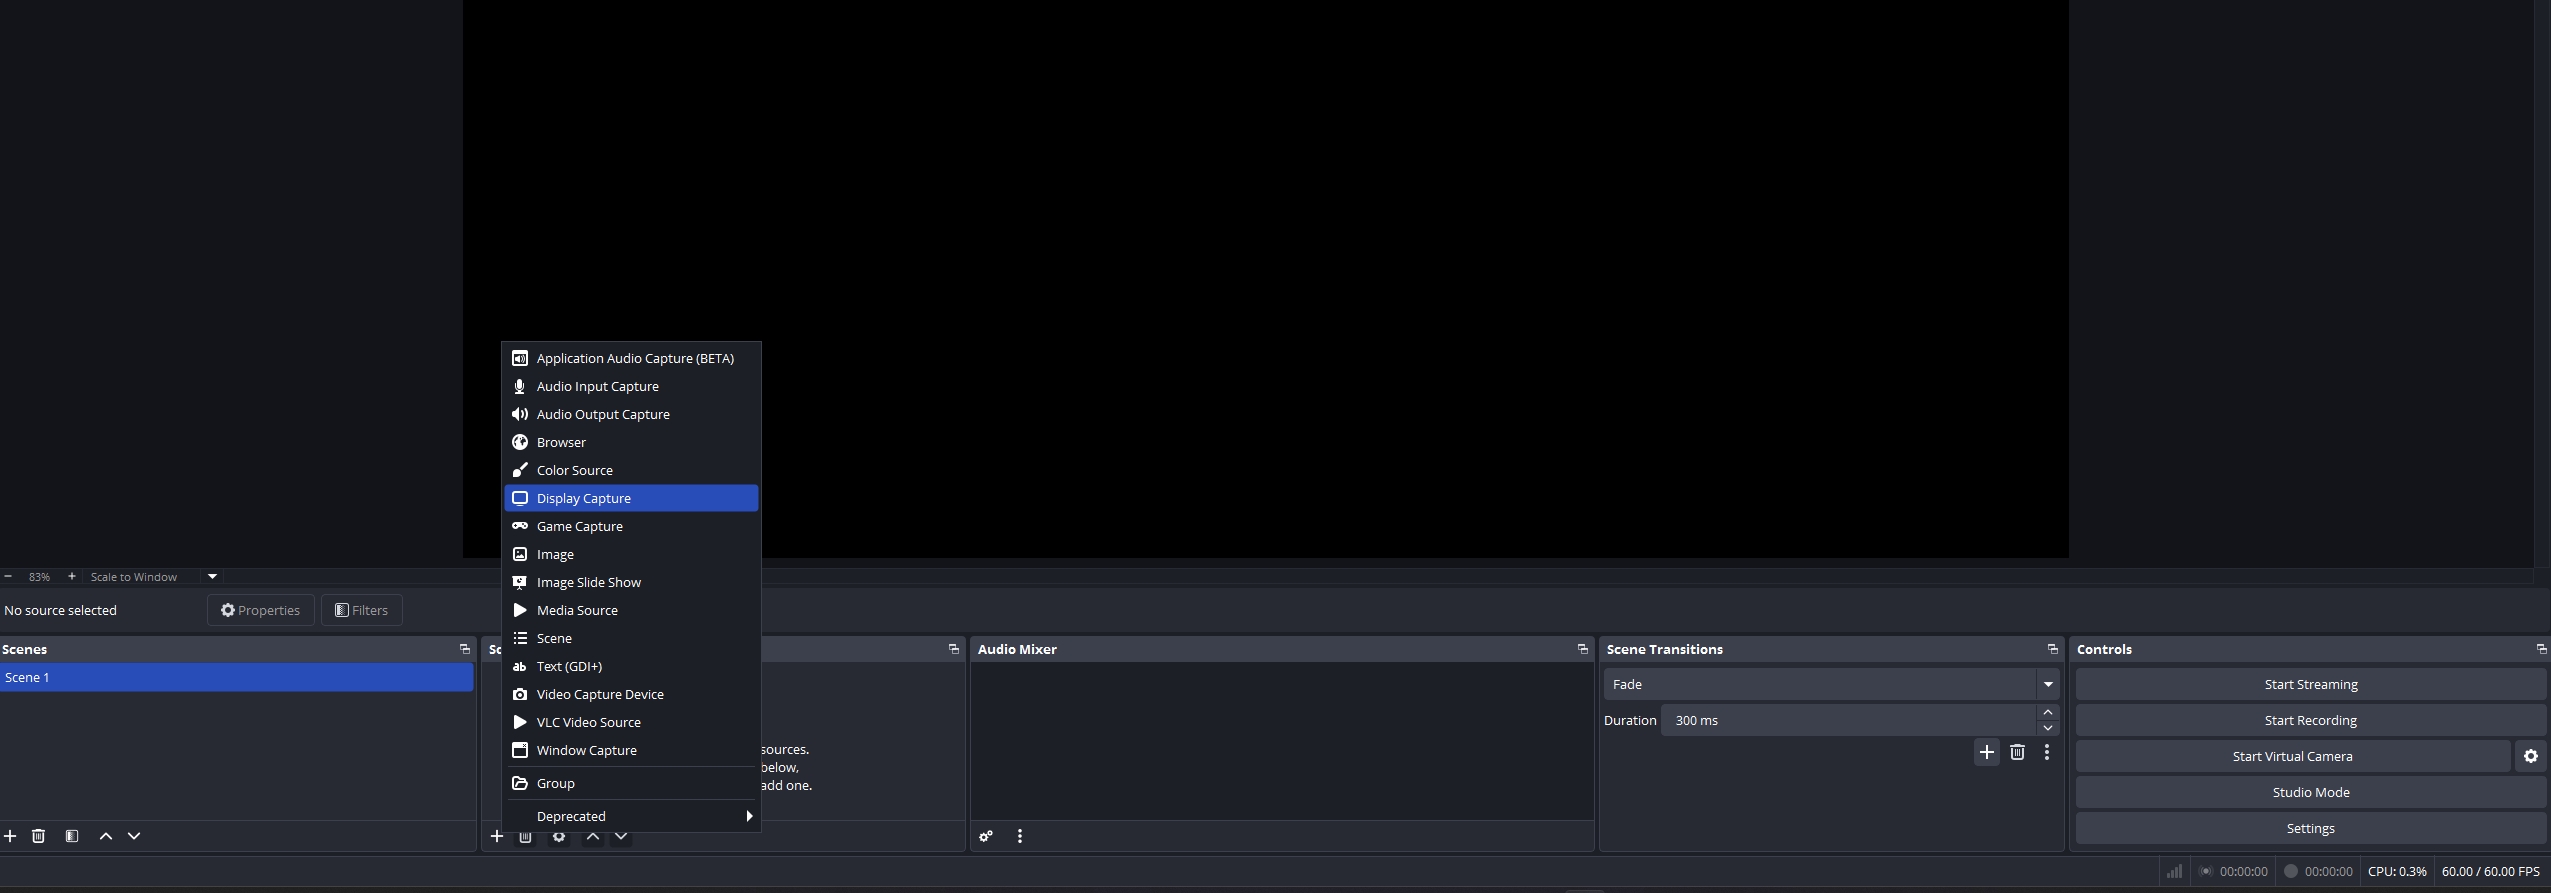
- Return to the main page, find the "Sources" section at the bottom left of the screen, click the "+" icon, and select "Display Capture".
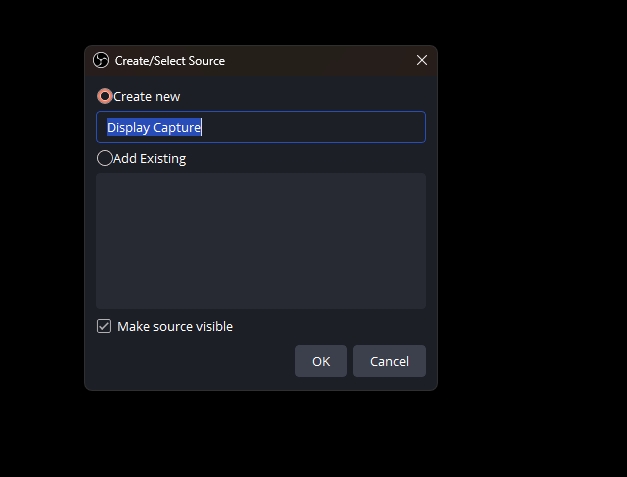
- Choose "Create new" and name the display capture source.
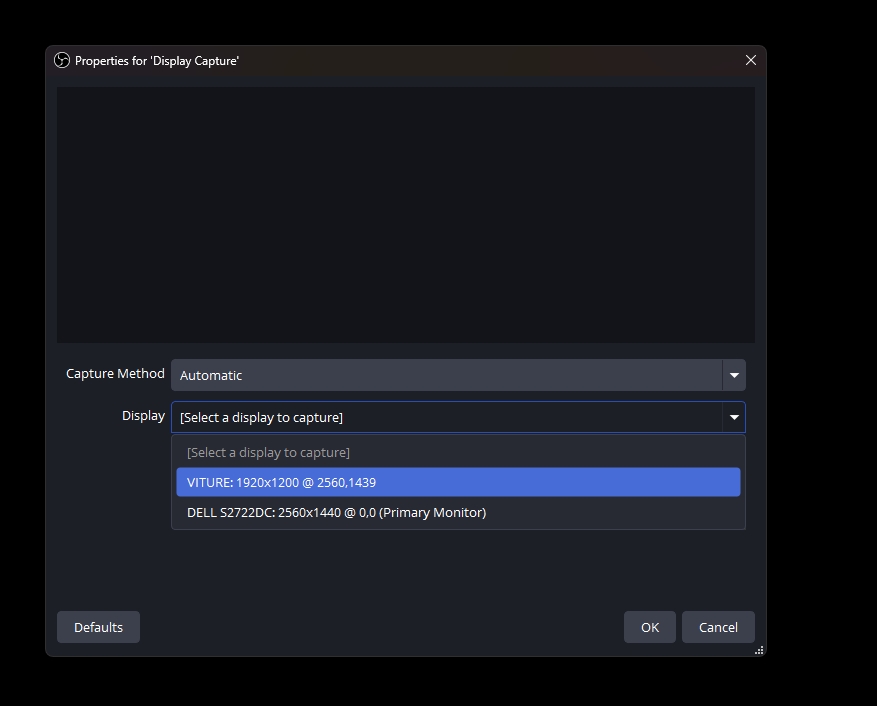
- In the "Capture Method" section, select "Automatic"; in the "Display" section, select "VITURE:1920x1200".
- Return to the main page, click "Start Recording" at the bottom right of the main page to begin recording.
Other Settings
Access these options within the SpaceWalker app menus.
Restore Default Settings
Resets all SpaceWalker settings to their original state.
Check For Updates
SpaceWalker will notify you when a new update is available. You can also manually check for updates here. Downloading the latest version is available upon clicking "Update."
Send Feedback
Report any issues you encounter while using SpaceWalker. Clicking this option will send anonymous log files to VITURE to help us improve the software. Log files do not contain any personal information.
Install Virtual Display Driver
For Snapdragon X Series Windows ARM64 Devices. To use SpaceWalker in Extended mode, a virtual display driver is required. If you're only using Mirrored mode (and don't need to disable the built-in screen), simply install the app—no driver setup needed.
We’ve integrated VitureVDA virtual display driver into the SpaceWalker installer, However, on ARM-based laptops (e.g. Snapdragon X series), a few system settings must be adjusted before installation.
Installation Steps:
- Disable BitLocker (if enabled): Open the Start menu and search for Device encryption settings. If Device Encryption is visible, toggle it off. This may take several minutes. If the setting is not found, BitLocker is not enabled—skip this step.
- Disable Secure Boot: Restart your computer and press F2 repeatedly during startup to enter BIOS. Then locate Secure Boot and disable it.
- Enable Windows Test Mode: Open PowerShell or CMD as Administrator, run the command:
bcdedit /set testsigning on. - Restart Your Computer: After rebooting, you should see “Test Mode” in the bottom-right corner of the desktop.
- Install the Driver*: Run the SpaceWalker installer. After installation, open Device Manager. Under Display adapters, confirm that VitureVDA appears.
If VitureVDA is listed, the driver was installed successfully. If not, verify that Test Mode was enabled before installation.
Notes:
- The driver only needs to be installed once per device (unless manually removed).
- It will not be overwritten by future software updates.
Check Interface Support on Windows
To run SpaceWalker, your XR Glasses need a single USB-C connection that carries three things at the same time:
- Power: The port powers your XR Glasses.
- Video (DisplayPort Alt Mode): The port must support video output over USB-C to send the picture to your glasses.
- Data (USB): SpaceWalker uses the data channel to read the glasses' motion sensors for head tracking and to control the glasses (brightness, volume, firmware). If data doesn't get through, the glasses can show a picture, but SpaceWalker can't connect to them.
A USB-C port that provides all three is often called a full-featured USB-C port.
Diagnose by What You See
Plug in your glasses and check what actually happens — each symptom points to a different cause:
The lenses respond (e.g., the tint changes when you press the electrochromic film button) → Your glasses are receiving power. Continue below to check video and data.
The glasses display lights up and shows your desktop, but SpaceWalker shows an error or stays on the connecting screen → Video (DP) is working, but USB data is likely not getting through. Common causes: a hub, dock, or adapter that doesn't pass through data, or a video-only cable. Follow the steps below — use the original cable and connect directly to the computer.
The glasses display stays black (no picture at all) → Video isn't getting through. Either the port doesn't support DisplayPort Alt Mode, or the glasses firmware needs attention:
- Check whether your port supports DP Alt Mode (see below).
- Make sure your glasses firmware is up to date: Update your XR Glasses.
Nothing happens at all (no tint change, no display) → The glasses may not be receiving power. Make sure the cable is firmly plugged in at both ends, then try another port.
How to Identify a Compatible Port
- If your computer's USB-C port is labeled with a lightning bolt symbol (Thunderbolt) or a DisplayPort symbol, it is likely compatible.
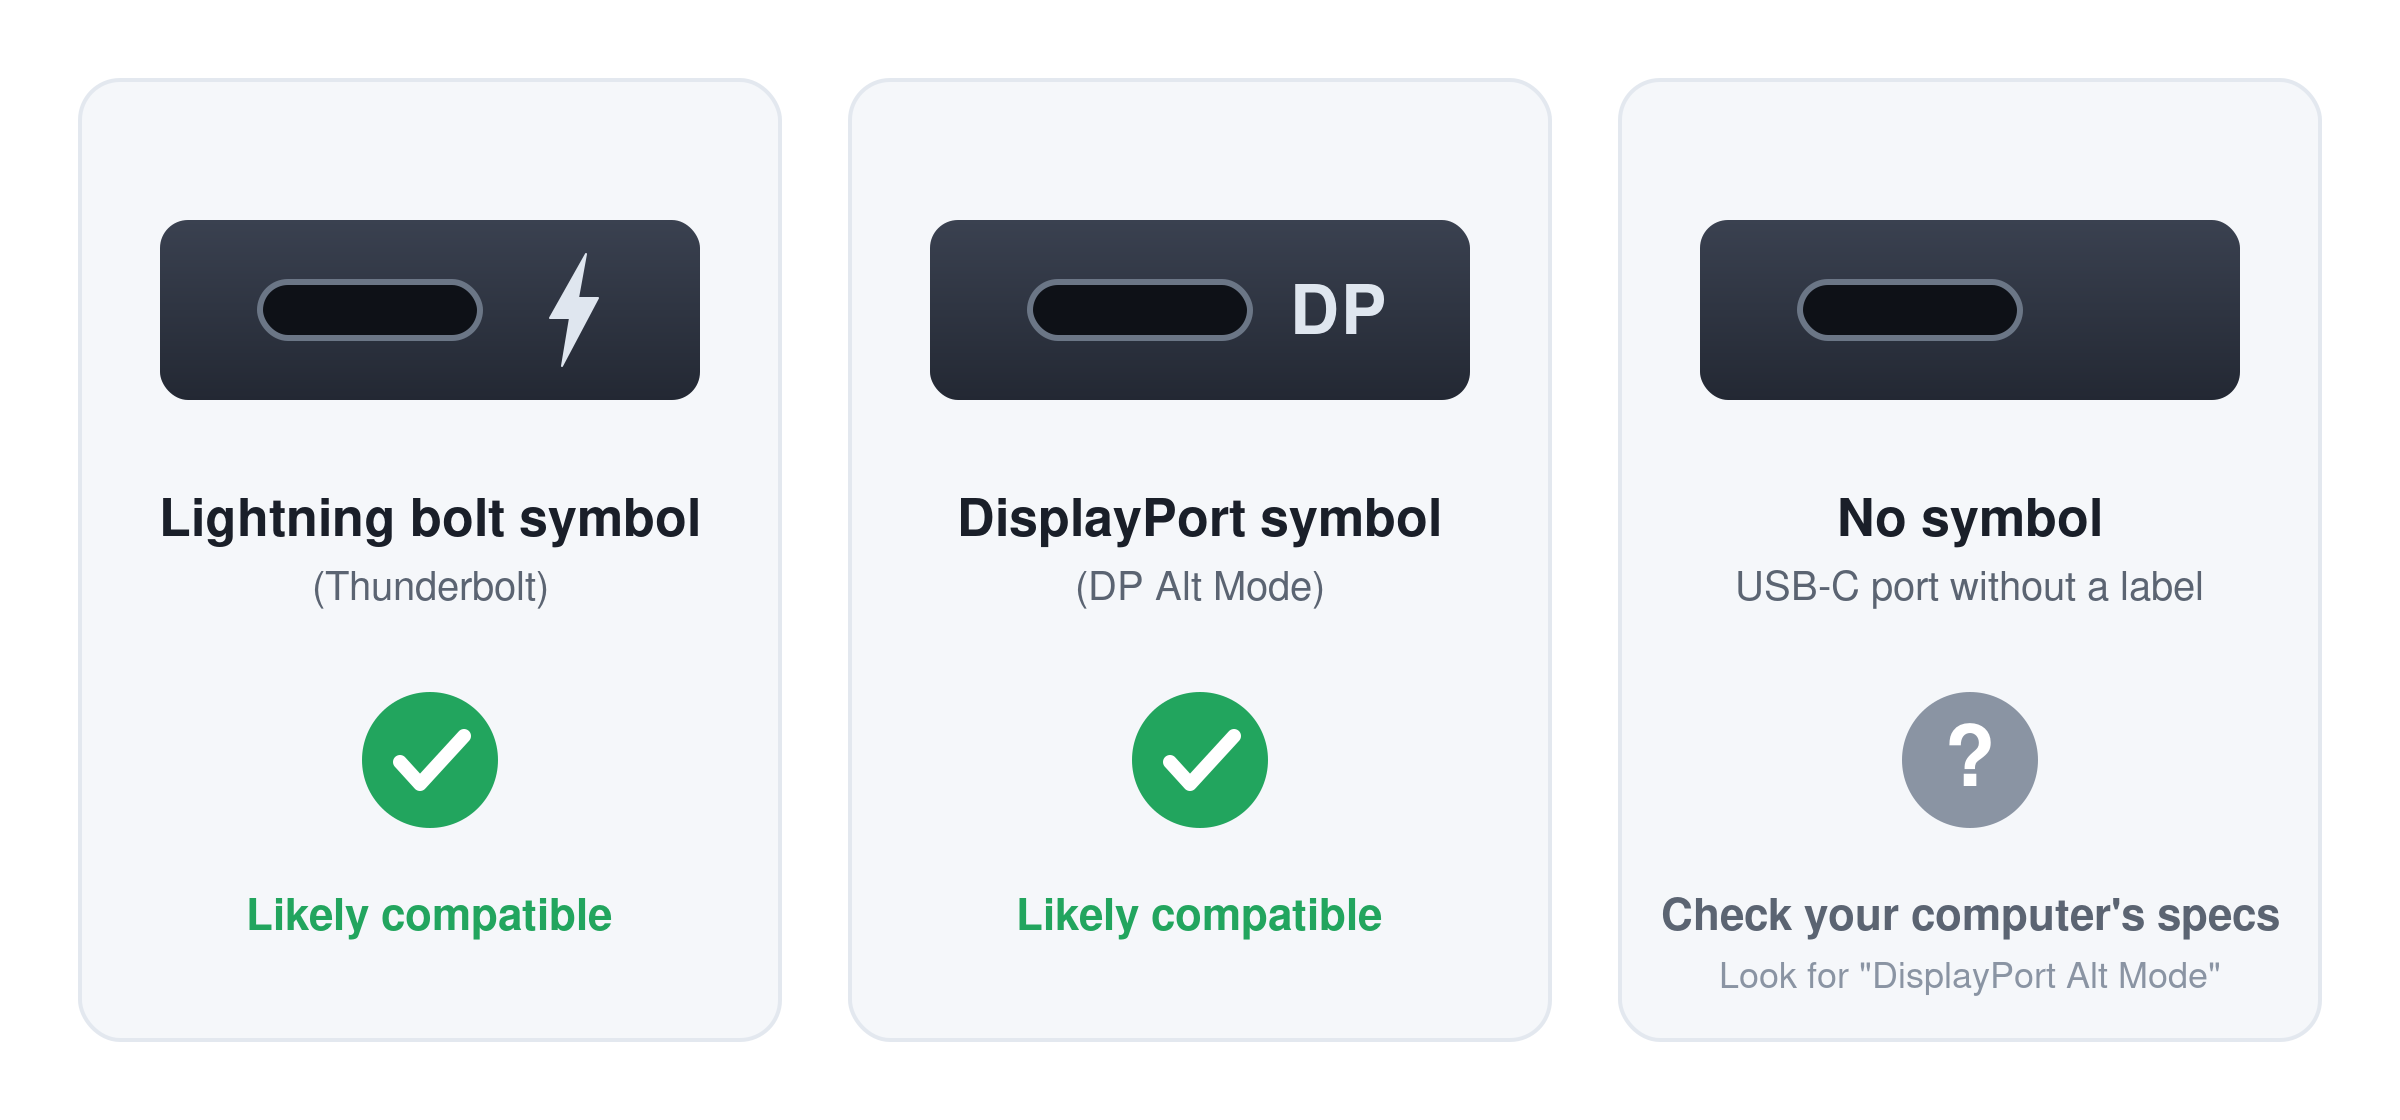
- If your laptop or mini PC has a full-featured USB-C port (supporting data, audio, video, and power transmission), simply connect your XR Glasses directly to this port.
- If the port isn't labeled, check your computer's specifications for "DisplayPort Alt Mode", "DP Alt Mode", or "video output" over USB-C.
Step-by-Step Checks
- Use the original cable. Many third-party USB-C cables are charge-only or don't carry video and data together.
- Connect directly to your computer. Remove any hub, docking station, or extension cable — many don't pass through DP Alt Mode or full USB data.
- Try every USB-C port. On many computers, only some ports support video output.
- Confirm the port supports DP Alt Mode using the symbols and specifications above.
- Retry. After each change, click Retry on the connection screen (or unplug and reconnect your glasses).
If Your Computer Has No Compatible USB-C Port
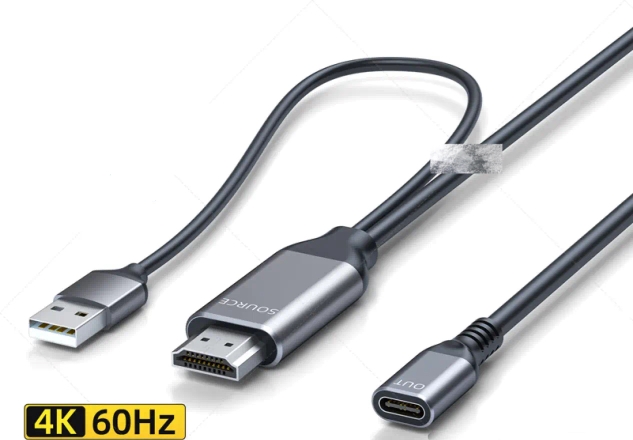
If your device doesn't have a USB-C port with DP Alt Mode, you'll need a DP + USB-A to USB-C adapter or an HDMI + USB-A to USB-C adapter to create a full-featured USB-C connection: the DP/HDMI plug provides the video, and the USB-A plug provides the data and power.
Important Notes:
- Power Source: Connect the USB-A plug to the PC chassis (not a smartphone power adapter) to ensure a stable power supply.
- Data Support: Ensure the adapter supports data transfer—not just charging or video.
- Port Selection: Choose either DisplayPort or HDMI input based on the available ports on your graphics card. Avoid using ports already connected to monitors or other active devices to prevent conflicts.
- Third-Party Adapters: While it may work with our devices, we're not able to provide technical support or guarantee full compatibility with non-VITURE docks or adapters.
Still Having Trouble?
If you've gone through all the steps above and SpaceWalker still can't connect, please send us feedback directly from the app: click the Settings > Feedback, describe the issue along with the steps to reproduce it, enter your email address, and click Submit. Our team will follow up with you.
Glasses Screen Not Displaying on macOS
If the XR glasses screen does not turn on when connected to a Mac running macOS 15.6.1 or later, the issue may be caused by corrupted or conflicting display configuration files.
Follow the steps below to reset the system display settings.
Symptoms
- Glasses remain black after connecting to a Mac
- The display named “VITURE” does not appear in System Settings → Displays.
- Issue occurs after updating to macOS 15.6.1 or later
Solution: Reset Display Configuration Files
These steps require administrator privileges.
Step 1: Backup and remove the main display configuration file
Open Terminal, then run the following command:
sudo mv /Library/Preferences/com.apple.windowserver.displays.plist /Library/Preferences/com.apple.windowserver.displays.plist.backup
This backs up and removes the system-level display configuration file.
Step 2: Backup and remove display configurations in the ByHost folder
Run the following command in Terminal:
for f in ~/Library/Preferences/ByHost/com.apple.windowserver*; do mv "" ""; done
This clears per-device display configuration files that may conflict with external displays.
Step 3: Restart your Mac
After completing the steps above:
Restart your system
Reconnect the XR glasses
Try switching the glasses to 3D mode and then switching back
Check whether the display turns on normally
Issue persists after restarting
If the issue persists after restarting, verify:
You are using a compatible USB-C cable
The glasses function normally when connected to another device
If the problem continues, please contact support and include your Mac model, macOS version, and connection method for further assistance.