VITURE XR SDK for Unity
Overview
Note: This documentation applies to VITURE XR SDK v0.7.0.
The VITURE XR SDK for Unity enables developers to create immersive XR experiences for VITURE devices.
Key features include:
- 6DoF Tracking: Full 6 degrees of freedom head tracking for immersive experiences.
- Hand Tracking: High precision skeletal hand tracking with built-in and custom gestures.
- Mixed Reality Capture: Record first-person videos from the glasses, or livestream a third-person spectator view from a mobile device.
- Marker Tracking: Track markers in the real world and anchor virtual objects to them.
- Camera API: Capture real-world color images for video see-through and environment understanding.
- Unity XR Integration: Seamlessly integrated with Unity's XR framework and compatible with XR Interaction Toolkit (XRI), XR Hands, and other Unity tools.
Build immersive XR apps, games, or enterprise solutions using existing assets and workflows you're already familiar with.
Requirements
Development Environment:
- Unity 6000.0 or later
- Unity Android Build Support module installed
Hardware:
- VITURE Pro Neckband with compatible XR glasses (see supported models below)
Supported Glasses:
- VITURE Luma Ultra: 6DoF tracking
- VITURE Luma / Luma Pro: 3DoF tracking
- VITURE Pro: 3DoF tracking
- VITURE One / One Lite: 3DoF tracking
What You'll Build
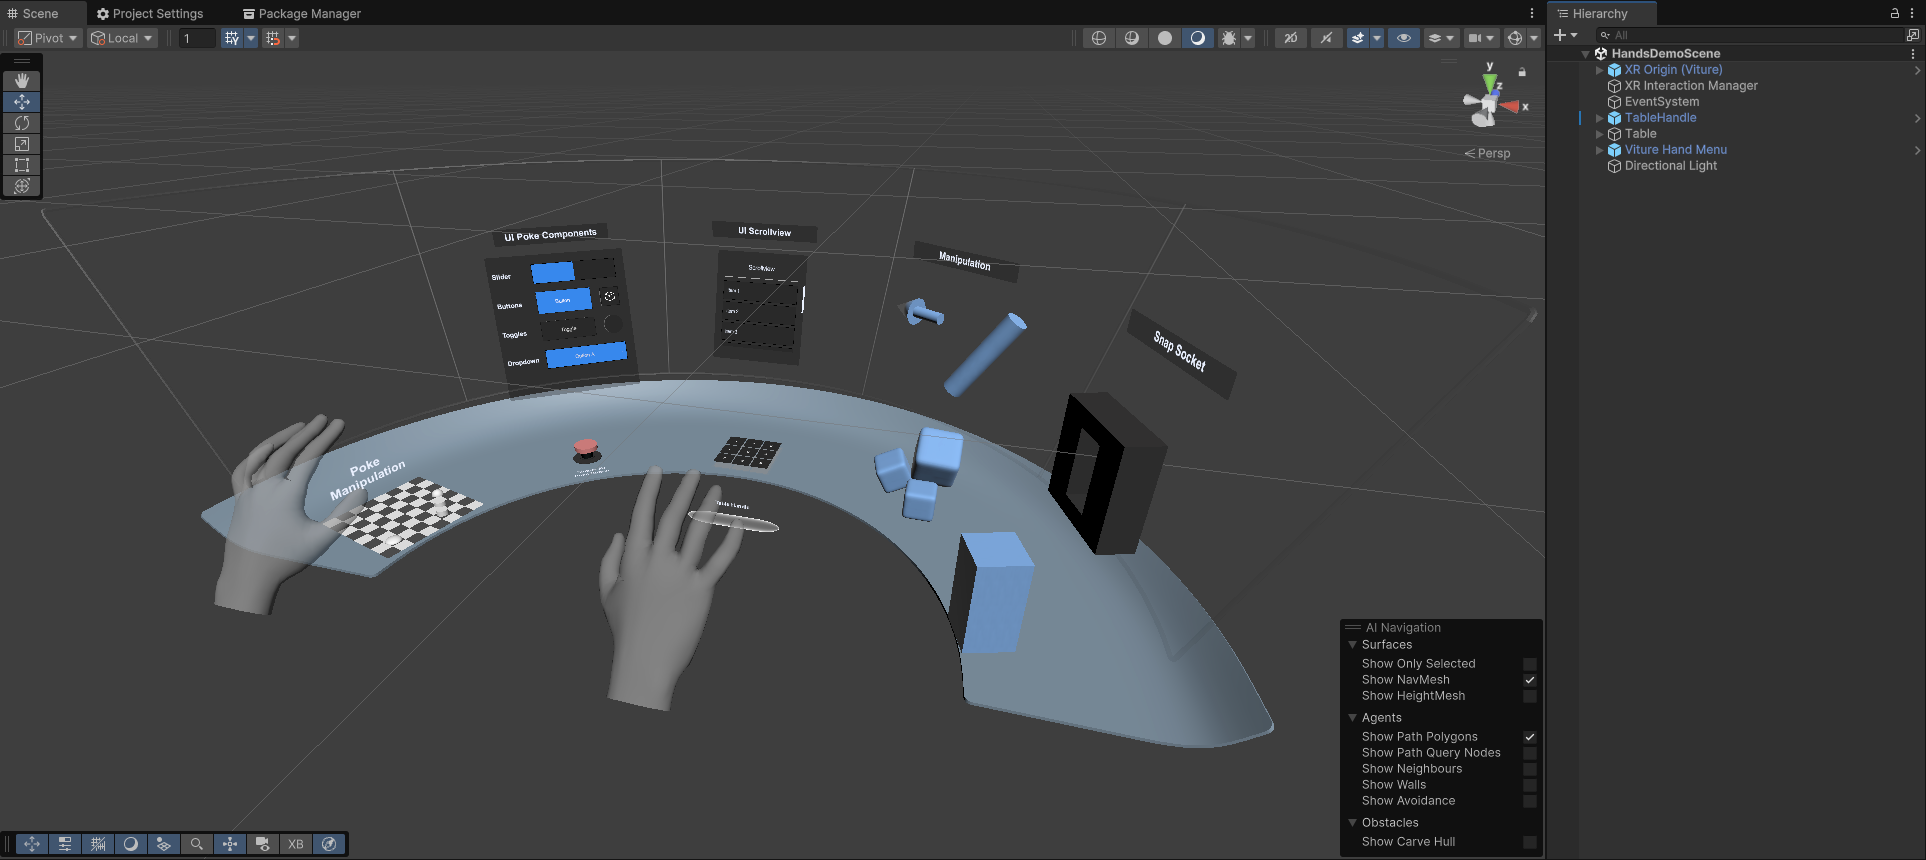
By following this quick start guide, you'll build an interactive demo scene showcasing different types of hand interactions on VITURE devices.
Unity's XR Interaction Toolkit (XRI) already provides a comprehensive hands interaction demo with three major interactors: near-field direct interactor and poke interactor for close-range objects, plus far-field ray interactor for distant targets. The original sample scene uses XRI's default input actions, we'll replace those with VITURE-specific inputs to make all interactors work seamlessly with VITURE hand tracking.
Prerequisites
Before getting started, ensure you have downloaded the VITURE Unity XR SDK (com.viture.xr) and have the following tools installed:
- Unity Hub - Latest version
- Unity Editor 6000.0+ - Any version 6000.0 or higher
- Android Build Support - Install this module through Unity Hub
Build Your First App
Project Setup
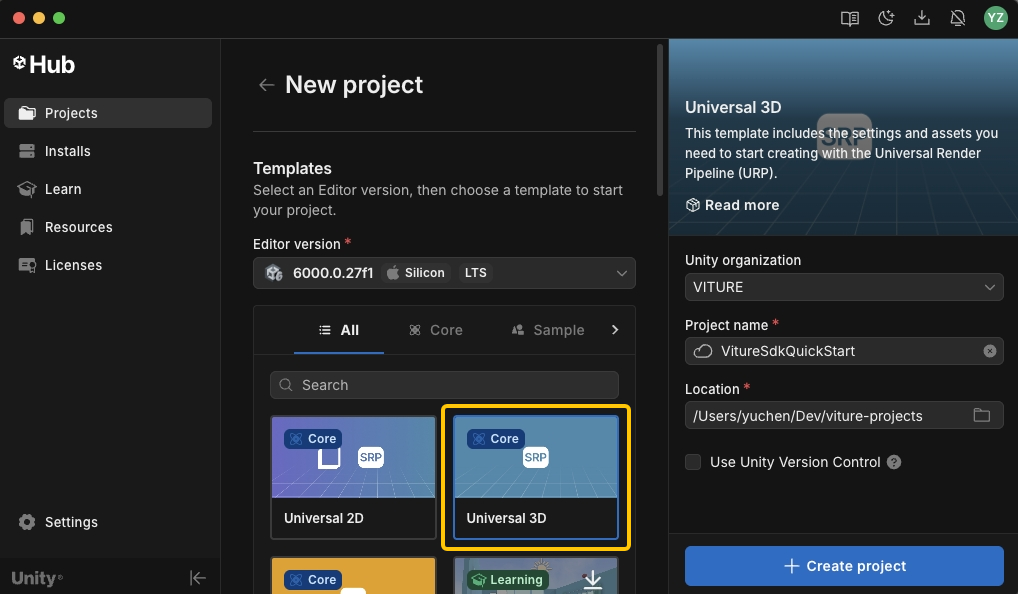
Create a new Unity project using the Universal 3D template. While URP isn't mandatory, we highly recommend it for all VITURE XR projects.
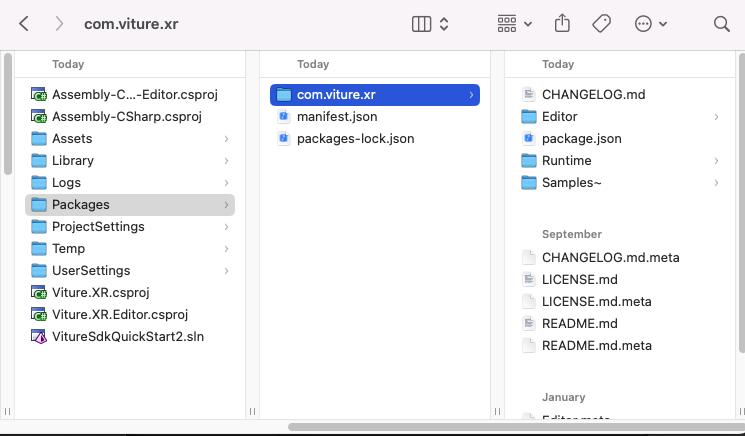
Extract the VITURE Unity XR SDK (com.viture.xr-x.x.x.zip) and copy the com.viture.xr folder into your project's Packages directory.
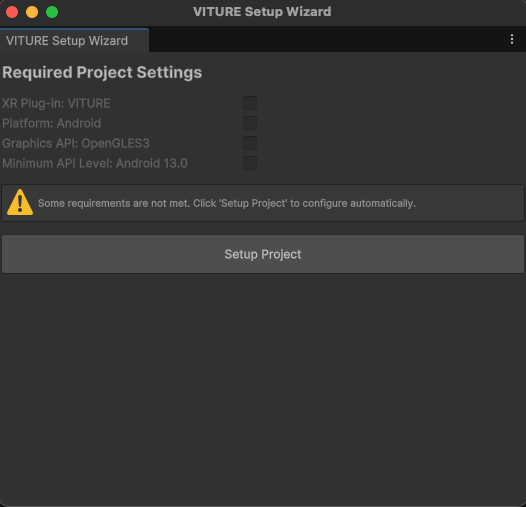
Once the SDK is imported, the VITURE Setup Wizard window should automatically pop up, which helps you configure all required project settings. If the wizard window doesn't appear automatically, you can open it manually by going to VITURE > Setup Wizard in the menu bar. Click Setup Project and your project is ready for VITURE XR development!
Next, we'll import the sample assets and build an interactive demo scene!
Import Required Samples
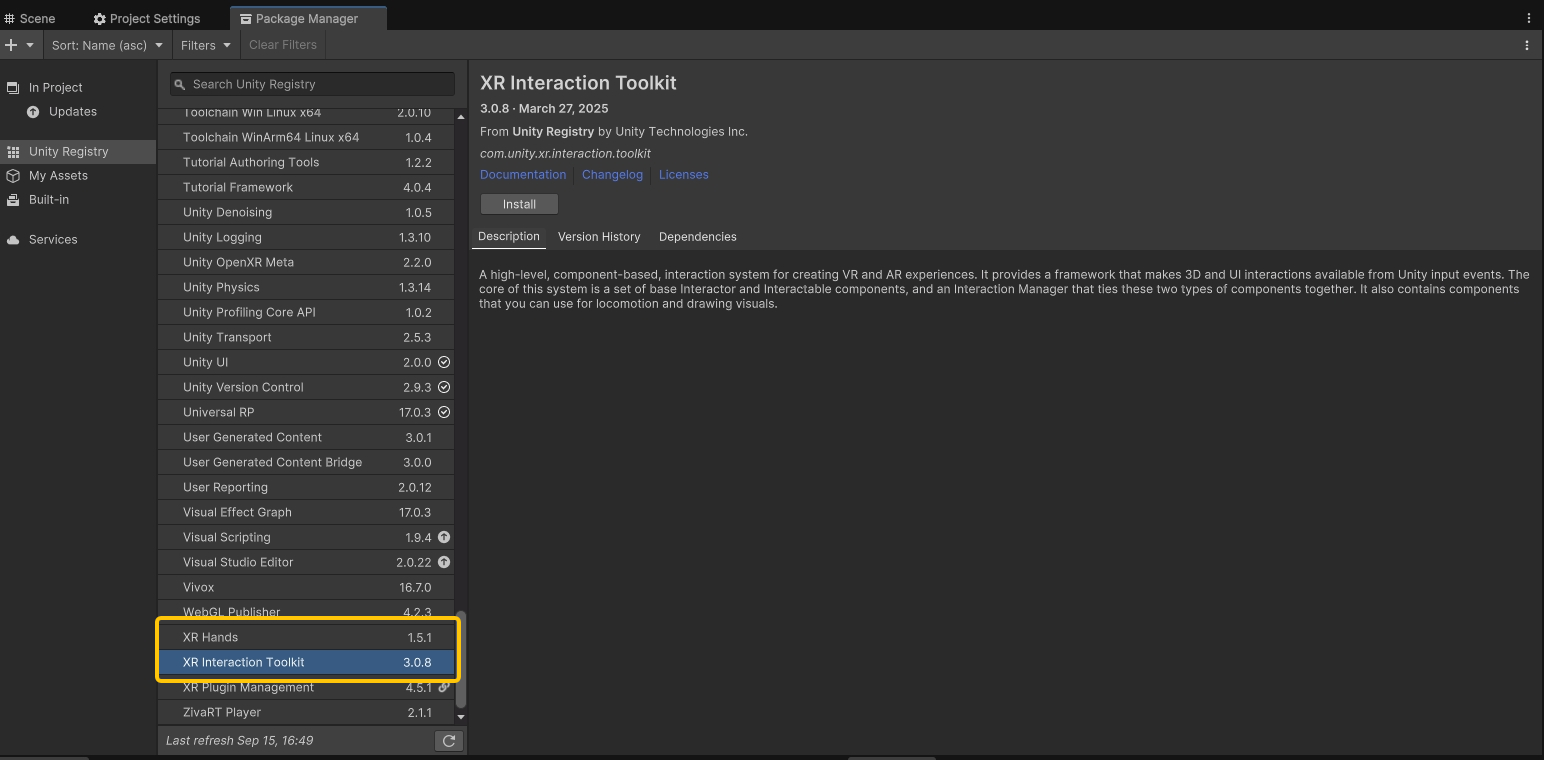
Navigate to Window > Package Manager > Unity Registry and install XR Interaction Toolkit and XR Hands.
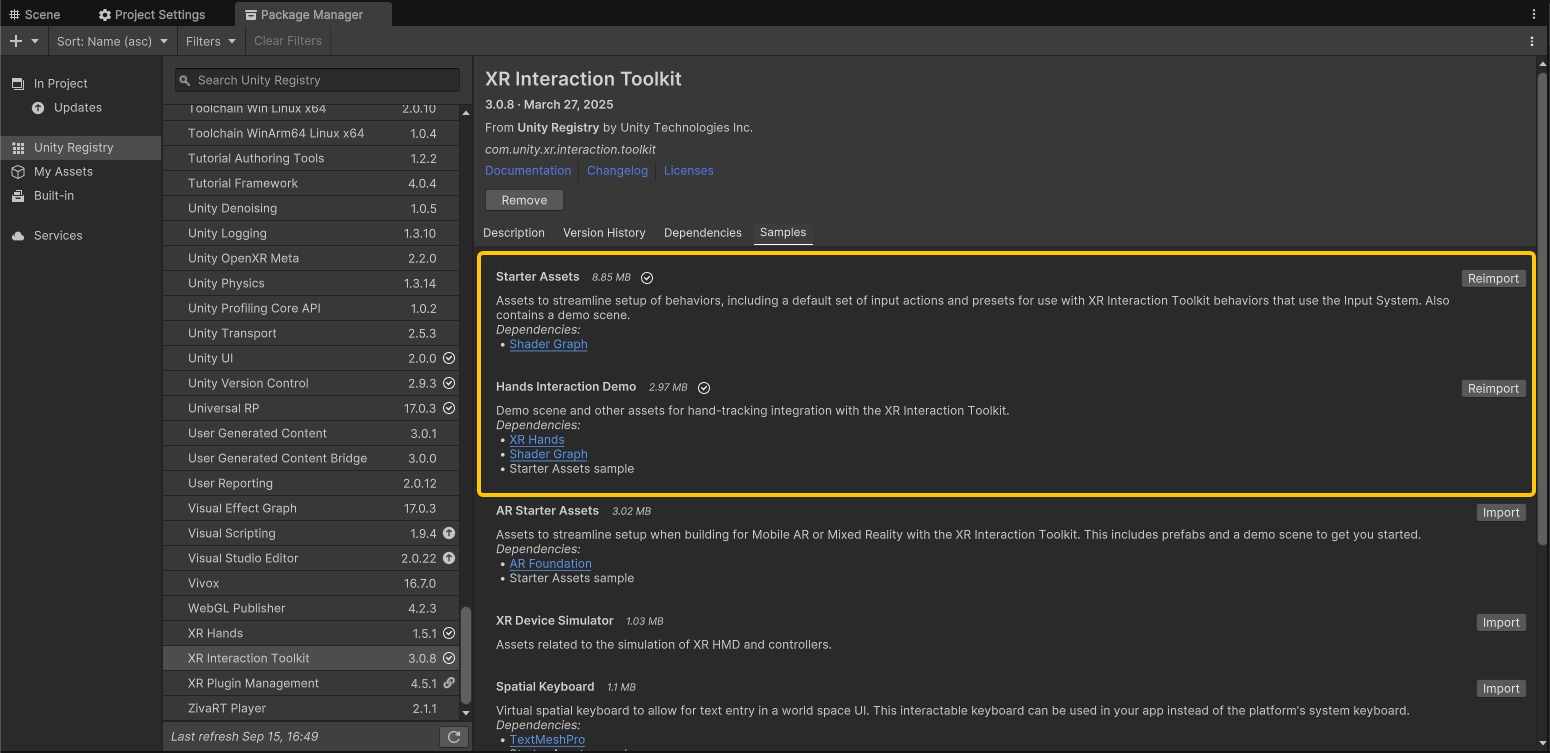
From the XR Interaction Toolkit package, import the Starter Assets and Hands Interaction Demo samples.
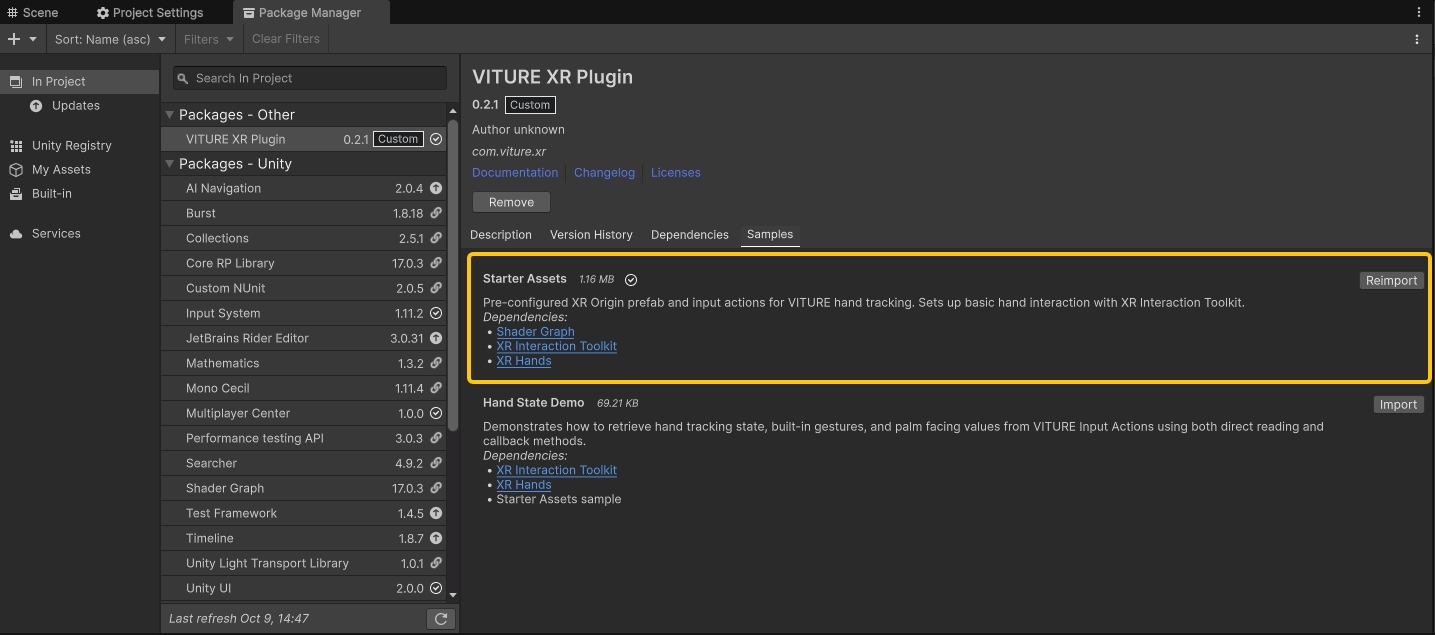
Finally, go to Window > Package Manager > In Project > VITURE XR Plugin and import the Starter Assets sample.
Configure Demo Scene for VITURE Input
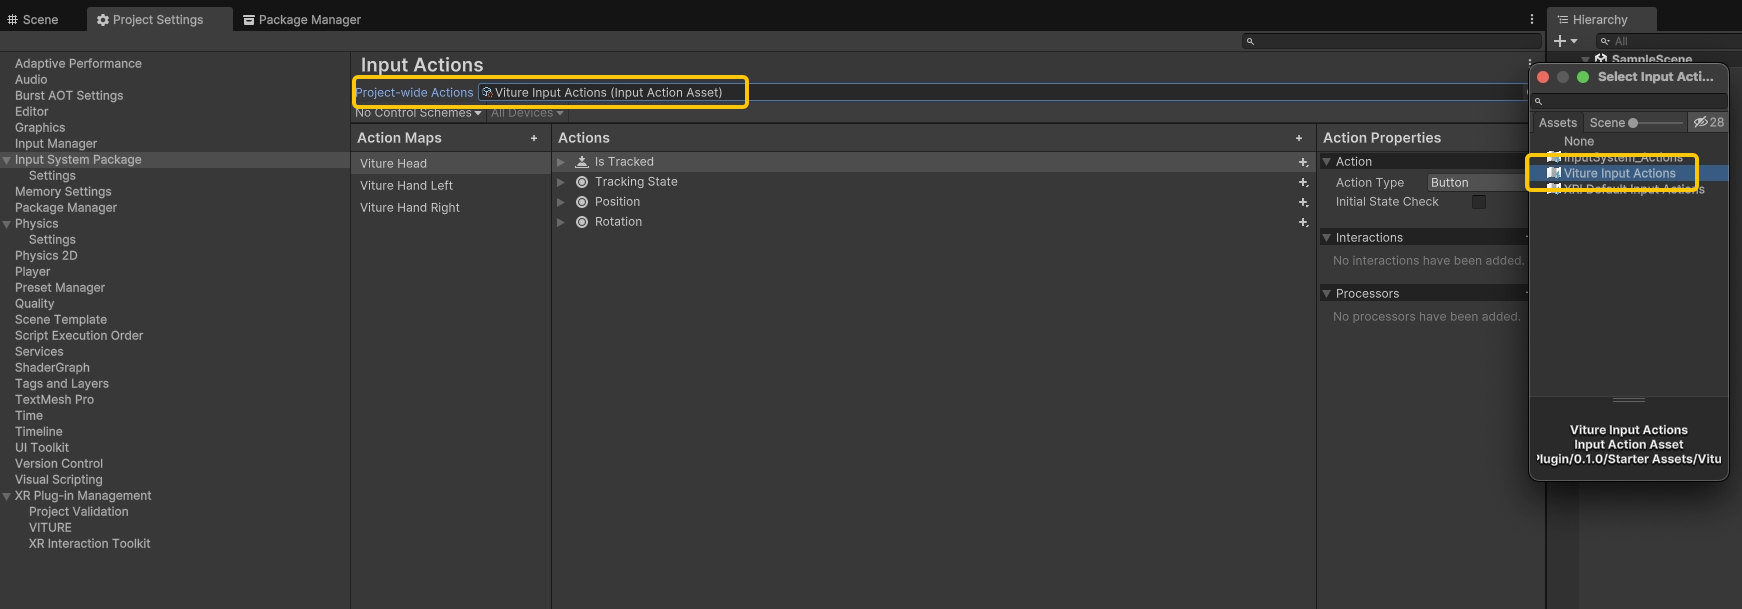
Go to Edit > Project Settings > Input System Package and set Project-wide Actions to Viture Input Actions.
Navigate to Assets > Samples > XR Interaction Toolkit > x.x.x > Hands Interaction Demo and open the demo scene. This scene uses default XRI input actions that we need to replace with VITURE-specific ones.
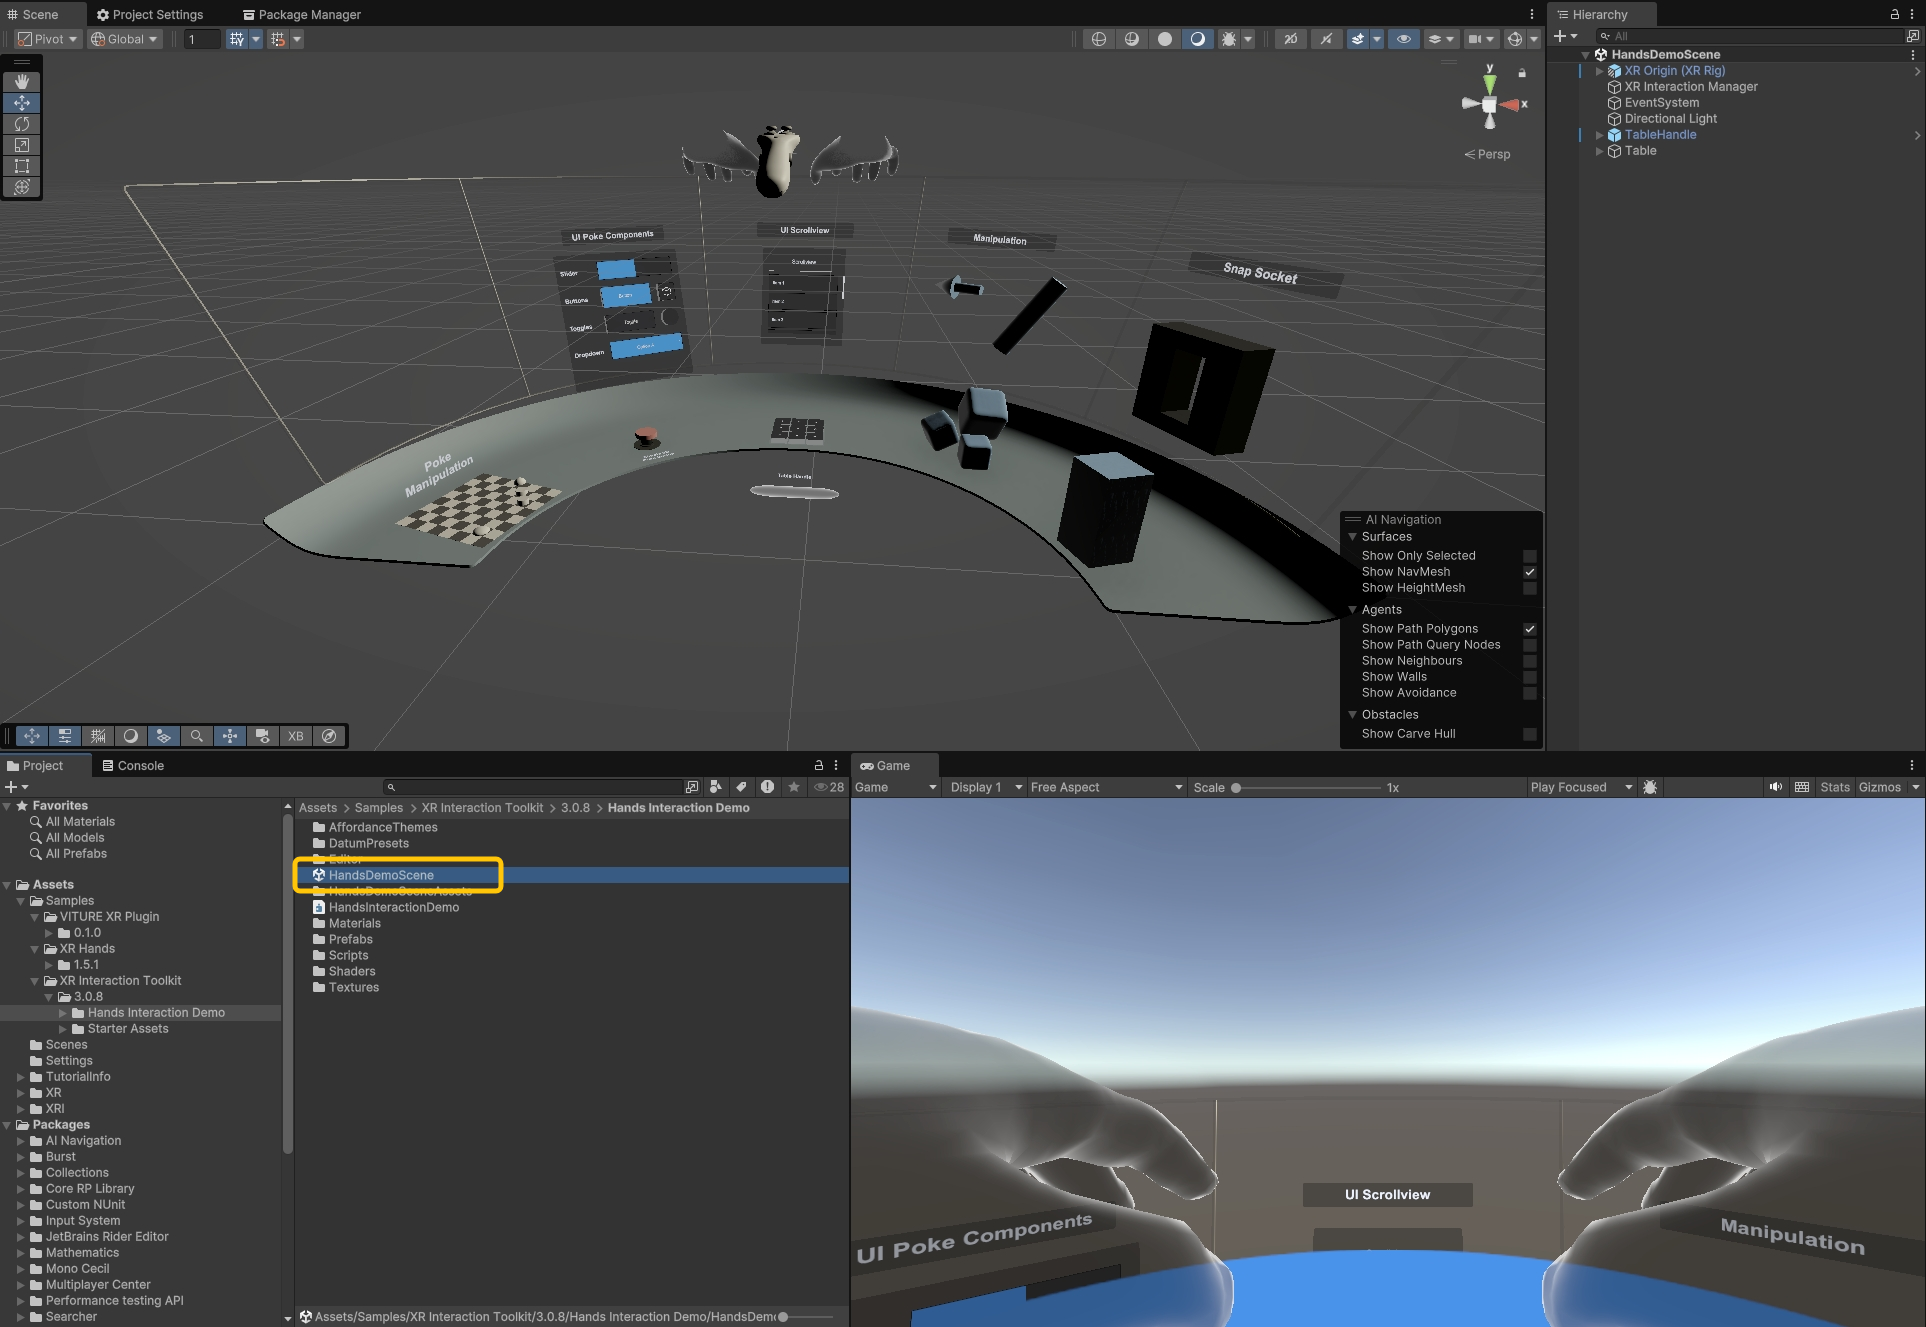
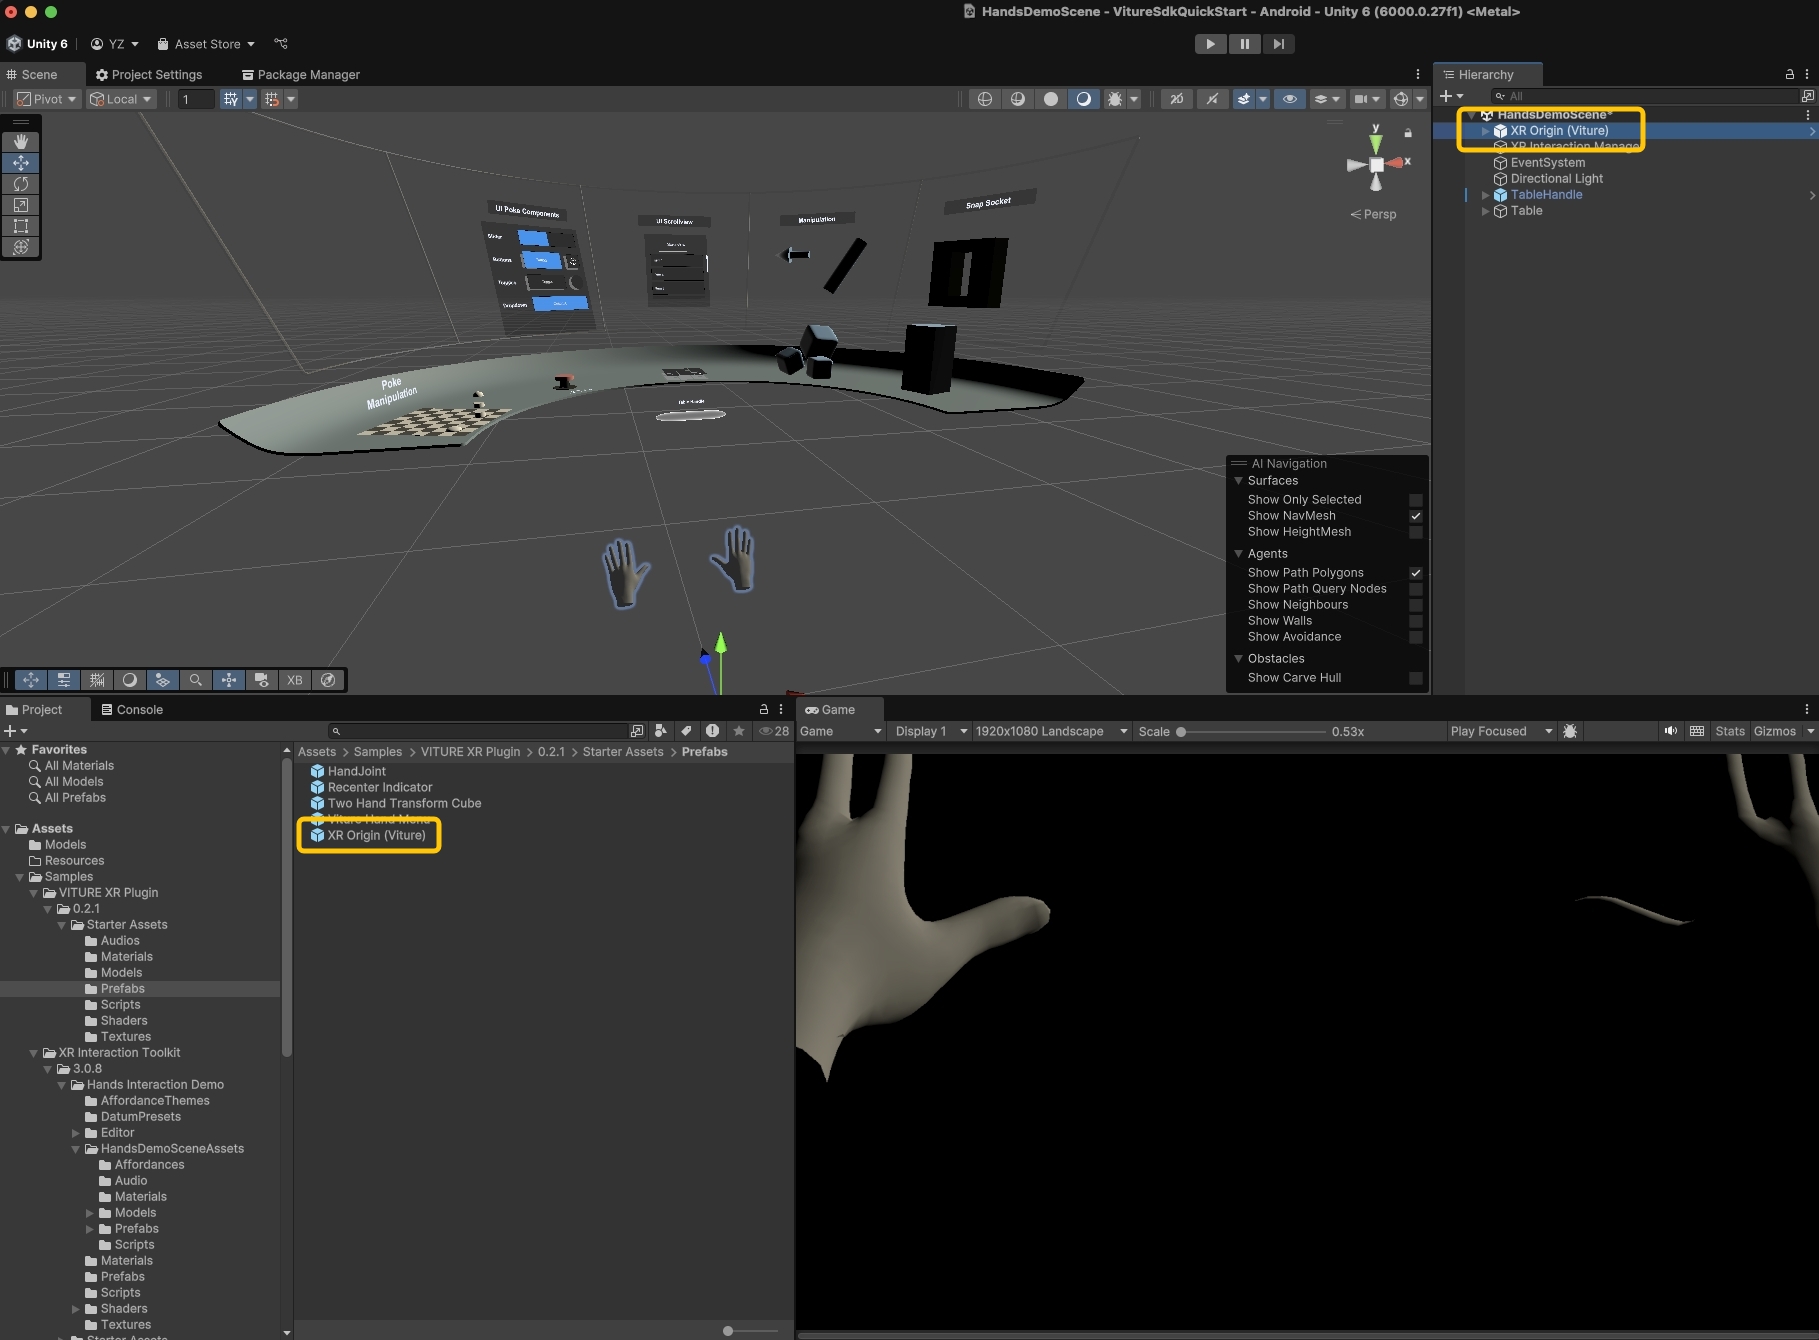
Delete the existing XR Origin (XR Rig) from the scene hierarchy. Replace it by dragging XR Origin (Viture) from Assets > Samples > VITURE XR Plugin > x.x.x > Starter Assets > Prefabs into the scene.
Drag the Viture Quick Actions prefab from Assets > Samples > VITURE XR Plugin > x.x.x > Starter Assets > Prefabs into your scene.
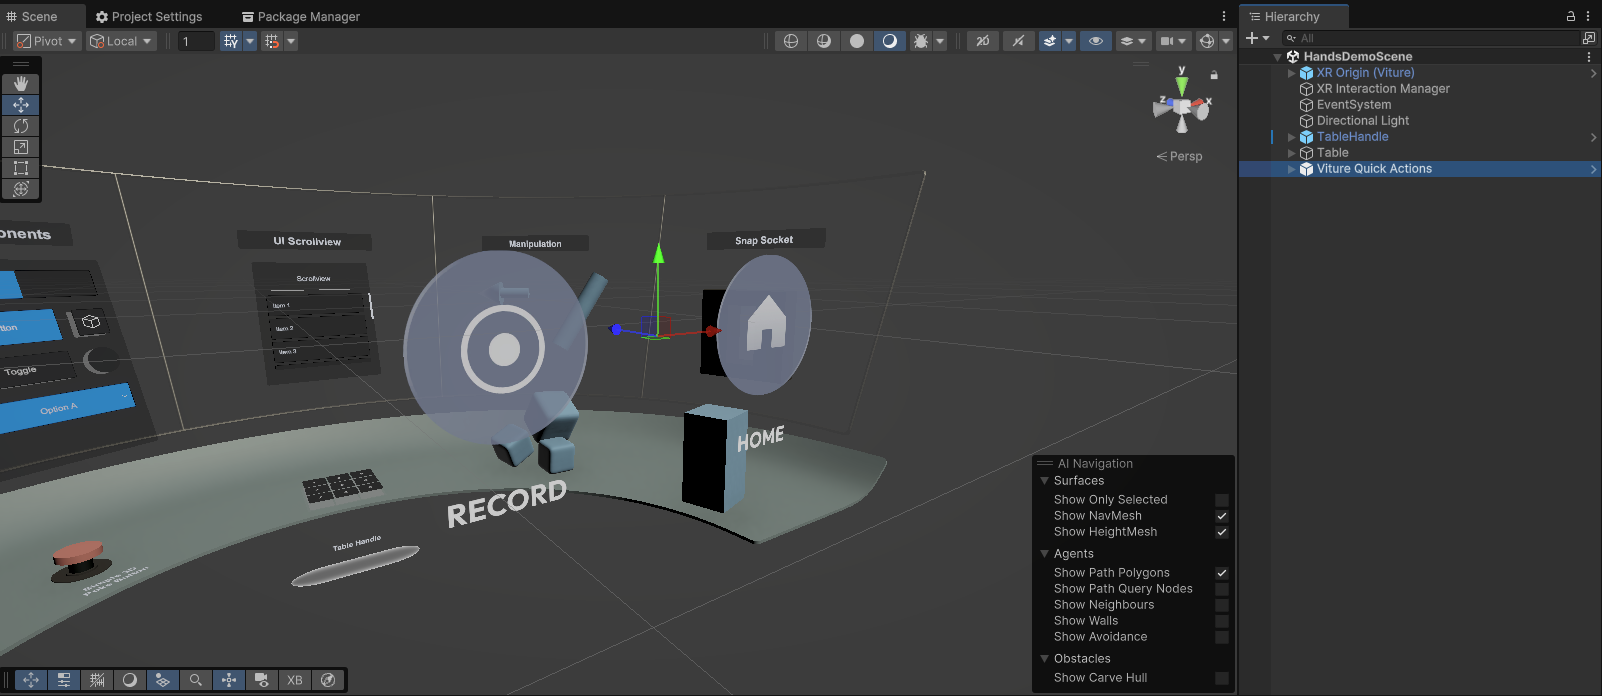
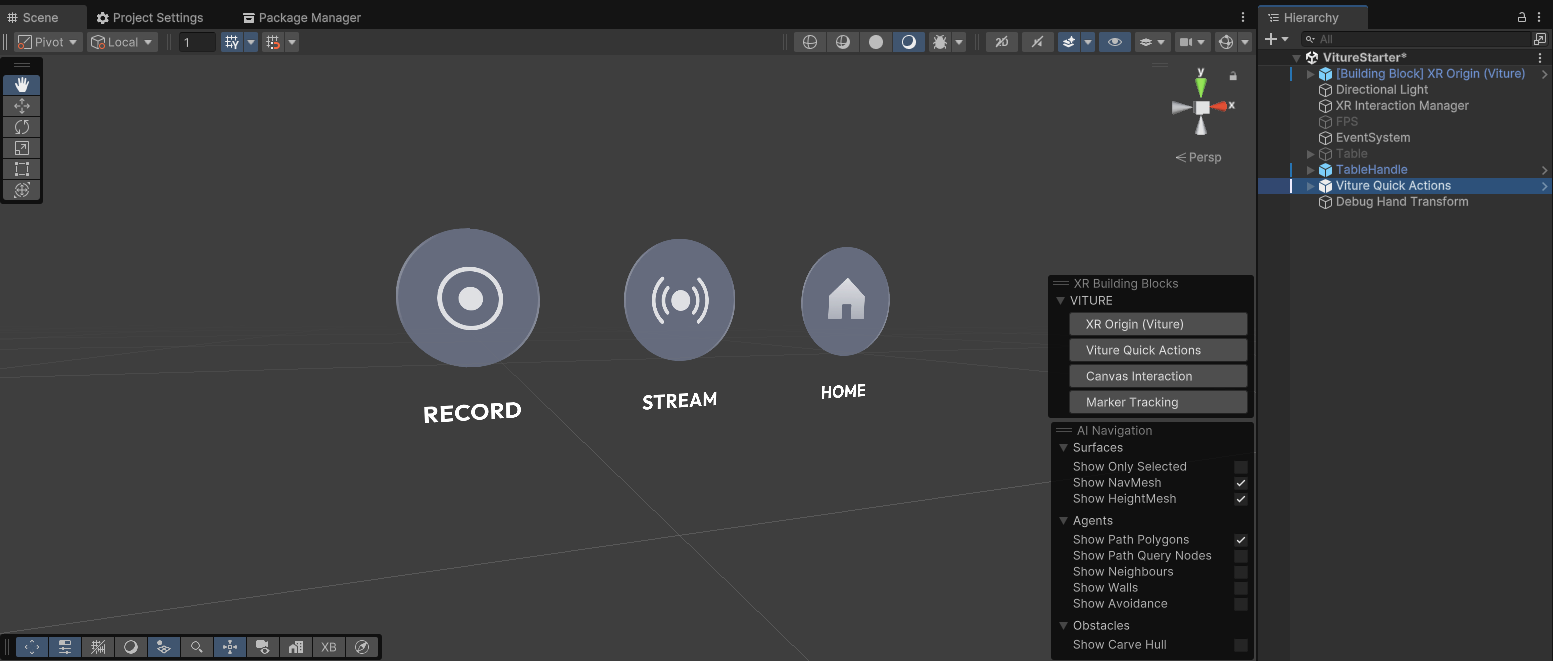
Viture Quick Actions is a system UI that appears when users look up, providing essential functions: Record (first-person mixed reality recording) and Home (exit to launcher). We recommend including this prefab in all VITURE XR applications.
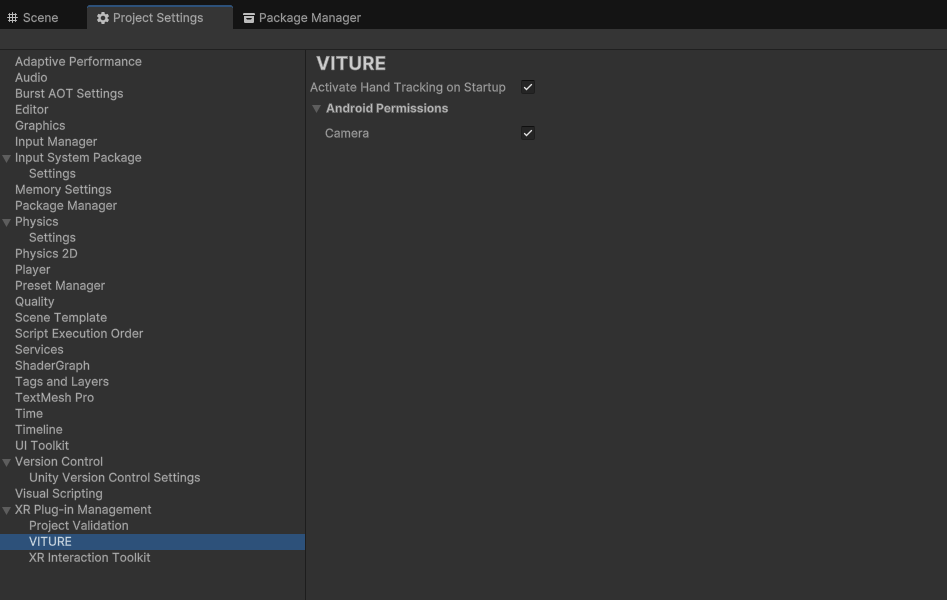
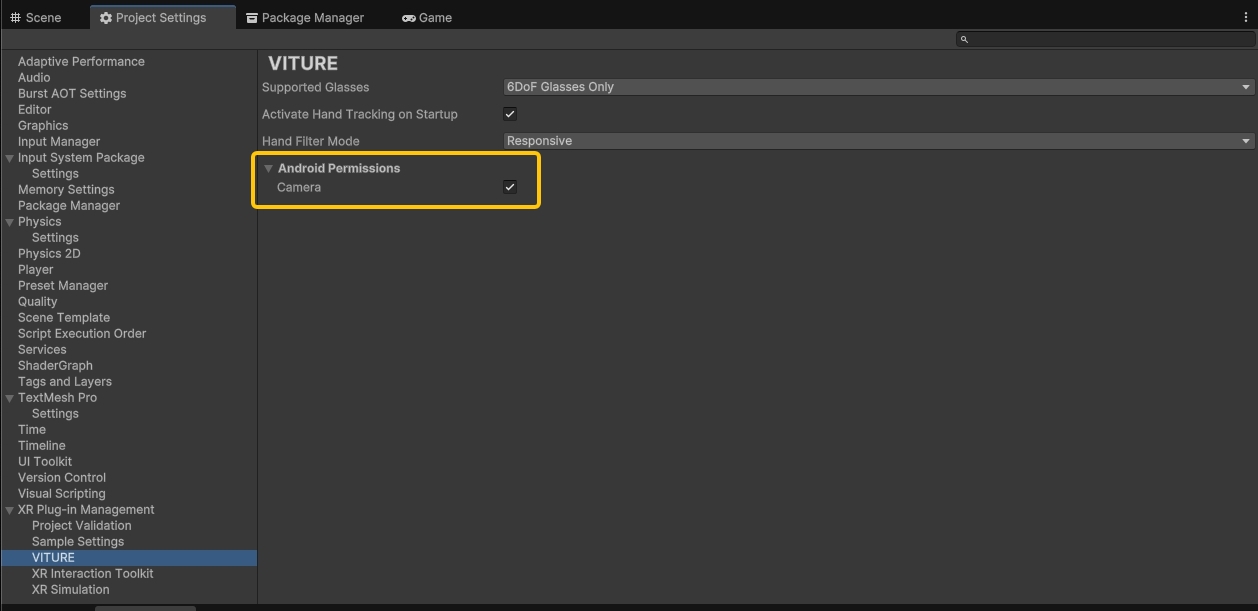
The first-person recording feature requires RGB camera access. To enable this, go to Edit > Project Settings > XR Plug-in Management > VITURE and check the Android camera permission.
The default table position is too high for comfortable interaction. Select both TableHandle and Table in the Scene Hierarchy and move them lower and forward for better accessibility.
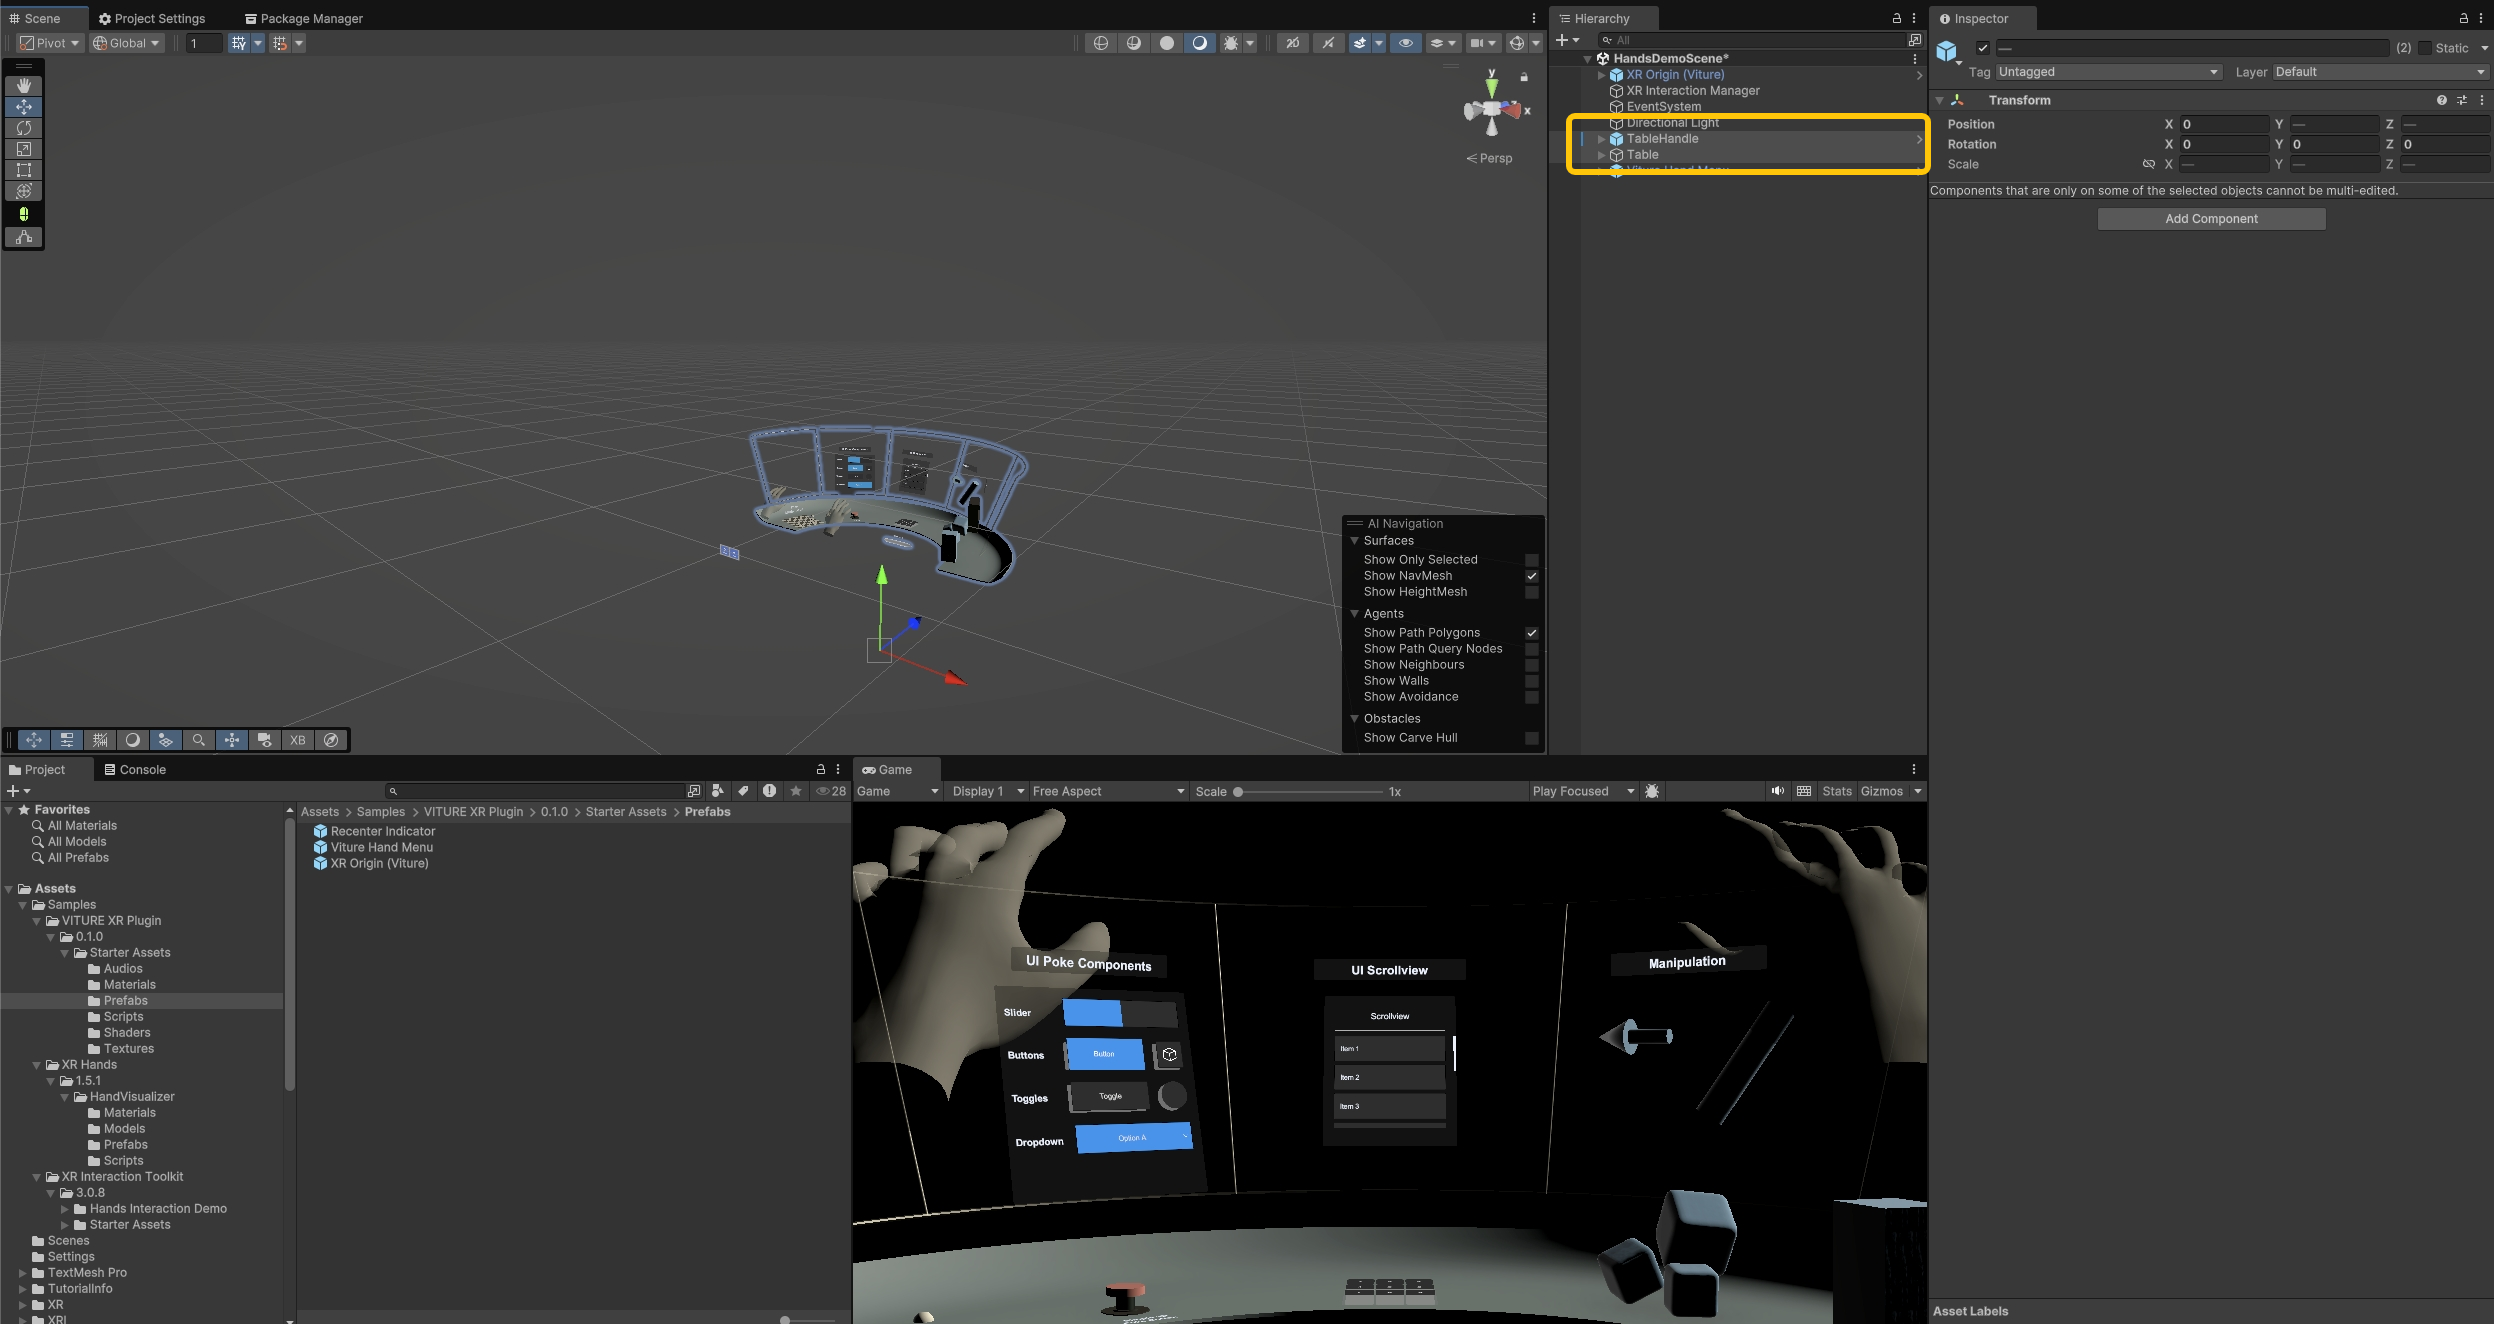
The default Directional Light may appear dim in the demo scene. Adjust its rotation to make the scene brighter.
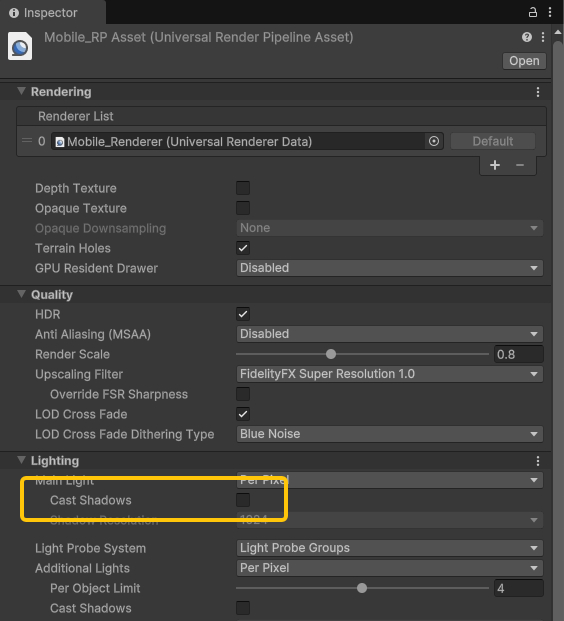
For optimal performance, we recommend disabling shadows in your URP settings. Navigate to Assets > Settings > Mobile_RPAsset and disable the Cast Shadows option.
Build APK
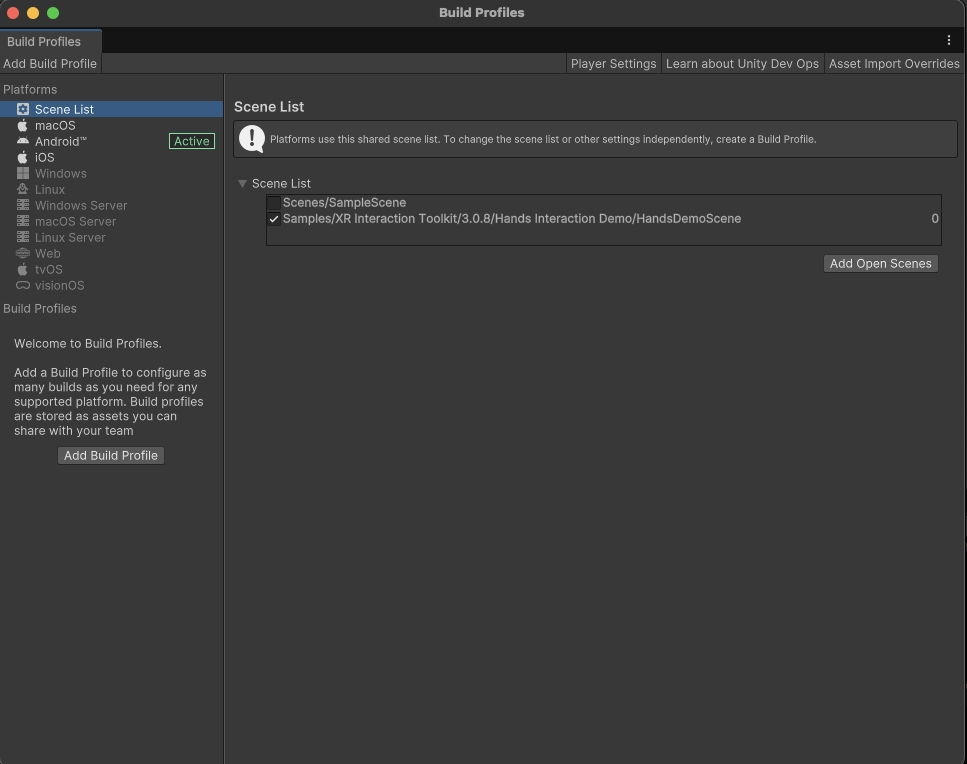
Go to File > Build Profiles > Scene List and click Add Open Scenes to include only the HandsDemoScene in your build.
Click Build, create a Build folder, name your APK, and click Save to start the build process.
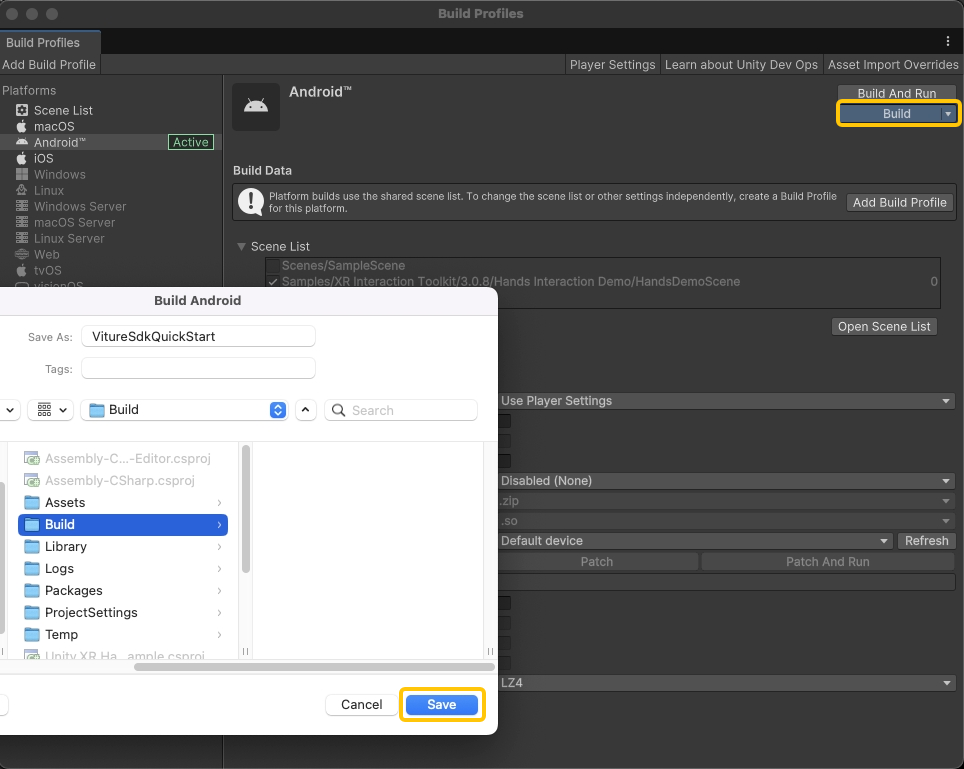
Congratulations! ? You've built your first VITURE XR application.
Deploy to Device
First, ensure ADB (Android Debug Bridge) is installed on your computer.
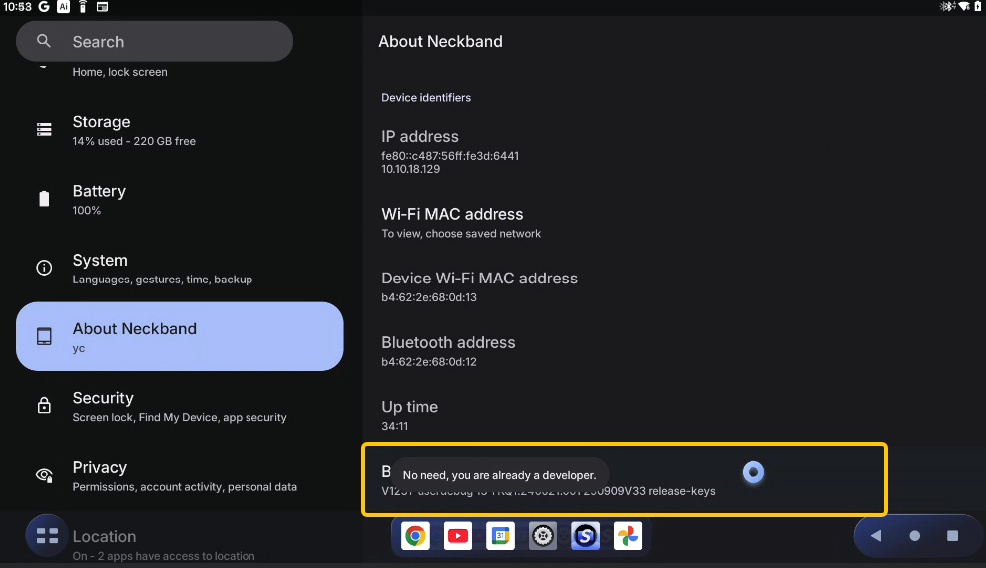
Enable Developer Mode by opening Settings and navigating to About Neckband > Build number. Tap the Build number area 7 times to unlock Developer Mode.
Navigate to System > Developer options and enable Wireless debugging. Click Allow when prompted.
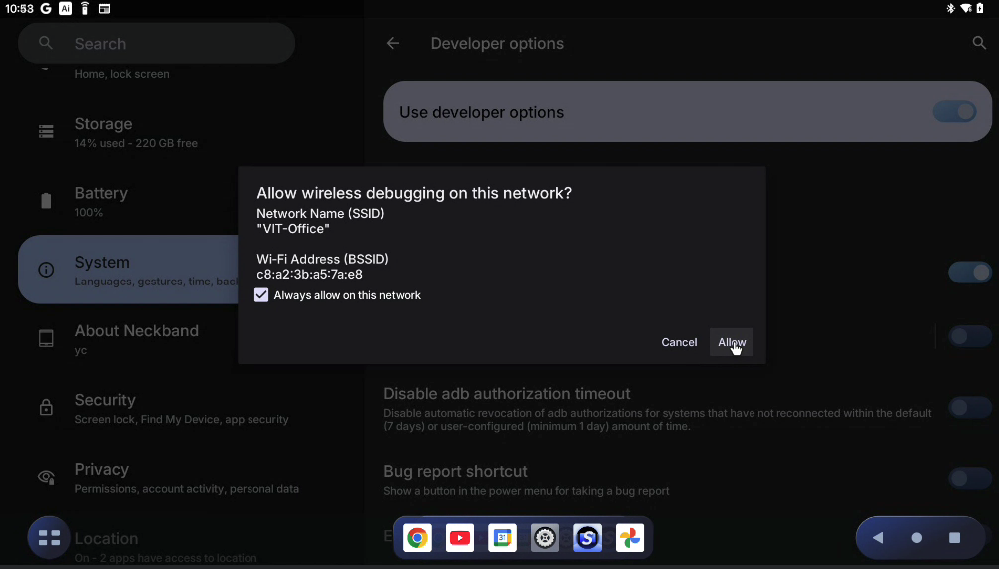
Important Note: The wireless debugging prompt cannot be clicked using hand tracking in SpaceWalker mode. If you encounter this situation, you have two options to proceed:
- Use the VITURE Neckband Remote app to control the cursor and click Allow.
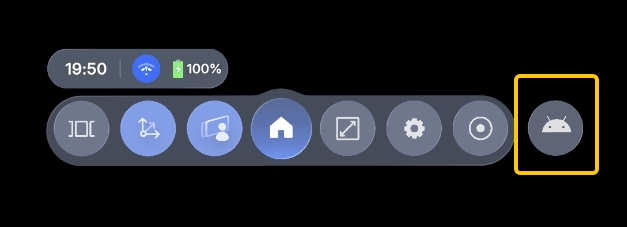
- Switch to Android Mode by pressing the bottom-left physical button on the neckband to open the quick settings menu, then select the rightmost option.
With wireless debugging now enabled, go to System > Developer options > Wireless debugging and tap Pair device with pairing code to display the pairing panel.
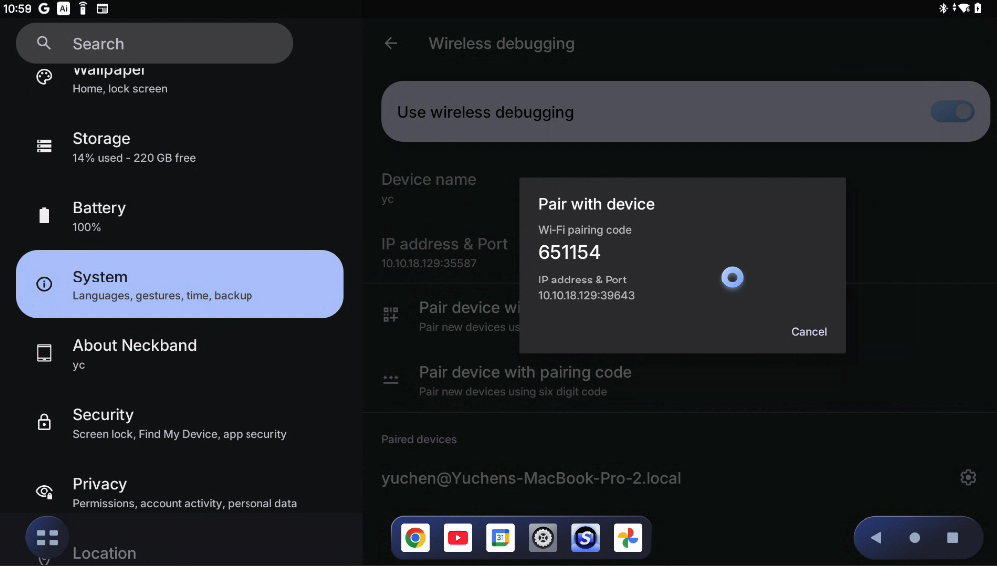
Pair and connect using ADB commands in your terminal, and then install your APK:
# Pair with the device (one-time setup)
adb pair <IP_ADDRESS>:<PAIRING_PORT>
# Enter the pairing code when prompted

# Connect to the device
adb connect <IP_ADDRESS>:<PORT>

# Install your APK
adb install path/to/your/app.apk
Once installed successfully, launch SpaceWalker on your VITURE neckband and find your app to enter the demo scene!
Mixed Reality Capture
One major drawback of XR is the lack of shareability. People not wearing the glasses cannot see what you see, even though they are in the same physical space. This makes the unique experiences that XR creates difficult to share with others — a significant barrier for social sharing. An object is virtual precisely because only you can see it; if everyone present could see it, it would be as good as real.
Mixed Reality Capture solves this by letting you share your XR experience from both first-person and third-person perspectives -- using your phone as the capture device. With the Neckband Capture app, you can record or livestream any experience on the VITURE platform in real time, including system experiences, first-party apps, and third-party apps built with our SDK. Simply download the app and start sharing!
Availability:
- Third-Person View Share currently requires VITURE Luma Ultra (6DoF) glasses. Support for 3DoF glasses is coming soon.
- The Neckband Capture app is currently available on iOS. Android support is coming soon.
First-Person Recording
First-person recording captures what you see through the glasses. On Luma Pro and Luma Ultra, the built-in RGB camera records both virtual content and the real-world background, producing a true mixed reality video. On glasses without an RGB camera, only the virtual content is recorded against a black background.
Third-Person View Share
Third-person view share provides a real-time spectator view of the XR experience on your VITURE neckband -- from your phone. Move the phone freely through the space and the virtual world updates from that perspective in real time. This goes beyond sharing what you see in the glasses: it lets others experience your XR world from their own unique viewpoint. Capture yourself inside your experience and share it with friends!
Alignment
For the phone to show the correct view of the virtual world, both devices -- the glasses and the phone -- need to agree on where things are in 3D space. Here's why this isn't automatic.
When any AR device starts a session, it establishes a virtual 3D coordinate system from its starting position, known as the XR origin. All subsequent tracking is relative to this origin. Since each device creates its own XR origin independently, the same coordinates -- say, (8.3, 7.9, 9.4) -- refer to a different physical location on each device. Alignment is the process of synchronizing these coordinate systems so that the same coordinate maps to the same physical location on both devices.
To align, both devices must observe a shared anchor -- something that exists at a known position in the physical space -- and use it to reconcile their coordinate systems. The most convenient approach is Finger Sync, which uses the user's hand joints as the shared anchor to synchronize the two devices. Other approaches, such as external markers, are also possible. Currently, only Finger Sync is available; additional alignment methods will be added in the future to support more complex real-world scenarios.
Integrating Capture in Your App
The entries of the first-person recording and third-person view share are in the Viture Quick Actions prefab in the Starter Assets sample. Simply drag the prefab into your scene, enable the camera permission in VITURE Project Settings, and you're ready to go.
Marker Tracking
Marker tracking enables XR applications to detect and track physical markers in the real world. This anchors virtual content to real world positions, letting you place 3D objects exactly where you want them in physical space.
ArUco Markers
We currently utilize the open-source ArUco marker tracking algorithm from OpenCV, which provides fast, accurate tracking at low computational cost.
Each ArUco marker belongs to a dictionary - a prefefined set of marker patterns. Within each dictionary, individual markers are identified by a Marker ID. For example, Dictionary 4x450 contains 50 unique marker patterns (IDs 0-49), while Dictionary 4x4100 contains 100 unique patterns (IDs 0-99).
Marker patterns overlap between dictionaries. For example, marker ID 0 in 4x450 has the identical visual pattern as marker ID 0 in 4x4100. Therefore, always use the smallest dictionary that meets your needs. Smaller dictionaries track faster because the system checks fewer patterns for each frame. For instance, 4x450 performs better than 4x4100.
https://chev.me/arucogen/ provides a good tool to generate ArUco markers.
Setup
The Marker Tracking Demo sample provides a minimal implementation showing how to track multiple markers simultaneously.
First, create a Marker Library scriptable object to store information about the markers you want to track.
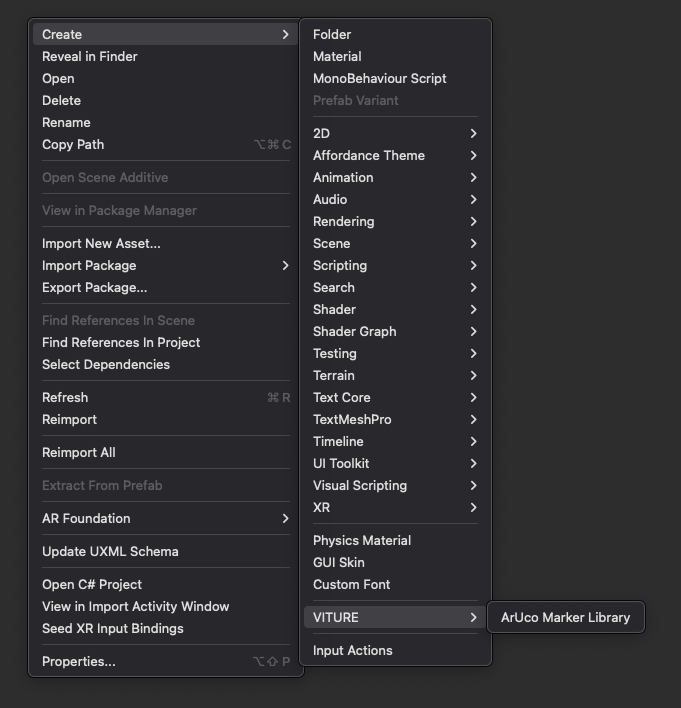
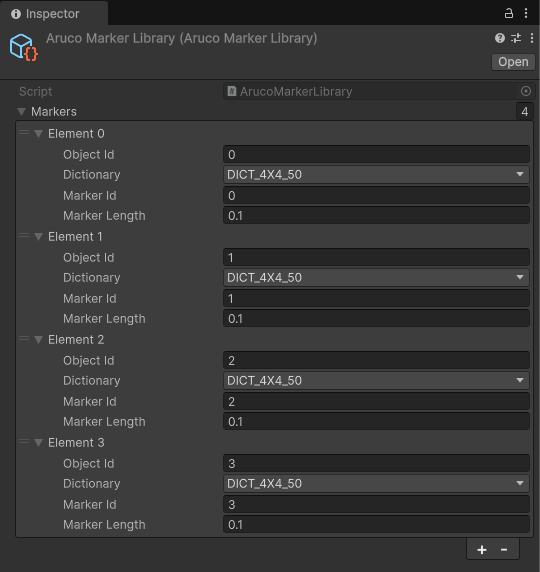
Configure each marker with the following properties:
- Object Id: A unique integer identifier for this marker. Use this ID to distinguish between tracked markers in your code.
- Dictionary: The ArUco dictionary this marker belongs to (explained above).
- Marker Id: The specific marker pattern within the dictionary (explained above).
- Marker Length: The physical size of the marker's side in meters. Ensure the printed marker matches this size exactly for accurate tracking.
The system supports tracking up to 8 markers per frame.
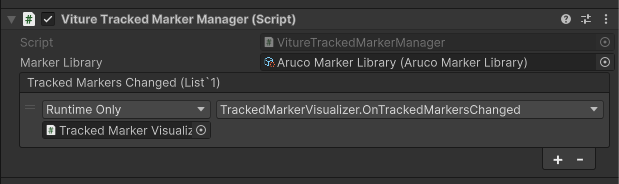
Add the VitureTrackedMarkerManager component to the scene and assign your Marker Library to it. Subscribe to the trackedMarkersChanged event to receive updates when markers are detected or lost. The callback provides a list of currently tracked markers each frame.
Camera API
VITURE provides RGB Camera API for glasses with a built-in RGB camera (Luma Pro, Luma Ultra, Luma Cyber, Beast). Use VitureXR.Camera.RGB and VitureRGBCameraManager to access the device's physical RGB camera. Data is exposed to Unity as RenderTexture, Texture2D, or Color32[], so you can build rendering and algorithm features (e.g., live view, object detection, image capture).
Supported Devices
Supported: Glasses with a built-in RGB camera: VITURE Luma Pro, Luma Ultra, Luma Cyber, and Beast.
Core Components
- VitureXR.Camera.RGB — Static API: start/stop, resolution management, frame callback.
- VitureRGBCameraManager — Scene singleton: preview texture and frame-capture APIs.
Key Integration Points
- Rendering: Assign VitureRGBCameraManager.Instance.CameraRenderTexture to a RawImage or material to show the live camera feed.
- Algorithms / saving: Use CaptureFrameAsync() for a Texture2D or ReadPixelsAsync() for Color32[] for object detection, saving images, or encoding/upload.
Core Features
- Access the physical RGB camera on Luma Pro / Luma Ultra / Luma Cyber / Beast (not only for tracking).
- Live texture (GPU: CameraRenderTexture) and pixel data (CPU: ReadPixelsAsync, or after CaptureFrameAsync and encode).
- Dynamic resolution (GetSupportedResolutions, Start with custom resolution) and frame callback (frameAvailable event).
- First-Person Recording: Use Capture.StartRecording(captureRealWorldLayer: true) to include the RGB camera in the recording when using default resolution. Note: Custom resolutions are not supported during recording.
- Lifecycle is handled by the Manager and SDK (OnEnable/OnDisable, Stop()). On Android, the app must handle camera permission and pause/resume (e.g., call Stop() in OnApplicationPause).
Permissions
Enable the camera permission in VITURE Project Settings.
<uses-permission android:name="android.permission.CAMERA" />
Notes
- To change resolution, call Stop() then Start() with the new resolution.
- Custom resolutions cannot be used while First-Person Recording is active.
- Check isSupported and isActive before using the camera.
- Frame capture is asynchronous and thread-safe.
VITURE Project Settings
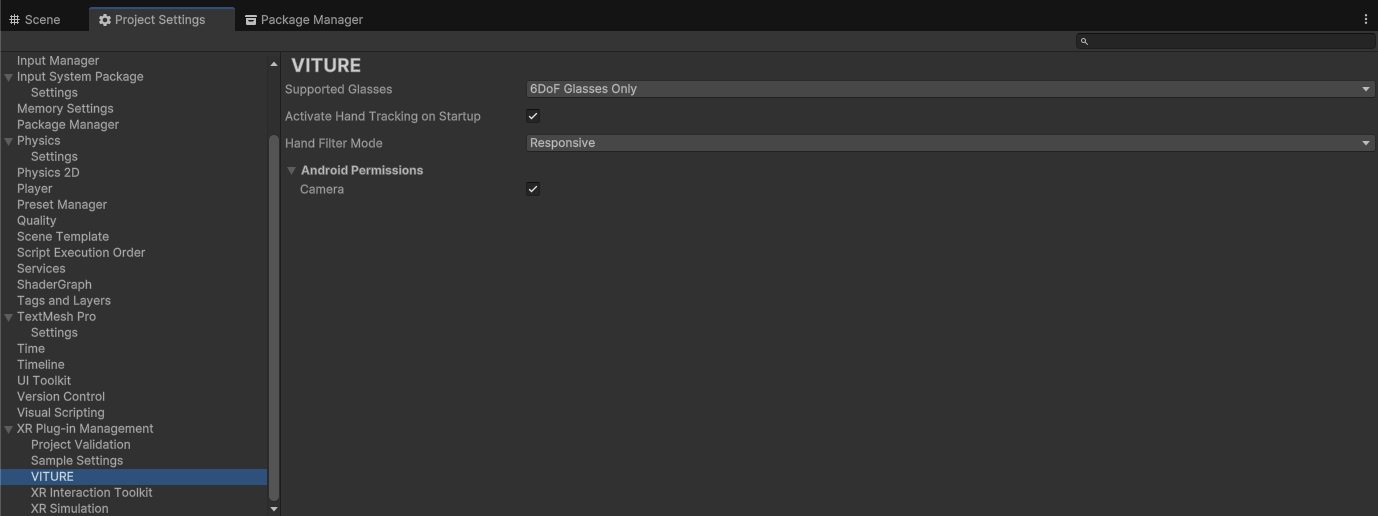
Configure VITURE-specific settings for your Unity project. Access these settings through Edit > Project Settings > XR Plug-in Management > VITURE.
Settings
Supported Glasses
Defines which VITURE glasses your app supports. The system checks this to verify compatibility with the connected glasses.
Options:
- 6DoF Glasses Only (Default) — Application supports only 6DoF glasses.
- Both 3DoF and 6DoF Glasses — Application supports both 3DoF and 6DoF glasses.
Activate Hand Tracking on Startup
Automatically activate hand tracking when the application starts. Disable this if you want to control hand tracking manually via VitureXR.HandTracking.Start() and VitureXR.HandTracking.Stop().
Hand Filter Mode
Balances hand tracking responsiveness vs stability. Responsive has lower latency but more jitter. Stable is smoother but slightly delayed. Can be changed at runtime via VitureXR.HandTracking.filterMode.
Options:
- Responsive (Default) — Lower latency but more jitter.
- Stable — Smoother but slightly delayed.
Android Permissions
Select the Android permissions your app needs. These permissions are automatically added to your Android manifest during build.
Camera
Enables the app to use the device camera. Required for recording feature.
Building Blocks
VITURE Building Blocks extends Unity's XR Building Blocks framework to provide one-click setup for common VITURE features. It automatically handles package dependencies, sample imports, and scene configuration, letting you set up XR functionality in seconds instead of minutes.
How to Access
You can access VITURE Building Blocks from three locations in the Unity Editor:
1. Scene View Overlay Menu
Scene View > Overlay Menu > XR Building Blocks
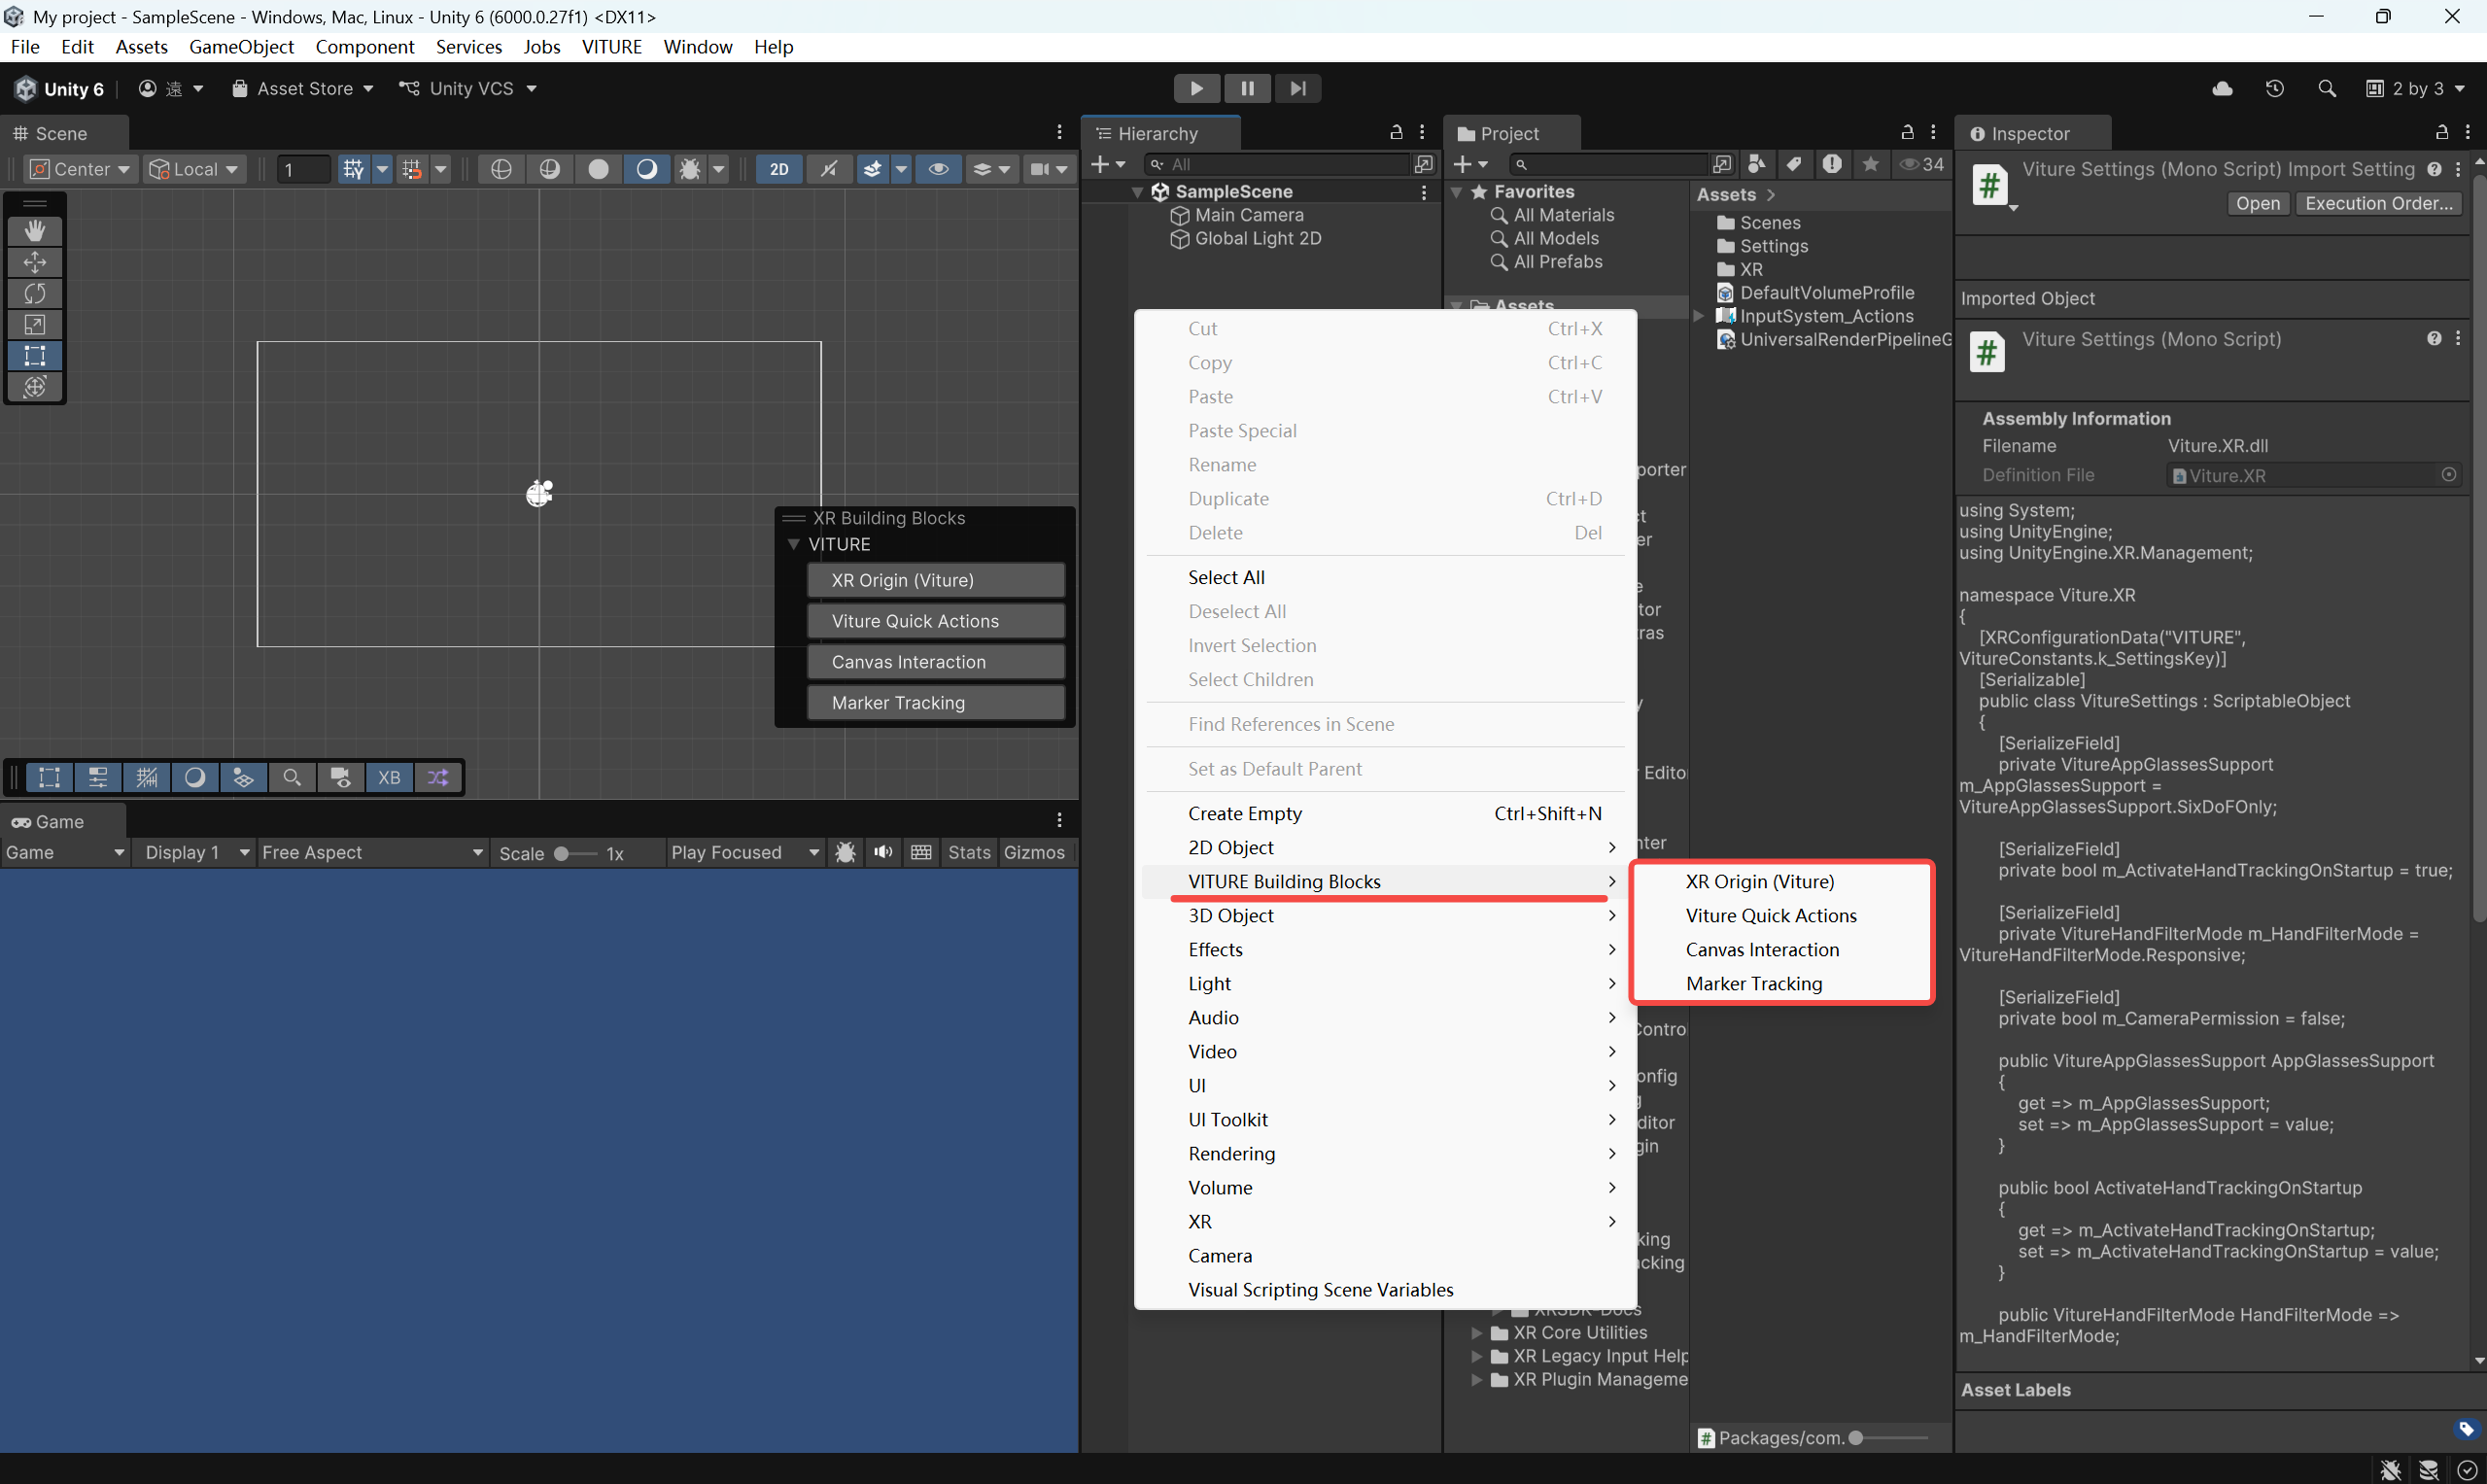
2. Hierarchy Context Menu
Hierarchy > Right-click > VITURE Building Blocks
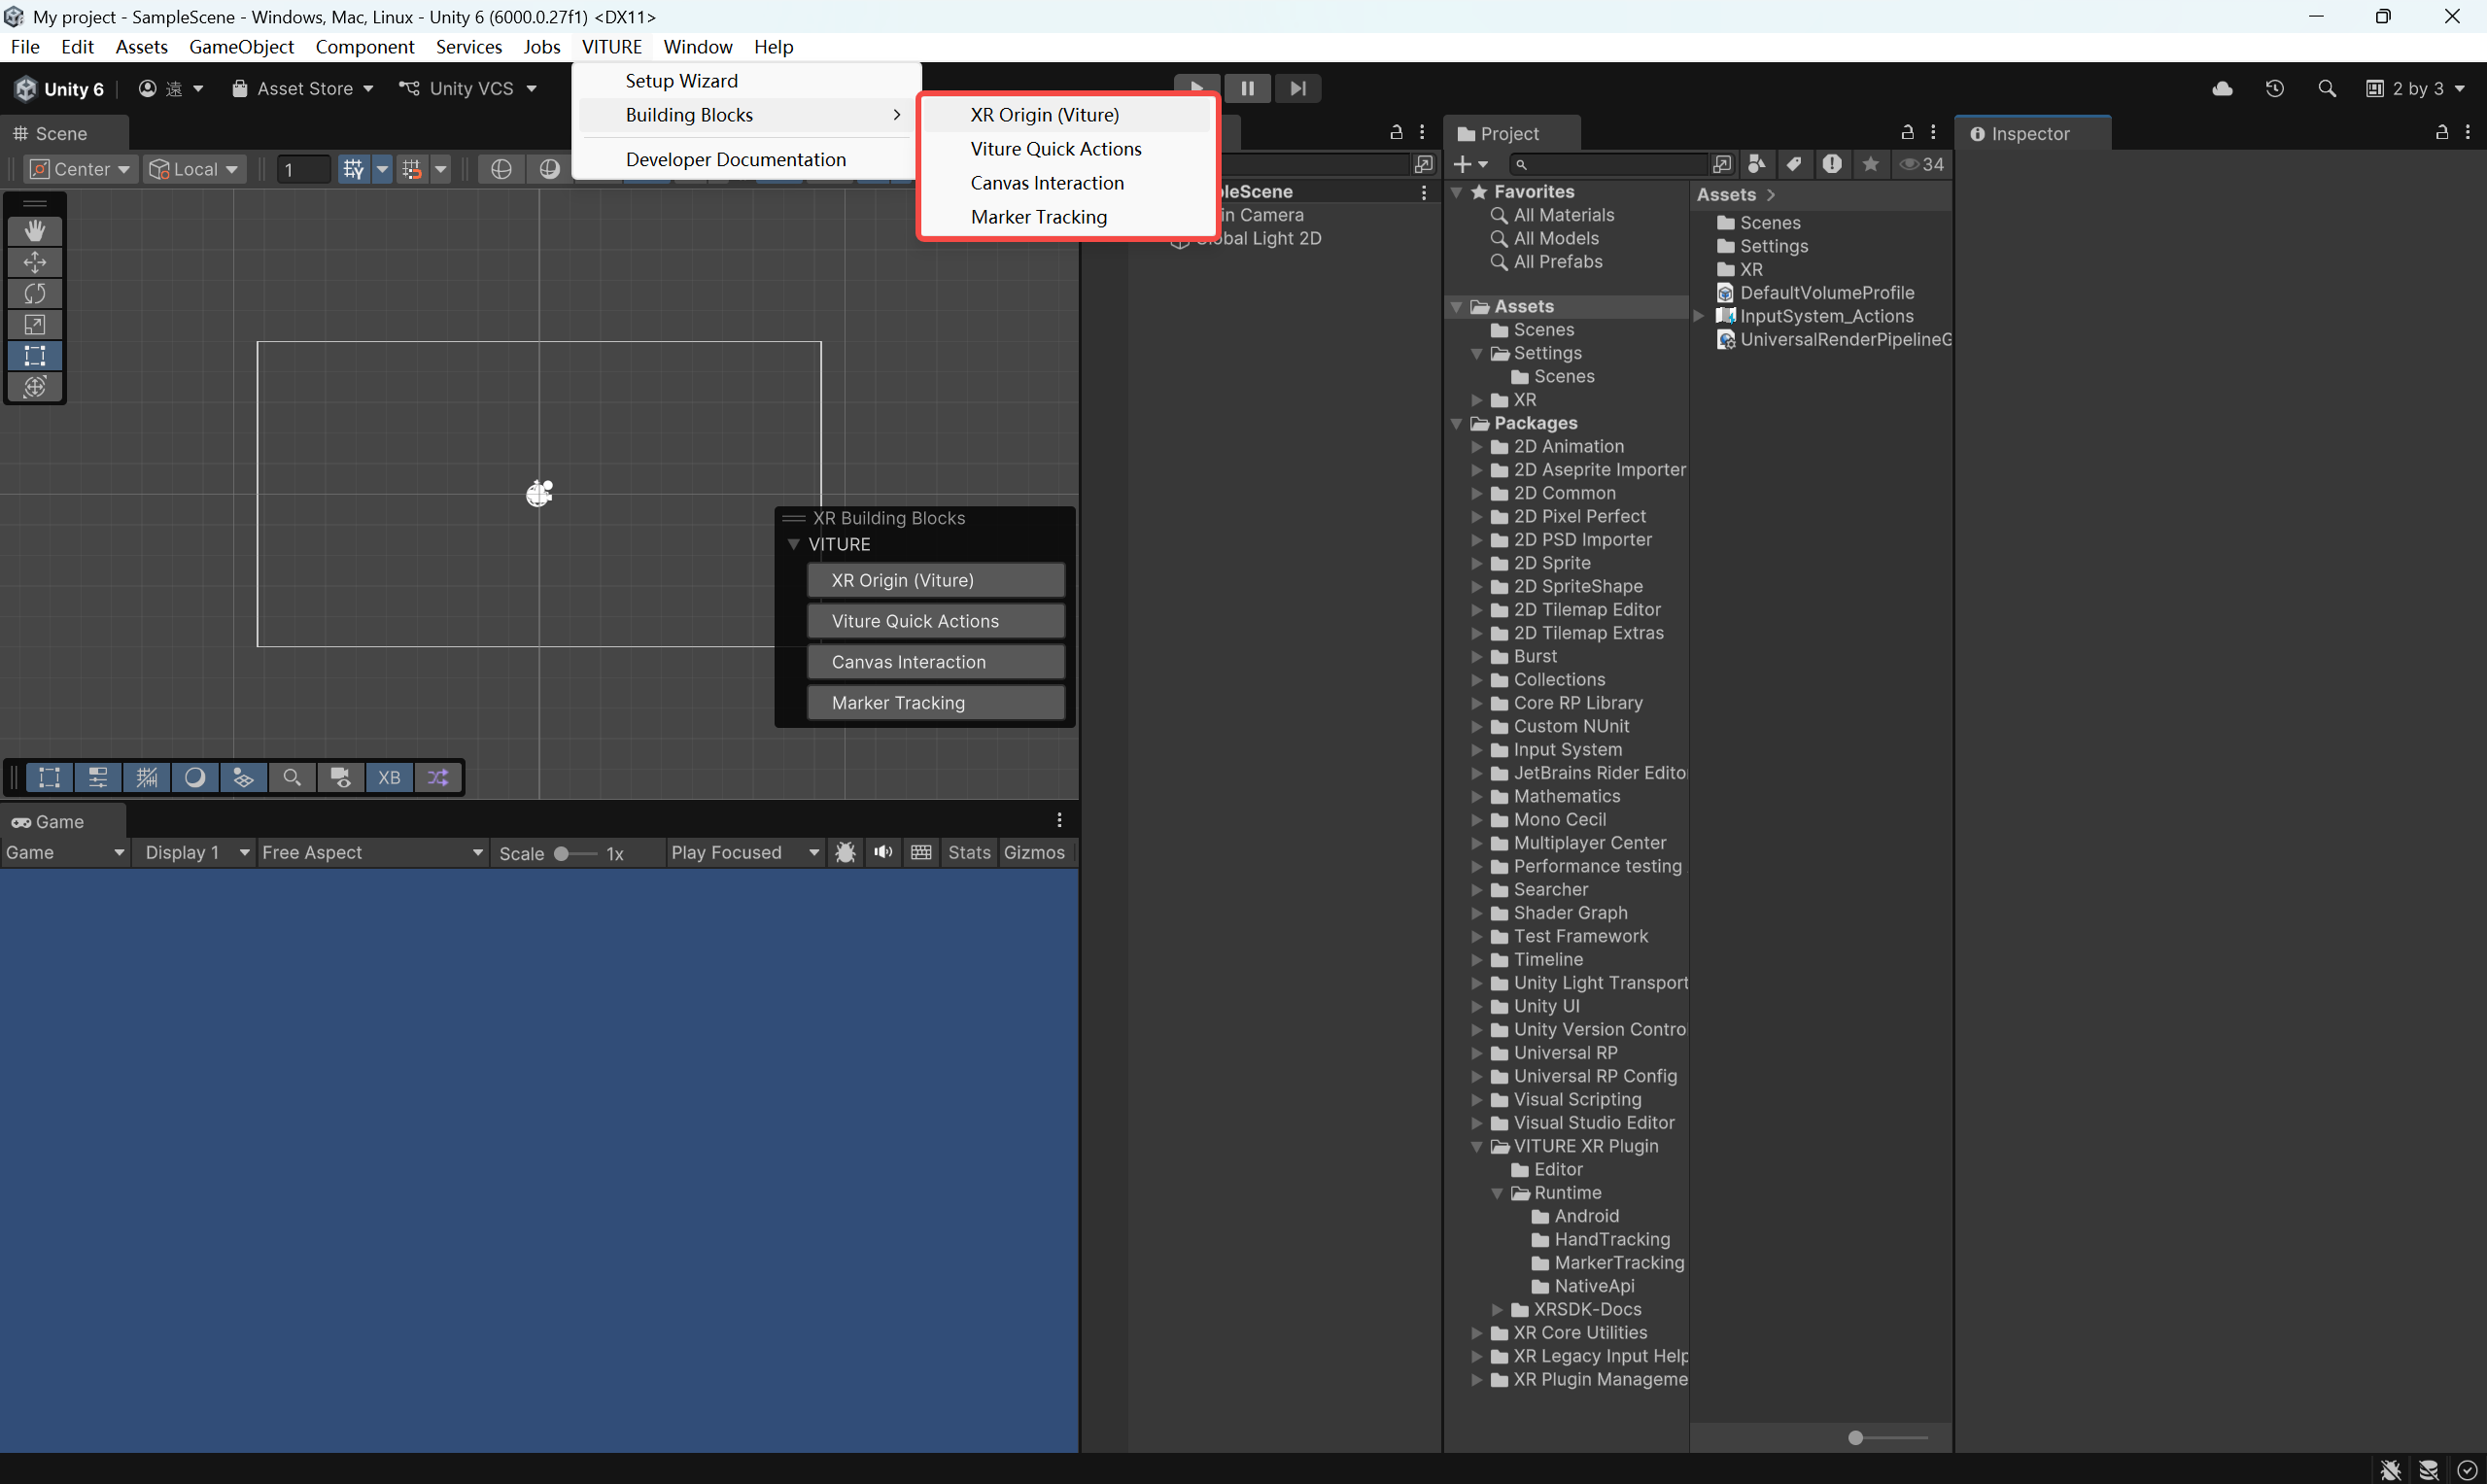
3. Top Menu Bar
VITURE > Building Blocks
Available Building Blocks
XR Origin (Viture)
Sets up the core XR camera rig with hand tracking support.
What it does:
- Installs required packages (
XR Interaction Toolkit,XR Hands) - Imports VITURE Starter Assets sample
- Sets up VITURE Input Actions as project-wide input
- Adds XR Origin prefab to your scene
Result: A fully configured XR Origin with camera, hand tracking, and input ready to use.
Viture Quick Actions
Adds the VITURE Quick Actions menu to your scene for in-app controls.
What it does:
- Installs required packages (
XR Interaction Toolkit,XR Hands) - Imports VITURE Starter Assets sample
- Adds Quick Actions prefab to the scene
- Configures the UI canvas for XR interaction (world space, camera reference, raycasting)
- Hides any default MainCamera to prevent UI rendering issues
Result: An interactive in-app menu that responds to hand input.
Canvas Interaction
Sets up UI canvas interaction with hand tracking.
What it does:
- Installs required packages (
XR Interaction Toolkit,XR Hands) - Imports VITURE Starter Assets sample
- Adds XR Origin if not present
- Creates and configures a Canvas for XR (world space, camera reference, raycasting)
- Hides default MainCamera and EventSystem to prevent conflicts
Result: A canvas ready for hand-based UI interaction. Add buttons and UI elements that respond to hand input.
Marker Tracking
Adds marker tracking capability to your scene.
What it does:
- Imports Marker Tracking Demo sample
- Adds Marker Tracking prefab to the scene
Result: Scene is ready for ArUco marker tracking. Configure your marker library and start detecting physical markers.
RGB Camera API
Adds real-time RGB camera functionality to your scene for video preview and frame capture.
What it does:
- Imports the RGB Camera Demo sample.
- Adds the RGB Camera prefab to the scene and initializes the
VitureRGBCameraManager. - Automatically enables the camera on start (
StartCameraOnEnable = true). - Configures project settings to request Camera permissions (
CameraPermission = true). - Ensures OES Blit shaders are included for correct video rendering.
- Disables conflicting default Main Cameras.
Result: Scene is ready to display live RGB video feeds and capture frames. Configure resolution settings and access the video stream for computer vision or recording features.
Starter Assets
This sample provides pre-configured assets to streamline VITURE XR project setup. We advise importing this sample to accelerate your development workflow. Make sure to install all required dependencies and samples for everything to work properly.
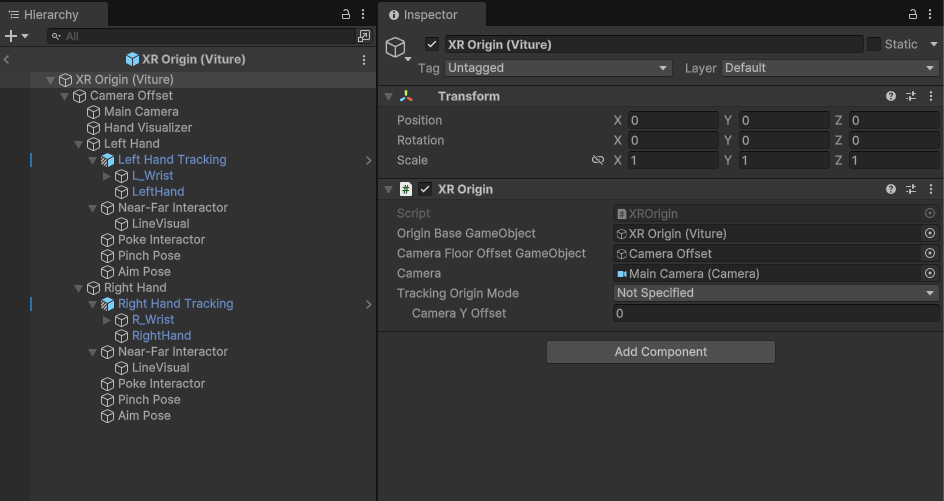
XR Origin (Viture)
Pre-configured XR Origin prefab with main camera and hand tracking components. Includes Near-Far Interactor and Poke Interactor already wired up with VITURE input actions.
Viture Quick Actions
System UI prefab that appears when users look up, providing essential functions:
- Record - First-person mixed reality recording
- Stream - Third-person view share
- Home - Exit to launcher
Add this to let users access system-level controls in your application.
Two Hand Transform Cube
Demonstration prefab showcasing the TwoHandTransform script for intuitive two-handed object manipulation. Pinch with both hands simultaneously to translate, rotate, and scale the target object using natural hand gestures.
Interaction Simulator
One of the most time-consuming parts of XR development is the build-deploy-test cycle: make a change in Unity, build the APK, install it on the neckband, and test. Every iteration adds up.
The VITURE Interaction Simulator lets you test HMD and hand interaction directly in the Unity Editor. It simulates head movement and hand ray input in an FPS-style control scheme using your mouse and keyboard.
This tool is inspired by Unity's XR Interaction Simulator in the XR Interaction Toolkit package. The built-in simulator does not support VITURE-specific hand interactions, so our custom version provides a more streamlined experience for developing XR apps on the VITURE platform.
| Input | Action |
|---|---|
| Right-click + drag | Rotate HMD (yaw / pitch) |
| WASD | Move HMD (forward / left / back / right) |
| R / F | Move HMD (up / down) |
| Q | Toggle left hand tracking on/off |
| E | Toggle right hand tracking on/off |
| Mouse position | Hand aim direction |
| Left-click | Select / Pinch |
Marker Tracking Demo
Demonstrates how to track multiple ArUco markers simultaneously and visualize them with 3D objects.
How to Use
- Import the sample from Package Manager
- Open the Marker Tracking Demo scene
- Print ArUco markers from the configured Marker Library. Important: The printed marker size must exactly match the Marker Length specified in the library for accurate tracking.
- Build and deploy to your VITURE device
- Point the camera at your printed markers to see tracking in action
RGB Camera Demo
The RGB Camera Demo is a sample in the VITURE XR Plugin that shows how to use the RGB Camera API for live preview and resolution switching.
How to Use
- Import the sample from Package Manager
- Open the RGB Camera Demo scene
- Enable the camera permission in VITURE Project Settings
- Build and deploy to your VITURE device
- Run the scene, confirm the preview appears, change resolution
Scene and Components
- VitureRGBCameraManager — Add to the scene; provides the preview texture and frame-capture APIs (singleton Instance).
- RGBCameraExample — Sample script wired to buttons and UI:
- Turn the camera on/off.
- Resolution dropdown: Populated from GetSupportedResolutions(); changing the selection calls Stop() then Start() with the new resolution and updates the displayed current resolution.
- Displays CameraRenderTexture on a RawImage or Renderer.
Configurable Fields (Inspector)
| Field | Description |
|---|---|
| Toggle Button | Turn camera on/off |
| Resolution Dropdown | Select camera resolution (only when camera is active) |
| Display RawImage | Where to show the preview |
VitureXR API Reference
VitureXR is the SDK's central hub providing static access to VITURE XR functionality. All APIs are organized into logical categories for easy discovery and use.
Namespace:
Viture.XR
Access: All APIs are accessed through the staticVitureXRclass.
Quick Reference
| Category | API | Type | Description |
|---|---|---|---|
| Glasses | GetGlassesModel() |
Method | Get connected glasses model |
| Glasses | SetElectrochromicLevel(float) |
Method | Set lens darkness level |
| Rendering | SetHalfFrameRate(bool) |
Method | Toggle half frame rate |
| Head Tracking | GetHeadTrackingCapability() |
Method | Get 3DoF/6DoF capability |
| Head Tracking | trackingStatus |
Property | Current head tracking quality (Normal / Limited) |
| Head Tracking | trackingStatusChanged |
Event | Invoked when head tracking quality changes |
| Head Tracking | Reset() |
Method | Reinitialize the tracking algorithm (~1s stall) |
| Head Tracking | SetWorldOrigin(...) |
Method | Set the world origin to the specified position and orientation |
| Head Tracking | SetWorldOrigin() |
Method | Set the world origin to the current head pose |
| Hand Tracking | IsActive |
Property | Check if hand tracking is active |
| Hand Tracking | filterMode |
Property | Set filter mode |
| Hand Tracking | aimSensitivity |
Property | Controls the sensitivity of the hand aim ray direction |
| Hand Tracking | Start() |
Method | Start hand tracking |
| Hand Tracking | Stop() |
Method | Stop hand tracking |
| Camera.RGB | isSupported |
Property | Checks current device RGB camera support |
| Camera.RGB | isActive |
Property | Check if RGB Camera is active |
| Camera.RGB | currentResolution |
Property | Current output resolution of the camera |
| Camera.RGB | frameAvailable |
Event | Invoked when a new camera frame becomes available |
| Camera.RGB | GetDefaultResolution() |
Method | Gets the default camera resolution for the connected glasses model |
| Camera.RGB | GetSupportedResolutions() |
Method | Gets the resolutions supported by the camera |
| Camera.RGB | Start() |
Method | Start the RGB camera at the default resolution |
| Camera.RGB | Start(...) |
Method | Start the RGB camera at the specified resolution |
| Camera.RGB | Stop() |
Method | Stop the RGB camera |
| Camera.RGB | GetNativeTextureId() |
Method | Gets the native texture ID for the camera frame |
| Capture | isRecording |
Property | Check if recording |
| Capture | isSharingView |
Property | Gets whether a view share session is currently active |
| Capture | recordingStartSuccess |
Event | Invoked when recording starts successfully |
| Capture | recordingStartFailure |
Event | Invoked when recording fails to start |
| Capture | recordingSaveSuccess |
Event | Invoked when recording is saved successfully |
| Capture | recordingSaveFailure |
Event | Invoked when recording fails to save |
| Capture | advertisingStarted |
Event | Invoked when the neckband starts advertising and becomes discoverable to mobile devices |
| Capture | advertisingStopped |
Event | Invoked when the neckband stops advertising |
| Capture | clientConnected |
Event | Invoked when a mobile device connects to the neckband |
| Capture | clientDisconnected |
Event | Invoked when the connected mobile device disconnects |
| Capture | alignmentCalibrationStarted |
Event | Invoked when an alignment calibration session starts with the selected alignment mode |
| Capture | alignmentCalibrationStopped |
Event | Invoked when the current alignment calibration session stops |
| Capture | alignmentCheckStarted |
Event | Invoked when an alignment check session starts |
| Capture | alignmentCheckStopped |
Event | Invoked when the current alignment check session stops |
| Capture | streamingStarted |
Event | Invoked when a streaming session starts |
| Capture | streamingStopped |
Event | Invoked when the current streaming session stops |
| Capture | StartRecording(...) |
Method | Starts recording XR content with the specified capture options |
| Capture | StopRecording(...) |
Method | Stops the current recording and saves the video file |
| Capture | StartViewShare(...) |
Method | Starts advertising to nearby mobile devices on the same local network |
| Capture | StopViewShare(...) |
Method | Stops advertising and disconnects any connected mobile device |
| Capture | SendTrackedMarkerPose(...) |
Method | Sends the tracked marker pose to the mobile device for marker-based alignment calibration |
| Capture | GetLocalIpAddress(...) |
Method | Gets the local IPv4 address of this device |
Glasses
Provides information and control for connected VITURE glasses.
GetGlassesModel()
Gets the model of the currently connected VITURE glasses.
Returns: VitureGlassesModel - Connected model, or Unknown if no glasses are connected.
Supported Models:
| Value | Description |
|---|---|
VitureGlassesModel.One |
VITURE One and VITURE One Lite glasses |
VitureGlassesModel.Pro |
VITURE One Pro glasses |
VitureGlassesModel.Luma |
VITURE Luma glasses (no RGB camera) |
VitureGlassesModel.LumaPro |
VITURE Luma Pro glasses (has RGB camera) |
VitureGlassesModel.LumaUltra |
VITURE Luma Ultra glasses |
VitureGlassesModel.LumaCyber |
VITURE Luma Cyber glasses |
VitureGlassesModel.Beast |
VITURE Beast glasses |
VitureGlassesModel.Pro2 |
VITURE Pro 2 glasses (3DoF, no RGB camera) |
Example:
var model = VitureXR.Glasses.GetGlassesModel();
if (model == VitureGlassesModel.Beast)
{
    Debug.Log("Connected to VITURE Beast glasses");
}
SetElectrochromicLevel(float level)
Sets the electrochromic darkness level of the glasses lenses.
Note: Current glasses models treat this as on/off:
0.0= off, any other value = on. Future models will support multiple darkness levels.Note: VITURE Pro 2 has no electrochromic film. The call is accepted but has no effect.
Parameters:
| Name | Type | Description |
|---|---|---|
level |
float |
Darkness from 0.0 (transparent) to 1.0 (dark). Values outside this range are clamped. |
Returns: void
Example:
// Enable electrochromic (darken lenses)
VitureXR.Glasses.SetElectrochromicLevel(1.0f);

// Disable electrochromic (transparent lenses)
VitureXR.Glasses.SetElectrochromicLevel(0.0f);
Rendering
Advanced rendering controls for performance optimization.
SetHalfFrameRate(bool enabled)
Enables or disables half frame rate rendering for performance optimization.
Note: When enabled, reduces rendering frame rate by half (e.g., 90fps → 45fps). Animation will appear less smooth.
Parameters:
| Name | Type | Description |
|---|---|---|
enabled |
bool |
true to enable half frame rate, false to disable. |
Returns: void
Example:
// Enable half frame rate for better battery life
VitureXR.Rendering.SetHalfFrameRate(true);
Head Tracking
Controls head tracking functionality and provides device capability information.
GetHeadTrackingCapability()
Gets the head tracking capability of the currently connected glasses.
Returns: VitureHeadTrackingCapability - Head tracking capability based on the connected glasses model.
| Value | Description |
|---|---|
VitureHeadTrackingCapability.ThreeDoF |
3 degrees of freedom tracking (rotation only) |
VitureHeadTrackingCapability.SixDoF |
6 degrees of freedom tracking (rotation and position) |
Example:
var capability = VitureXR.HeadTracking.GetHeadTrackingCapability();
if (capability == VitureHeadTrackingCapability.SixDoF)
{
    Debug.Log("6DoF tracking available - enabling room-scale features");
}
trackingStatus [Property, Read-only]
Last reported head tracking quality. Always VitureHeadTrackingStatus.Normal on 3DoF glasses.
Type: VitureHeadTrackingStatus
| Value | Description |
|---|---|
VitureHeadTrackingStatus.Normal |
Head tracking is operating normally. Poses can be trusted. |
VitureHeadTrackingStatus.Limited |
Head tracking is degraded. Poses are still delivered but may drift. Only 6DoF glasses report this. |
Example:
if (VitureXR.HeadTracking.trackingStatus == VitureHeadTrackingStatus.Limited)
{
    Debug.Log("Head tracking is degraded - poses may drift");
}
Events
trackingStatusChanged
Invoked on the main thread when trackingStatus changes. Earlier changes are not replayed, so read trackingStatus once after subscribing.
Signature: Action<VitureHeadTrackingStatus>
Parameters:
| Name | Type | Description |
|---|---|---|
status |
VitureHeadTrackingStatus |
The new head tracking quality. |
Example:
void OnEnable()
{
    VitureXR.HeadTracking.trackingStatusChanged += HandleTrackingStatusChanged;

    // The event does not replay earlier changes, so read the current value once.
    HandleTrackingStatusChanged(VitureXR.HeadTracking.trackingStatus);
}

void OnDisable()
{
    VitureXR.HeadTracking.trackingStatusChanged -= HandleTrackingStatusChanged;
}

void HandleTrackingStatusChanged(VitureHeadTrackingStatus status)
{
    Debug.Log($"Head tracking status: {status}");
}
Reset()
Resets the head tracking algorithm. This reinitializes the tracking system and may cause a brief stall (~1 second). Use this when tracking has drifted significantly and needs full recalibration.
Returns: void
Example:
VitureXR.HeadTracking.Reset();
SetWorldOrigin(Vector3 position, Quaternion rotation)
Sets the world origin to the specified position and orientation. Only the yaw component of the rotation is used (pitch and roll are discarded). This is an instantaneous operation with no tracking interruption.
Parameters:
| Name | Type | Description |
|---|---|---|
position |
Vector3 |
The world position to use as the new origin. |
rotation |
Quaternion |
The world rotation to use as the new origin (only yaw is applied). |
Returns: void
Example:
VitureXR.HeadTracking.SetWorldOrigin(/* position */, /* rotation */);
SetWorldOrigin()
Sets the world origin to the current head pose. This makes the current position and yaw orientation the new zero point. This is an instantaneous operation with no tracking interruption.
Returns: void
Example:
VitureXR.HeadTracking.SetWorldOrigin();
Hand Tracking
Controls the hand tracking algorithm.
Requirement: Unity XR Hands package (
com.unity.xr.hands) must be installed to use this feature.
IsActive [Property, Read-only]
Gets whether hand tracking is currently active.
Type: bool
Example:
if (VitureXR.HandTracking.IsActive)
{
    Debug.Log("Hand tracking is running");
}
filterMode [Property, Set-only]
Sets the hand tracking filter mode.
Type: VitureHandFilterMode
| Value | Description |
|---|---|
VitureHandFilterMode.Responsive |
Lower latency but more jitter |
VitureHandFilterMode.Stable |
Smoother but slightly delayed |
Example:
// Use stable mode for smoother hand visualization
VitureXR.HandTracking.filterMode = VitureHandFilterMode.Stable;
aimSensitivity [Property, Read-only]
Controls the sensitivity of the hand aim ray direction. Only takes effect in 6DoF mode.
Type: VitureHandAimSensitivity
| Value | Description |
|---|---|
VitureHandAimSensitivity.Low |
Arm direction only. Stable ray, ignores wrist rotation. |
VitureHandAimSensitivity.High |
Blends arm and wrist direction. More responsive to fine hand movements. |
Example:
var value = VitureXR.HandTracking.aimSensitivity;
Debug.Log(aimSensitivity + ": " + value);
Start()
Starts the VITURE XR hand tracking algorithm.
Returns: void
Example:
void EnableHandTracking()
{
    VitureXR.HandTracking.Start();
}
Stop()
Stops the VITURE XR hand tracking algorithm.
Returns: void
Example:
void DisableHandTracking()
{
    VitureXR.HandTracking.Stop();
}
Capture
Controls XR content capture functionality. Currently supports first-person mixed reality recording with both virtual and real-world layers.
isRecording [Property, Read-only]
Gets whether a recording is currently in progress.
Type: bool
Example:
if (VitureXR.Capture.isRecording)
{
    Debug.Log("isRecording is active");
}
isSharingView [Property, Read-only]
Gets whether a view share session is currently active.
Type: bool
Example:
if (VitureXR.Capture.isSharingView)
{
    Debug.Log("isSharingView is active");
}
Events
recordingStartSuccess
Invoked when recording starts successfully.
Signature: Action
Example:
void OnEnable()
{
    VitureXR.Capture.recordingStartSuccess += HandlerecordingStartSuccess;
}

void OnDisable()
{
    VitureXR.Capture.recordingStartSuccess -= HandlerecordingStartSuccess;
}
recordingStartFailure
Invoked when recording fails to start. Parameters: errorCode, errorMessage.
Signature: Action<int, string>
Parameters:
| Name | Type | Description |
|---|---|---|
errorCode |
int |
Error code indicating the failure reason |
errorMessage |
string |
Human-readable error description |
Example:
void OnEnable()
{
    VitureXR.Capture.recordingStartFailure += HandlerecordingStartFailure;
}

void OnDisable()
{
    VitureXR.Capture.recordingStartFailure -= HandlerecordingStartFailure;
}
recordingSaveSuccess
Invoked when recording is saved successfully. Parameter: filePath.
Signature: Action<string>
Parameters:
| Name | Type | Description |
|---|---|---|
filePath |
string |
Full path to the saved video file |
Example:
void OnEnable()
{
    VitureXR.Capture.recordingSaveSuccess += HandlerecordingSaveSuccess;
}

void OnDisable()
{
    VitureXR.Capture.recordingSaveSuccess -= HandlerecordingSaveSuccess;
}
recordingSaveFailure
Invoked when recording fails to save. Parameters: errorCode, errorMessage.
Signature: Action<int, string>
Parameters:
| Name | Type | Description |
|---|---|---|
errorCode |
int |
Error code indicating the failure reason |
errorMessage |
string |
Human-readable error description |
Example:
void OnEnable()
{
    VitureXR.Capture.recordingSaveFailure += HandlerecordingSaveFailure;
}

void OnDisable()
{
    VitureXR.Capture.recordingSaveFailure -= HandlerecordingSaveFailure;
}
advertisingStarted
Invoked when the neckband starts advertising and becomes discoverable to mobile devices.
Signature: Action
Example:
void OnEnable()
{
    VitureXR.Capture.advertisingStarted += HandleadvertisingStarted;
}

void OnDisable()
{
    VitureXR.Capture.advertisingStarted -= HandleadvertisingStarted;
}
advertisingStopped
Invoked when the neckband stops advertising.
Signature: Action
Example:
void OnEnable()
{
    VitureXR.Capture.advertisingStopped += HandleadvertisingStopped;
}

void OnDisable()
{
    VitureXR.Capture.advertisingStopped -= HandleadvertisingStopped;
}
clientConnected
Invoked when a mobile device connects to the neckband.
Signature: Action
Example:
void OnEnable()
{
    VitureXR.Capture.clientConnected += HandleclientConnected;
}

void OnDisable()
{
    VitureXR.Capture.clientConnected -= HandleclientConnected;
}
clientDisconnected
Invoked when the connected mobile device disconnects.
Signature: Action
Example:
void OnEnable()
{
    VitureXR.Capture.clientDisconnected += HandleclientDisconnected;
}

void OnDisable()
{
    VitureXR.Capture.clientDisconnected -= HandleclientDisconnected;
}
alignmentCalibrationStarted
Invoked when an alignment calibration session starts with the selected alignment mode.
Signature: Action<ViewShareAlignmentMode>
Parameters:
| Name | Type | Description |
|---|---|---|
errorCode |
ViewShareAlignmentMode |
Error code indicating the failure reason |
Example:
void OnEnable()
{
    VitureXR.Capture.alignmentCalibrationStarted += HandlealignmentCalibrationStarted;
}

void OnDisable()
{
    VitureXR.Capture.alignmentCalibrationStarted -= HandlealignmentCalibrationStarted;
}
alignmentCalibrationStopped
Invoked when the current alignment calibration session stops.
Signature: Action
Example:
void OnEnable()
{
    VitureXR.Capture.alignmentCalibrationStopped += HandlealignmentCalibrationStopped;
}

void OnDisable()
{
    VitureXR.Capture.alignmentCalibrationStopped -= HandlealignmentCalibrationStopped;
}
alignmentCheckStarted
Invoked when an alignment check session starts.
Signature: Action
Example:
void OnEnable()
{
    VitureXR.Capture.alignmentCheckStarted += HandlealignmentCheckStarted;
}

void OnDisable()
{
    VitureXR.Capture.alignmentCheckStarted -= HandlealignmentCheckStarted;
}
alignmentCheckStopped
Invoked when the current alignment check session stops.
Signature: Action
Example:
void OnEnable()
{
    VitureXR.Capture.alignmentCheckStopped += HandlealignmentCheckStopped;
}

void OnDisable()
{
    VitureXR.Capture.alignmentCheckStopped -= HandlealignmentCheckStopped;
}
streamingStarted
Invoked when a streaming session starts.
Signature: Action
Example:
void OnEnable()
{
    VitureXR.Capture.streamingStarted += HandlestreamingStarted;
}

void OnDisable()
{
    VitureXR.Capture.streamingStarted -= HandlestreamingStarted;
}
streamingStopped
Invoked when the current streaming session stops.
Signature: Action
Example:
void OnEnable()
{
    VitureXR.Capture.streamingStopped += HandlestreamingStopped;
}

void OnDisable()
{
    VitureXR.Capture.streamingStopped -= HandlestreamingStopped;
}
StartRecording(bool captureVirtualLayer, bool captureRealWorldLayer, bool captureAppAudio, bool captureMicrophoneAudio)
Starts recording XR content with the specified capture options.
Note: At least one visual layer (virtual or real-world) must be enabled.
Note: Real-world layer capture requires VITURE Luma Pro, Luma Ultra, Luma Cyber, or Beast glasses.
Note: Audio capture (
captureAppAudioandcaptureMicrophoneAudio) is not currently supported and will be available in future releases.
Parameters:
| Name | Type | Description |
|---|---|---|
captureVirtualLayer |
bool |
If true, captures Unity-rendered content. |
captureRealWorldLayer |
bool |
If true, captures physical RGB camera feed. |
captureAppAudio |
bool |
If true, captures application audio output. (Not currently supported) |
captureMicrophoneAudio |
bool |
If true, captures microphone audio input. (Not currently supported) |
Returns: void
Example:
// Record mixed reality (virtual + real-world)
VitureXR.Capture.StartRecording(
    captureVirtualLayer: true,
    captureRealWorldLayer: true,
    captureAppAudio: false,
    captureMicrophoneAudio: false
);

// Record virtual content only
VitureXR.Capture.StartRecording(true, false, false, false);
StopRecording()
Stops the current recording and saves the video file.
Note: Listen to recordingSaveSuccess or recordingSaveFailure events to get the result.
Returns: void
Example:
VitureXR.Capture.StopRecording();
StartViewShare()
Starts advertising to nearby mobile devices on the same local network.
Note: /// View Share allows a mobile device to capture a third-person view of the mixed reality experience. /// The typical workflow is: ///
///
/// Call- ///
Conn ection: Mobile device connects to the neckband. - ///
Alignment calibration: Both devices align their coordinate systems. - ///
Alignment check: User visually verifies alignment accuracy. - ///
Streaming: AR content is streamed to the mobile device. to stop advertising and disconnect any connected client. ///
Returns: void
Example:
VitureXR.Capture.StartViewShare();
StopViewShare()
Stops advertising and disconnects any connected mobile device.
Returns: void
Example:
VitureXR.Capture.StopViewShare();
SendTrackedMarkerPose(Vector3 position, Quaternion rotation)
Sends the tracked marker pose to the mobile device for marker-based alignment calibration.
Parameters:
| Name | Type | Description |
|---|---|---|
position |
Vector3 |
The marker position in the neckband's coordinate system. |
rotation |
Quaternion |
The marker rotation in the neckband's coordinate system. |
Returns: void
Example:
VitureXR.Capture.SendTrackedMarkerPose(/* position */, /* rotation */);
GetLocalIpAddress()
Gets the local IPv4 address of this device.
Returns: string - The first IPv4 address found.
Example:
var result = VitureXR.Capture.GetLocalIpAddress();
Camera.RGB
The VitureXR.Camera.RGB class provides static methods and properties to control the RGB camera lifecycle, manage resolution, and listen to frame events.
Properties
isSupported
Type: bool (Read-only)
Returns true if the current device has an RGB camera. Check this before attempting to use any camera functionality.
Example:
if (VitureXR.Camera.RGB.isSupported)
{
    Debug.Log("RGB camera is available on this device");
}
isActive
Type: bool (Read-only)
Returns true if the RGB camera is currently streaming frames. Use this to determine if the camera has been successfully started.
Example:
if (VitureXR.Camera.RGB.isActive)
{
    Debug.Log("Camera is actively streaming");
}
currentResolution
Type: Vector2Int (Read-only)
Gets the current output resolution of the camera. Returns the default resolution when the camera is not active.
Example:
var resolution = VitureXR.Camera.RGB.currentResolution;
Debug.Log($"Current resolution: {resolution.x}x{resolution.y}");
Events
frameAvailable
Triggered when a new camera frame becomes available for processing.
Signature: Action<long> - Parameter is the frame timestamp in nanoseconds.
Behavior:
- Fired on the main thread
- Includes precise frame timestamp for synchronization
- Use for frame-based event handling
Example:
void OnEnable()
{
    VitureXR.Camera.RGB.frameAvailable += OnFrameAvailable;
}

void OnDisable()
{
    VitureXR.Camera.RGB.frameAvailable -= OnFrameAvailable;
}

void OnFrameAvailable(long timestampNs)
{
    // Process new frame
    Debug.Log($"New frame available at {timestampNs} ns");
}
Methods
GetDefaultResolution()
Retrieves the default camera resolution for the connected glasses model. This resolution varies by device model and cannot be changed.
Returns: Vector2Int - Default resolution (e.g., 1920x1080).
Example:
var defaultRes = VitureXR.Camera.RGB.GetDefaultResolution();
Debug.Log($"Default: {defaultRes.x}x{defaultRes.y}");
GetSupportedResolutions()
Retrieves all resolutions supported by the camera. Use this to populate UI dropdown menus or validate user input.
Returns: Vector2Int[] - Array of supported resolutions.
Example:
var resolutions = VitureXR.Camera.RGB.GetSupportedResolutions();
foreach (var res in resolutions)
{
    Debug.Log($"Supported: {res.x}x{res.y}");
}
Start()
Starts the RGB camera with the default resolution for the connected glasses model.
Behavior:
- Acquires the camera on the GL thread
- Initializes the native texture pipeline
- Fires
frameAvailableevent when frames are ready - Check
isActiveor listen toframeAvailableto determine readiness
Example:
if (VitureXR.Camera.RGB.isSupported)
{
    VitureXR.Camera.RGB.Start();
    // Wait for frameAvailable event or check isActive
}
Start(int width, int height)
Starts the RGB camera with a specified custom resolution.
Parameters:
width(int): Desired width in pixels. Must be a supported resolution.height(int): Desired height in pixels. Must be a supported resolution.
Constraints:
- Resolution must be in the list returned by
GetSupportedResolutions() - Custom resolutions cannot be used during First-Person Recording (recording always uses default resolution)
- To change resolution on an active camera, call
Stop()first, thenStart()with the new resolution
Example:
// Get supported resolutions
var supported = VitureXR.Camera.RGB.GetSupportedResolutions();

// Start with custom resolution if available
if (supported.Contains(new Vector2Int(1280, 720)))
{
    VitureXR.Camera.RGB.Start(1280, 720);
}
else
{
    VitureXR.Camera.RGB.Start(); // Fallback to default
}
Changing Resolution:
// Change resolution on active camera
VitureXR.Camera.RGB.Stop();
VitureXR.Camera.RGB.Start(1920, 1080);
Stop()
Stops the RGB camera and releases resources.
Behavior:
- Stops the native camera stream
- Releases OES texture resources
- Automatically called on app pause, focus loss, or exit
- Safe to call multiple times
Example:
VitureXR.Camera.RGB.Stop();
Debug.Log($"Camera stopped. isActive: {VitureXR.Camera.RGB.isActive}");
GetNativeTextureId()
Gets the native texture ID for the camera frame, useful for advanced rendering scenarios.
Returns: int - The native texture ID. Returns 0 if the camera is not active.
Use Cases:
- Creating external textures with
Texture2D.CreateExternalTexture() - Custom rendering pipelines
- Direct GPU access
Example:
int textureId = VitureXR.Camera.RGB.GetNativeTextureId();
if (textureId > 0)
{
    var externalTexture = Texture2D.CreateExternalTexture(
        1920, 1080, TextureFormat.RGBA32, false, false,
        new IntPtr(textureId));
}