Pro & One Series XR Glasses
VITURE Pro XR Glasses
Our biggest and brightest display yet: VITURE Pro XR Glasses feature a fully private 135", 120Hz full-HD UltraClarity™ display, projecting at 4000 nits (1000 nits perceived) for an immersive visual experience 15" larger, 120% brighter, and double the refresh rate than any we've released before.
With edge-to-edge clarity thanks to UltraClarity™, even small text is readable on the XR Glasses' giant display, with anti-glare, anti-ghost, and anti-motion sickness for maximum comfort and immersion.
VITURE Pro XR Glasses are also the first and only XR Glasses to feature myopia adjustments on the latest Sony micro OLED panel and newly improved electrochromic film that blocks up to 99.5% of external light, making lens shades a thing of the past. And though VITURE Pro XR Glasses' display is our sharpest and brightest yet, it's also SGS A+ certified to cause less eye strain than your phone.
Enjoy absolute, effortless privacy everywhere you go as UltraFreedom™ keeps you fully incognito, guaranteeing no visible content on the outer lenses and no sound-bleed disturbance for those around you to those around you — all thanks to our redesigned display and stunning stereo soundscape engineered in partnership with HARMAN.
With all this wrapped in a full-metal aircraft-grade aluminum body (with titanium hinges), VITURE Pro XR Glasses are built to last — but great hardware is only half the equation. Paired with our exclusive SpaceWalker app (available free on iOS, Android, macOS, and coming soon to Windows), you can unlock multiple virtual screens, a suite of productivity tools, native 3D/VR video support (+ spatial video on iPhone 15 Pro), and more. Together, VITURE Pro XR Glasses are the ultimate way to work, stream, and game on any device, anywhere, anytime.
Key Features
- 135'' Giant Screen: Unlock a giant, 135" 49 PPD virtual screen displaying 1080p at 120fps for fully engrossing visual immersion.
- Lightweight: VITURE Pro XR Glasses weigh in at just 77g. Easy to wear for hours of uninterrupted immersion (even on the move).
- Native 3D Support: VITURE Pro XR Glasses feature native Full SBS 3D video (3840×1080) support.
- Electrochromic Film: VITURE Pro XR Glasses arm with a better tint-changing film – easily adjust the brightness and background for the best picture quality day and night. You cannot barely notice the light in the real world when turning on Electrochromic Film.
- Myopia Adjustments: Don't let a little myopia get in your way: easily adjust the dials above XR Glasses' lenses to your vision prescription for crystal-clarity as you immerse yourself in the worlds of your choosing. VITURE Pro XR Glasses support adjusting the virtual image up to -5.0D (500 degrees) for users with myopia (nearsightedness).
- Spatial Sound: VITURE is proud to have partnered with top audio company HARMAN, creator of AudioEFX. AudioEFX offers an ideal solution to improve sound for small speakers in portable and multimedia devices. The XR Glasses' reverse sound field design effectively reduces noise leakage to 30 decibels at a distance of 20cm (8in) from the speakers, ensuring excellent sound quality and no disturbance to those around you.
Make Your XR Glasses Better
Pair your VITURE Pro XR Glasses with the Neckband for an all-in-one experience preloaded with all your favorite apps and support for your favorite Bluetooth game controller, headset, and more.
Or try the Mobile Dock, the perfect pairing for the avid Switch player or TV stick user.
Get the VITURE Pro Mobile Dock
What's in the Box
- VITURE Pro XR Glasses
- Nose Pads (4 sizes: 1, 2, 3, and 4*)
- VITURE XR Glasses USB-C to Magnetic Connector Cable
- Glasses Case
- Anti-Clip Hair Cover
* Nose Pads #4 is customizable for your individual nose shape. If the other nose pads aren't right, gently bend or spread #4's stems to find the fit that allows you to see the full display.
VITURE One Series XR Glasses
Enjoy your favorite movies, games, and shows on the go — VITURE One XR Glasses harness the power of the cloud for next-gen entertainment anywhere, anytime.
The first XR Glasses to use adjustable electrochromic film, VITURE XR Glasses display a seamless, pixel-free virtual screen right before your eyes and are compatible with any USB-C device capable of video and power output including Steam Deck, ROG Ally, MacBook, iPad, and many Android phones right out of the box.
Simply connect your device, put on VITURE One XR Glasses, and see the future.
Features
- 120" Giant Screen: Unlock a giant, 120" 55 PPD virtual screen displaying 1080p at 60fps for fully engrossing visual immersion.
- Lightweight: VITURE One XR Glasses weigh in at just 78g. Easy to wear for hours of uninterrupted immersion (even on the move).
- Native 3D support: VITURE One XR Glasses feature native Full SBS 3D video (3840×1080) support.
- Built-In 3DoF Support (Beta): As the only XR glasses with native 3DoF support, your screen will "float" in the air as you turn your head when this mode is turned on.
- Electrochromic Film: VITURE One XR Glasses are the first with a tint-changing film – easily adjust the brightness and background for the best picture quality day and night. Please note that the Lite XR Glasses do not use electrochromic film; instead, they can turn the screen on and off.
- Myopia Adjustments: Don't let a little myopia get in your way: easily adjust the dials above VITURE One's lenses to your vision prescription for crystal-clarity as you immerse yourself in the worlds of your choosing. VITURE One XR Glasses support adjusting the virtual image up to -5.0D (500 degrees) for users with myopia (nearsightedness).
- Spatial Sound: VITURE is proud to have partnered with top audio company HARMAN, creator of AudioEFX. AudioEFX offers an ideal solution to improve sound for small speakers in portable and multimedia devices. The XR Glasses' reverse sound field design effectively reduces noise leakage to 30 decibels at a distance of 20cm (8in) from the speakers, ensuring excellent sound quality and no disturbance to those around you.
Make Your XR Glasses Better
Pair your VITURE One XR Glasses with the Neckband for an all-in-one experience preloaded with all your favorite apps and support for your favorite Bluetooth game controller, headset, and more.
Or try the Mobile Dock, the perfect pairing for the avid Switch player or TV stick user.
Get the VITURE Pro Mobile Dock
What's in the Box
VITURE One XR Glasses
- VITURE One XR Glasses
- Nose Pads (4 sizes: 1, 2, 3, and 4*)
- VITURE XR Glasses USB-C to Magnetic Connector Cable
- Glasses Case
- Anti-Clip Hair Cover
VITURE One Lite XR Glasses
- VITURE One Lite XR Glasses
- Nose Pads (4 sizes: 1, 2, 3, and 4*)
- USB-C to USB-C cable
- Glasses Case
- VITURE XR Glasses Lens Shade
* Nose Pads #4 is customizable for your individual nose shape. If the other nose pads aren't right, gently bend or spread #4's stems to find the fit that allows you to see the full display.
Tutorial Video
Buttons & Modes
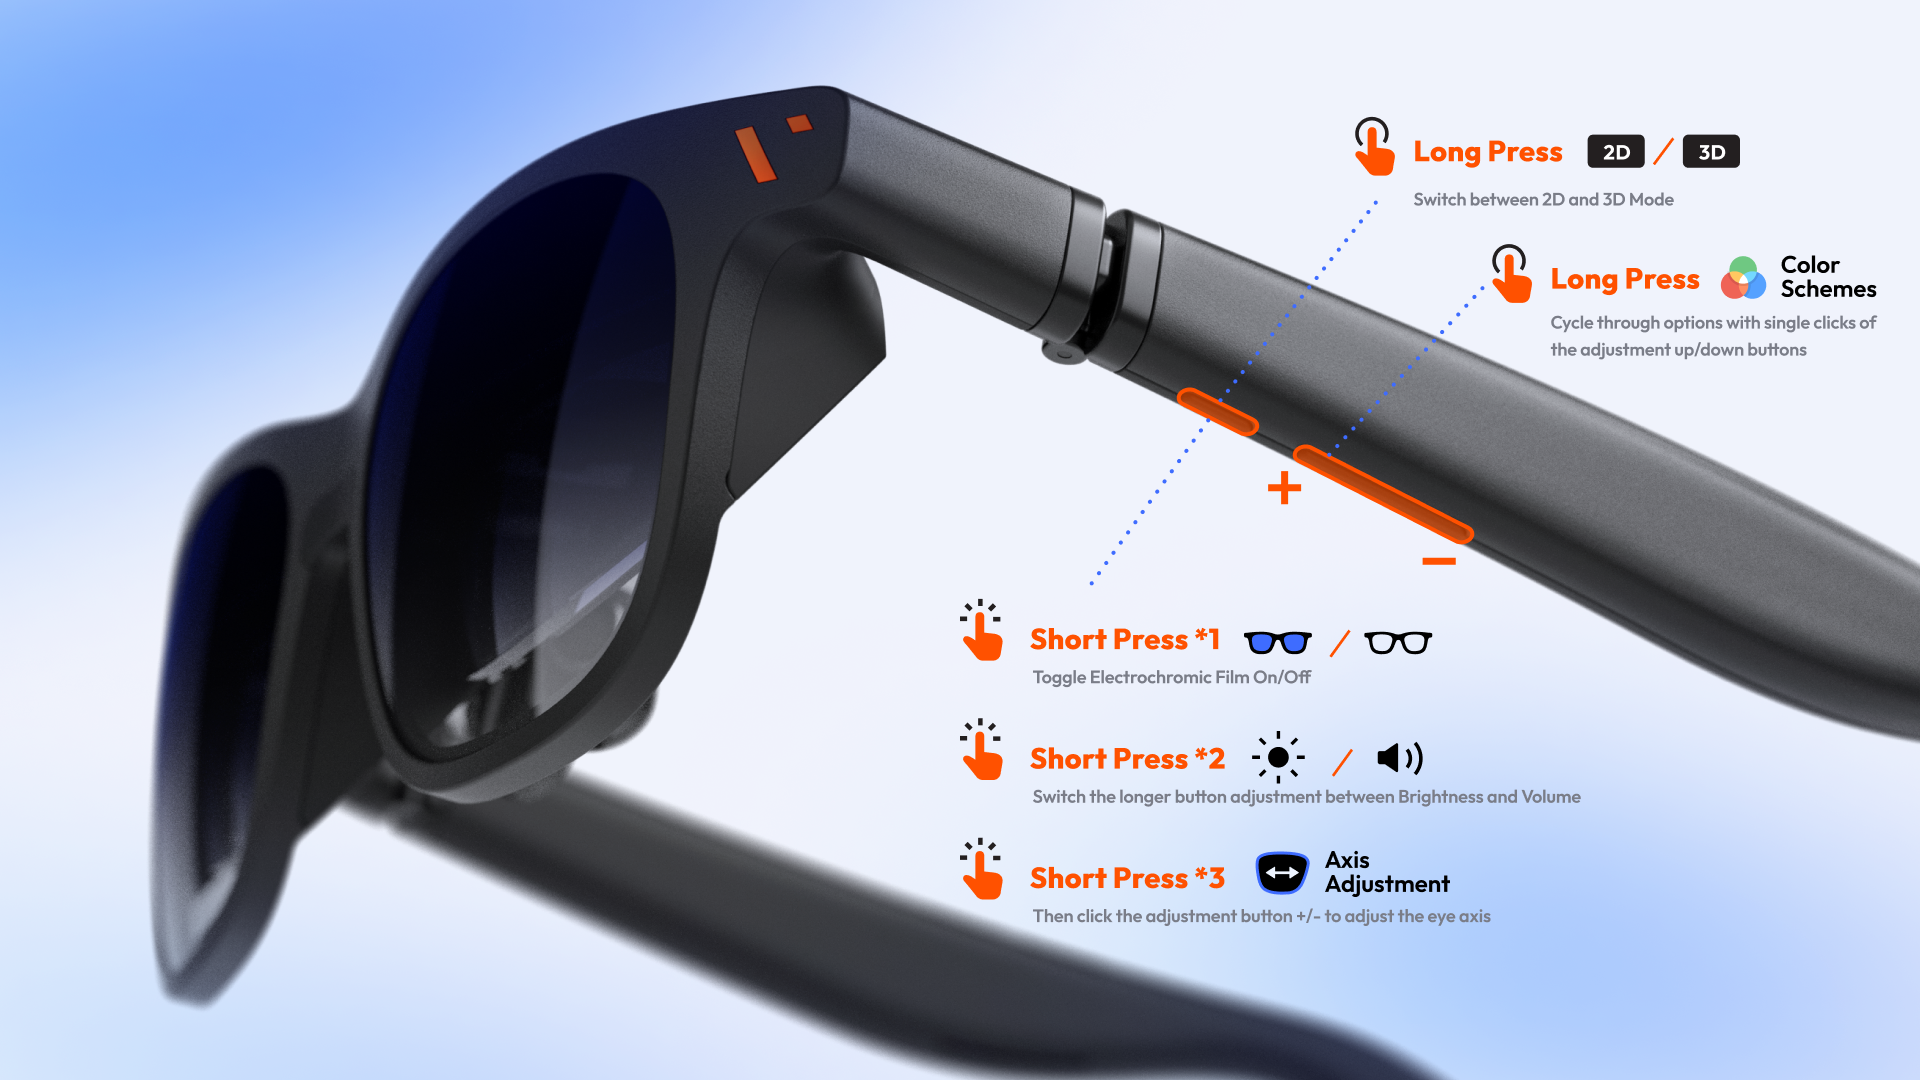
Image shown is Pro XR Glasses. See the list below for One series details.
| Control | Description |
|---|---|
| Adjust brightness/volume | Press the Adjustment button (long button) to increase or decrease the brightness (default) or volume. |
| Switch between brightness and volume adjustment | The default is brightness adjustment, double-press the Mode button (short button) to switch to volume adjustment. |
| Turn Electrochromic Film on or off | Press the Mode button. |
| Switch between 2D and 3D Modes | Press and hold the Mode button. |
| Switch between color schemes* | Press and hold the Adjustment + button to open the color scheme selection menu, then use the Adjustment up/down buttons to cycle through the options. |
| Adjust eye axis* | Triple-press the Mode button, then press the adjustment button +/- to adjust the eye axis. |
| Turn off the Screen | Press and hold the - button. Press any button to turn on the screen. |
| Switch between 0DoF and 3DoF (beta) ** | Triple-press the Mode button. |
Features marked with * are supported on Pro XR Glasses only. Features marked with ** are supported on Pro XR Glasses only. 3DoF is currently a beta feature and does not represent the final experience. We are constantly working to improve this feature.
Get to know VITURE One XR Glasses' buttons and modes, please watch this video.
Button functions may vary depending on the firmware version. To fully utilize your VITURE Pro XR Glasses, ensure you’re running the latest firmware. Click here to update.
Choose the Right Nose Pad
When wearing VITURE XR Glasses, the virtual screen should be unobstructed and centered in your line of sight. Try nose pads sizes 0, 1, 2 and 3 (or no nose pads at all) to find the best fit.
If none of the four nose pads fit perfectly, gently bend or spread size #3's stems to find the fit that allows you to see the full display. Refer to this video for instructions.
To remove nose pads:
- Hold the XR Glasses upright with one hand, so that the temples are away from you.
- With your other hand, put your thumb between the lenses, touching the metal wire pad arms.
- Push forward with your thumb until the nose pads come off.
To install the nose pads:
- With one hand, rotate and hold the nose pads with the size facing you and the number upright.
- With your other hand, hold the XR Glasses upright so that the temples are close to you.
- Slide the nose pads into the bridge of the XR Glasses until you hear a click.
Myopia Adjustment
VITURE XR Glasses have built-in support for adjusting the virtual image up to -6.0D (600 degrees, there are differences between models) for users with myopia (nearsightedness).
Adjust the rotary knobs on the top of your XR Glasses until the image is sharp and clear.
For users with severe astigmatism or myopia prescriptions of -6.0D and beyond, the Prescription Lens Frame allows you to attach your own prescription lenses to VITURE XR Glasses and experience the same immersive virtual entertainment as everyone else.
Connect to Your Devices
To connect your XR Glasses to a laptop, smartphone, or tablet, follow these steps:
- Clip the USB-C to Magnetic Connector Cable (included) to the magnetic port on your XR Glasses. Then, plug the USB-C end of the cable into your device.
- Turn on and unlock your device. The XR Glasses will power on automatically.
If there is no display on your XR Glasses, try disconnecting any other external displays connected to your device. Some device models support only one external display. Alternatively, connect to a different USB-C port on your device and try again.
To adjust mirror settings, access your device's system settings:
- On Macs, go to System Settings > Displays, choose VITURE, and modify the "use as" settings from the dropdown menu.
- On iPads, go to Settings > Display & Brightness > Displays > Arrangement.
- On PCs, go to Settings > Display.
To confirm compatibility with VITURE XR Glasses, refer to your device's manufacturer specifications. Look for keywords such as DisplayPort over USB-C, DP Alt Mode, Alt DP over USB-C, or Thunderbolt 4.
Please check this list for VITURE-certified supported mobile devices.
See also: Connect the Neckband to the XR Glasses
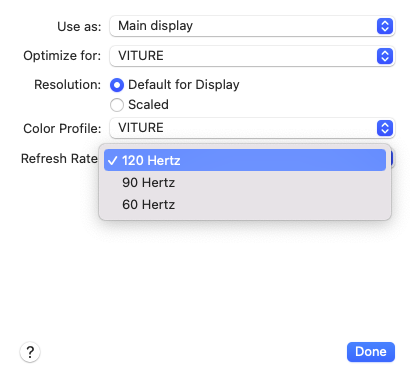
Change Display Refresh Rate
This feature is available on VITURE Pro XR Glasses. VITURE One XR Glasses only support 60 Hz.
Supports Refresh Rate:
- 120Hz
- 90Hz
- 60Hz
Windows PC
- Open the Start menu and select Settings.
- Navigate to System > Display.
- Under "Advanced display," select your VITURE display.
- From the "Choose a refresh rate" dropdown menu, select your desired refresh rate.
MacBook
- Open the Apple menu and select System Settings (or System Preferences).
- Click on Displays.
- Choose your VITURE display.
- Click the "Refresh Rate" pop-up menu and select your desired refresh rate.
SpaceWalker for Desktop (Mac & Windows)
SpaceWalker for Mac and Windows allows you to select a refresh rate (120Hz, 90Hz, or 60Hz) every time you launch the app with XR Glasses.
SpaceWalker app will remember the last refresh rate you selected for your VITURE XR Glasses and use it by default when you launch the app again.
Learn more:
Selecting A Refresh Rate - SpaceWalker for Desktop
SpaceWalker for iOS
To unlock refresh rate selection on iOS, you'll need both Pro XR Glasses and the USB-C XR Charging Adapter connected to your iPhone.
Once connected, an option to choose between 120Hz, 90Hz, or 60Hz will appear within the on-screen menu of SpaceWalker app on your iPhone.
The function to switch the refresh rate directly within SpaceWalker is coming soon for Android.
VITURE One Neckband, VITURE Pro Mobile Dock, and VITURE One Mobile Dock only support a 60Hz refresh rate. Adjusting the refresh rate is not supported on these accessories.
Change Color Mode
This feature is available on VITURE Pro XR Glasses. VITURE One XR Glasses not supported.
The following color modes are available:
- True Color (default)
- Vivid
- Film
- Warm
- Cold
Accessing the Color Mode Menu: Press and hold the Adjustment button +.
Then: Use the Adjustment up/down buttons to cycle through modes.
A UI prompt, similar to the image below, will show the selected color scheme.

Note: Some color modes may be unavailable or missing if your XR Glasses are running an older firmware version. To fully utilize this feature, make sure your XR Glasses are updated to the latest firmware. Click here to update.
Learn more: Update Your XR Glasses
Update Your XR Glasses' Firmware
Before using your XR Glasses, we highly recommend updating the firmware for a better experience and advanced features.
You can update your XR glasses firmware in several ways, including through the web, an Android device, a Mac, or a Windows device.
View the firmware release history here.
Update via Web
Notes:
- Make sure you are using Google Chrome (version 98 or later).
- Before connecting, ensure your device is not being used by other applications.
- To use VITURE Luma Ultra XR Glasses with this tool on Windows, first download SpaceWalker for Windows (driver included).
- Do not unplug the XR Glasses or refresh the page during the update process unless otherwise specified.
- If the update failed, please refer to this page for troubleshooting.
- Unplug the XR Glasses only after you see the Update Successful message.
Update via Android Phones & Tablets
You can use an Android device with a USB-C port to update your XR Glasses' firmware. Even if your Android phone or tablet doesn't support DP Alt Mode, you can still use it for updating the firmware.
- Download the Neckband Remote or SpaceWalker app on Google Play Store.
- At the top left, tap the = icon. Then tap Firmware Update.
- Connect your XR Glasses to your Android device.
- Your device will ask you to allow the app to access the USB device so that it can read the firmware version of your XR Glasses.
- If there is an update available, tap UPDATE NOW, then confirm UPDATE NOW in the pop-up window the start the update process.
- Your device may ask you to allow the app to access the USB device. If so, tap OK to start updating MCU firmware. Do not unplug or disconnect the USB connection during the update process.
- After finishing the MCU firmware update, your mobile device will ask you to allow the app to access the USB device again. A DP firmware update process will start.
If the update process is stuck at MCU 100% and the permission request does not show up within 5 seconds, try unplugging the USB connection and reconnecting. Or, restart the Neckband Remote app then tap UPDATE NOW to go on to update DP firmware.
Update via Mac or Windows
SpaceWalker for Mac and Windows also offers a simple way to update your XR Glasses to the latest firmware.
Click the links for more information on SpaceWalker for Desktop.
Calibrate Your XR Glasses' IMU
We recommend calibrating your XR Glasses' IMU after updating the firmware. A calibrated IMU will give you a lower drift rate and higher accuracy. You can also choose to enable/disable Wearer Detection.
Additionally, Luma Ultra XR Glasses doesn't require IMU calibration. This page doesn't support the Luma Ultra XR Glasses.
Set the Resolution on Your Console
While not strictly necessary for using XR Glasses on handheld consoles like Steam Deck or ROG Ally, adjusting your console's settings can enhance your gaming experience.
External Display Resolution
Connect your XR Glasses to your console.
To optimize your gaming experience on Steam Deck, follow these steps:
- Press the left Steam button on your Steam Deck.
- Navigate to Settings > Display.
- Set the external display resolution to 1920x1080@120Hz.
Tips:
- Set your external display resolution to 1080p (1920x1080) for optimal image quality.
- Pro XR Glasses users: For smoother visuals, enable a 120Hz refresh rate on your external display.
Adjust Game Settings
- Access the properties of the game you want to play by clicking the gear icon.
- Under the Display tab, select "Native" resolution.
Tips:
- Ideally, set the game resolution to 1080p for the best image quality.
- To conserve battery life, you can lower the game resolution, but this might result in a slightly blurred image.
In-game Settings
Configure in-game settings following these steps:
- Launch the game.
- Open the in-game settings or options menu.
- Change the resolution to 1920x1080.
- Consider disabling VSync for potential performance gains.
- Adjust FPS to 120fps (For VITURE Pro XR Glasses users).
Enable 3DoF on Steam Deck
You only need to directly connect XR Glasses and Steam Deck to use the native IMU data of XR Glasses to enable 3DoF functionality. To achieve a better fixed-position screen effect, you need to install Decky Loader and the XR Gaming plugin on Steam Deck.
Install Decky Loader
This installation can be done without an admin/sudo password set.
- Prepare a mouse and keyboard if possible.
- Press the STEAM button and open the Power menu.
- Select "Switch to Desktop".
- Navigate to the GitHub page on a browser of your choice.
- Download the installer file. (If using Firefox, it will be named deckyinstaller.desktop.download. Rename it to deckyinstaller.desktop before running it)
- Drag the file onto your desktop and double click it to run it.
- Either type your admin password or allow Decky to temporarily set your admin password to Decky! (this password will be removed after the installer finishes)
- Choose the version of Decky Loader you want to install. Pre-releases are unlikely to be fully stable but contain the latest changes. But we recommend installing Pre-releases to get the latest features of the plugin.
- Open the Return to Gaming Mode shortcut on your desktop.
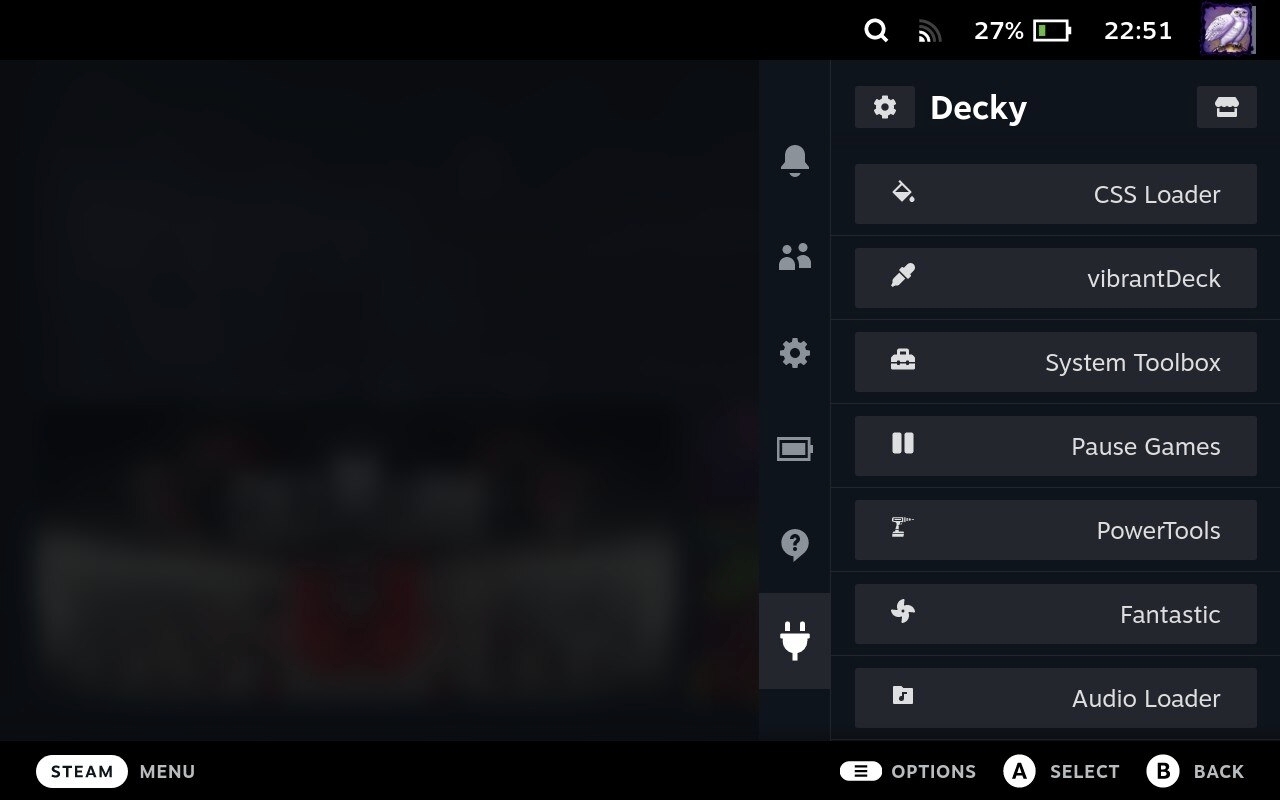
There is also a fast install for those who can use Konsole. Run
curl -L https://github.com/SteamDeckHomebrew/decky-installer/releases/latest/download/install_release.sh | sh
and type your password when prompted.
For more information about Decky Loader, please refer to this GitHub project: GitHub - decky-loader
Install XR Gaming Plugin
- Press the … button and navigate to the plugin icon. This is the Decky menu used for interacting with plugins and the loader itself.
- Select the store icon to open the Plugins Browser.
- In the search field, enter XR Gaming, select the "Install" button on the XR Gaming plugin. 4.
Enable 3DoF on Steam Deck
- Before using XR Gaming, you need to connect VITURE XR Glasses (including VITURE Pro XR Glasses, VITURE One XR Glasses, and VITURE One Lite XR Glasses) to Steam Deck.
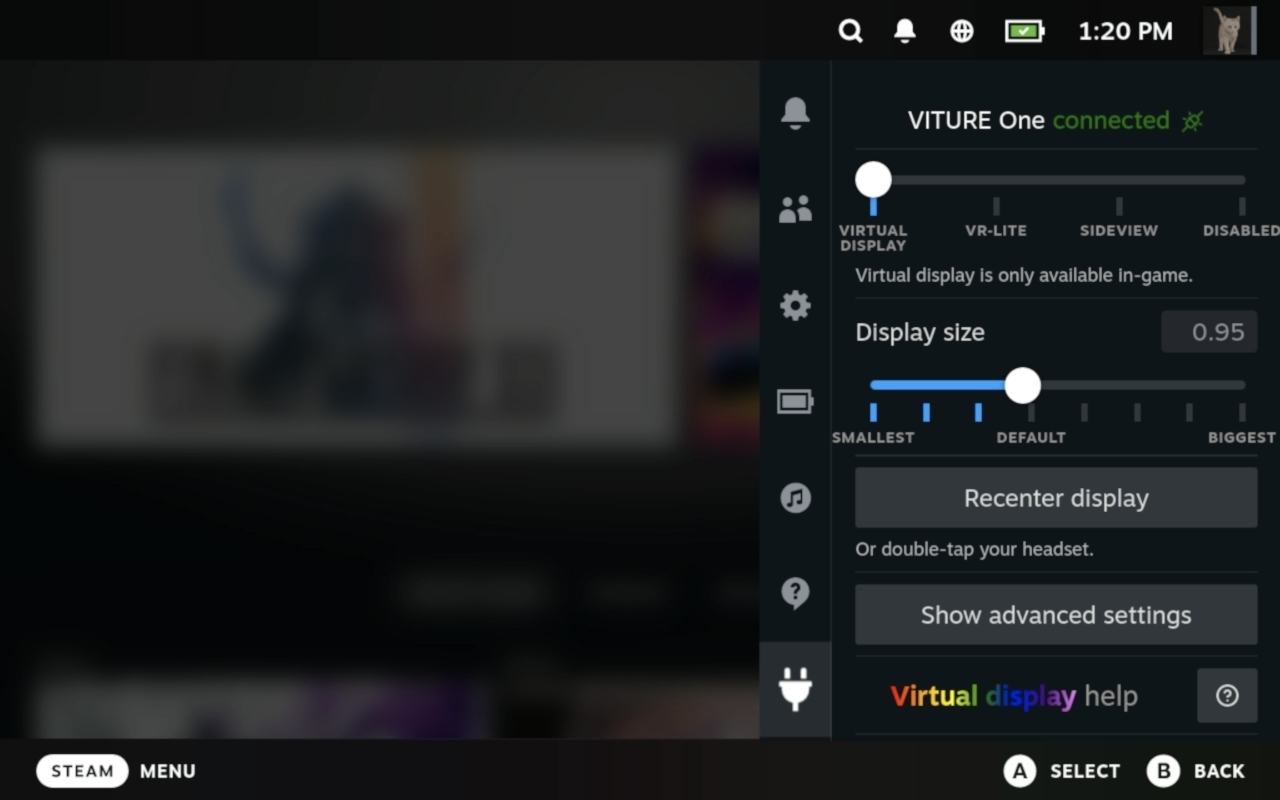
- After connecting the XR Glasses, click the … button, navigate to the Plugin icon, and open XR Gaming in Decky to access XR Gaming settings.
- The VIRTUAL DISPLAY option represents 3DoF, where a display will be rendered in a fixed position, allowing you to move your head to look at different parts of the screen.
- You can customize the screen size here. If the screen position is offset, you can click Recenter display to reset the screen to the center of your field of view.
- If you encounter significant offset during use, you can click Show advanced settings, expand it, and click Recalibrate headset to recalibrate XR Glasses.
Unleash the Power of XR Gaming Plugin
The XR Gaming plugin unlocks a suite of features designed to enhance your gaming experience:
Virtual Display: Pin your game screen in a virtual space, keeping it fixed in your view regardless of head movements. Perfect for strategy games or menus.
Side-by-Side 3D (Advanced feature for compatible games): Enable this mode to control the virtual screen distance and render games in stunning 3D (requires game support).
VR-Lite: Control the in-game camera (mouse look) using your head movements in first-person or third-person games. No VR setup needed!
Sideview: Discreetly display your game in a corner of your vision, allowing you to stay partially aware of your surroundings.
See what the developer are saying about XR Gaming on Reddit: Steam Deck VITURE support is ready! - Reddit
Visit this GitHub project to learn about the latest features and common issues of XR Gaming: GitHub - Decky-XRGaming
Adapters
USB-C XR Charging Adapter
iPhone 15 and later models can connect directly to VITURE XR Glasses for standard SpaceWalker features. But with the USB-C XR Charging Adapter, you unlock multiple virtual screens, Immersive 3D, Spatial Video support, and VR video playback — all while keeping your phone charged!
With the USB-C XR Charging Adapter, you get enhanced 3DoF tracking, VR capabilities, and multiscreen support on iPhones with a USB-C port.
Compatibility: All VITURE XR Glasses models except Luma Ultra Important: iPhone 16e & Air is not compatible with VITURE XR Glasses.
For further information, refer to USB-C XR Charging Adapter
HDMI XR Adapter
With the HDMI XR Adapter you can transform your iPhone 14 or earlier model into a portable XR workstation with multiple virtual screens, built-in VR video support, and a mobile cinema experience on XR Glasses' giant virtual display.
Designed for compatibility with the official Apple Lightning Digital AV Adapter. (The Apple Lightning Digital AV Adapter is available from Apple and must be purchased separately. Third-party adapters may be not compatible with the HDMI XR Adapter.)
This adapter is also great for gamers — a streamlined way to connect to your HDMI-compatible game consoles for a more immersive gaming experience on your XR Glasses.
Compatibility: All VITURE XR Glasses models except Luma Ultra
For further information, refer to HDMI XR Adapter.
Charging Adapter
Don't let a dead battery get in the way of your gaming — the USB-C to Glasses Charging Adapter is a must-have accessory that allows you to connect your device to your XR Glasses and charge up at the same time. Perfect for staying energized for hours of nonstop, uninterrupted immersion.
Compatibility: All VITURE XR Glasses models
Get the USB-C to Glasses and Charging Adapter.
| Color | Black |
|---|---|
| Weight | 22.5g |
| Dimensions | 160.0 × 35.0 × 10 (mm) |
| Connectors | USB-C |
| USB-C Video Output | 1920×1080 @ 60Hz, 3840×1080 @ 60Hz |
| USB Type | USB 3.2 Gen 1 (5Gbps) |
| Charging Power | 45W (5V~3A, 9V~2A, 12V~2A, 15V~3A) |
Cables
USB-C to Magnetic Connector Cable
This USB-C to Magnetic Connector Cable is great for having a little extra leeway to connect your VITURE Pro XR Glasses & VITURE One XR Glasses to compatible USB-C devices. With this cable, it's easy to connect, throw your device in a backpack, and keep moving without interrupting your favorite show or logging out of the game you just can't put down right now.
Compatibility: VITURE Luma Pro, Luma Ultra, Pro, and One XR Glasses
Get VITURE XR Glasses USB-C to Magnetic Connector Cable.
| Color | Black |
|---|---|
| Weight | 29.8g |
| Length | 120cm |
| Connectors | USB-C, Magnetic Connector |
| USB Type | USB 3.2 Gen1 |
| Data Transfer Rate | 10Gbit/s |
| Power | 20W (12V~1.65A, 9V~2A, 5V~3A) |
50cm USB-C Extension Cable
The USB-C Glasses Extension Cable provides extra length for using your XR Glasses.
This cable is compatible with any USB-C device compatible with VITURE XR Glasses, including many Android phones/tablets, PCs, MacBooks, iPads, Steam Deck, and more. Plug the USB-C end of the cable into any compatible device, and then connect to your XR Glasses via the magnetic connector.
Compatibility: All VITURE XR Glasses models
Get the 50cm USB-C Extension Cable.
| Color | Black |
|---|---|
| Weight | 18g |
| Length | 50cm |
| Connectors | USB-C |
| USB Type | USB 3.2 Gen1 |
| Data Transfer Rate | 10Gbit/s |
| Power | 20W (12V~1.65A, 9V~2A, 5V~3A) |
Lens Shade
Compatibility: VITURE Pro, One, and One Lite XR Glasses
Want the same level of detail and brightness at the park in broad daylight as you get at night in bed? The Lens Shade attachment fits directly onto your XR Glasses to completely block out all ambient light for the ultimate daytime visual experience.
The patented electrochromic lenses in the VITURE One XR Glasses are adjustable with opacity up to 30% — great for seeing the screen in almost any setting and perfect in the dark. Carry this attachment in your case to get that same experience anywhere — even at high noon.
| Color | Black |
|---|---|
| Dimensions | 143.7 × 50.2 × 15.0 mm |
| Weight | 8.9g |
| Material | ABS |
To install the Lens Shade for VITURE XR Glasses:
- Check your surroundings to ensure you are in a safe environment;
- Fold the temples of the XR Glasses in, holding them with one hand;
- With the other hand, align the top of the Lens Shade to the top of the XR Glasses;
- Rotate and push the Lens Shade towards the XR Glasses until there is no gap between the shade and each lens.
Note: The Lens Shade is compatible with VITURE Pro, One, and One Lite XR Glasses. It is not compatible with VITURE Luma, Luma Pro, Luma Ultra, or Beast XR Glasses.
Prescription Lens Frame
Compatibility: VITURE Pro, One, and One Lite XR Glasses
By default, VITURE XR Glasses frames include rotary knobs that allow for myopia adjustments for users with prescription lenses of up to -5.0D… But that's still not enough for everyone.
For users with severe astigmatism or myopia of -6.0D and beyond, the Prescription Lens Frame allows you to attach your own prescription lenses to your XR Glasses and experience the same immersive virtual entertainment as everyone else.
The Prescription Lens Frame is compatible with all VITURE XR Glasses models, including VITURE Pro XR Glasses, VITURE One XR Glasses, and VITURE One Lite XR Glasses.
After getting your custom lenses crafted, magnetically attach the frame to your VITURE XR Glasses: align the prescription lens frame to the XR Glasses' frame with the magnets facing the XR Glasses and the two frames will clip together automatically.
For a visual demonstration, please watch this video.
| Color | Black |
|---|---|
| Dimensions | 122.6 × 34.8 × 3.3 mm |
| Weight | 7.5g |
| Material | TR90 |
Note: The Prescription Lens Frame is compatible with VITURE Pro, One, and One Lite XR Glasses. It is not compatible with VITURE Luma, Luma Pro, Luma Ultra, or Beast XR Glasses.
Tech Specs Comparison
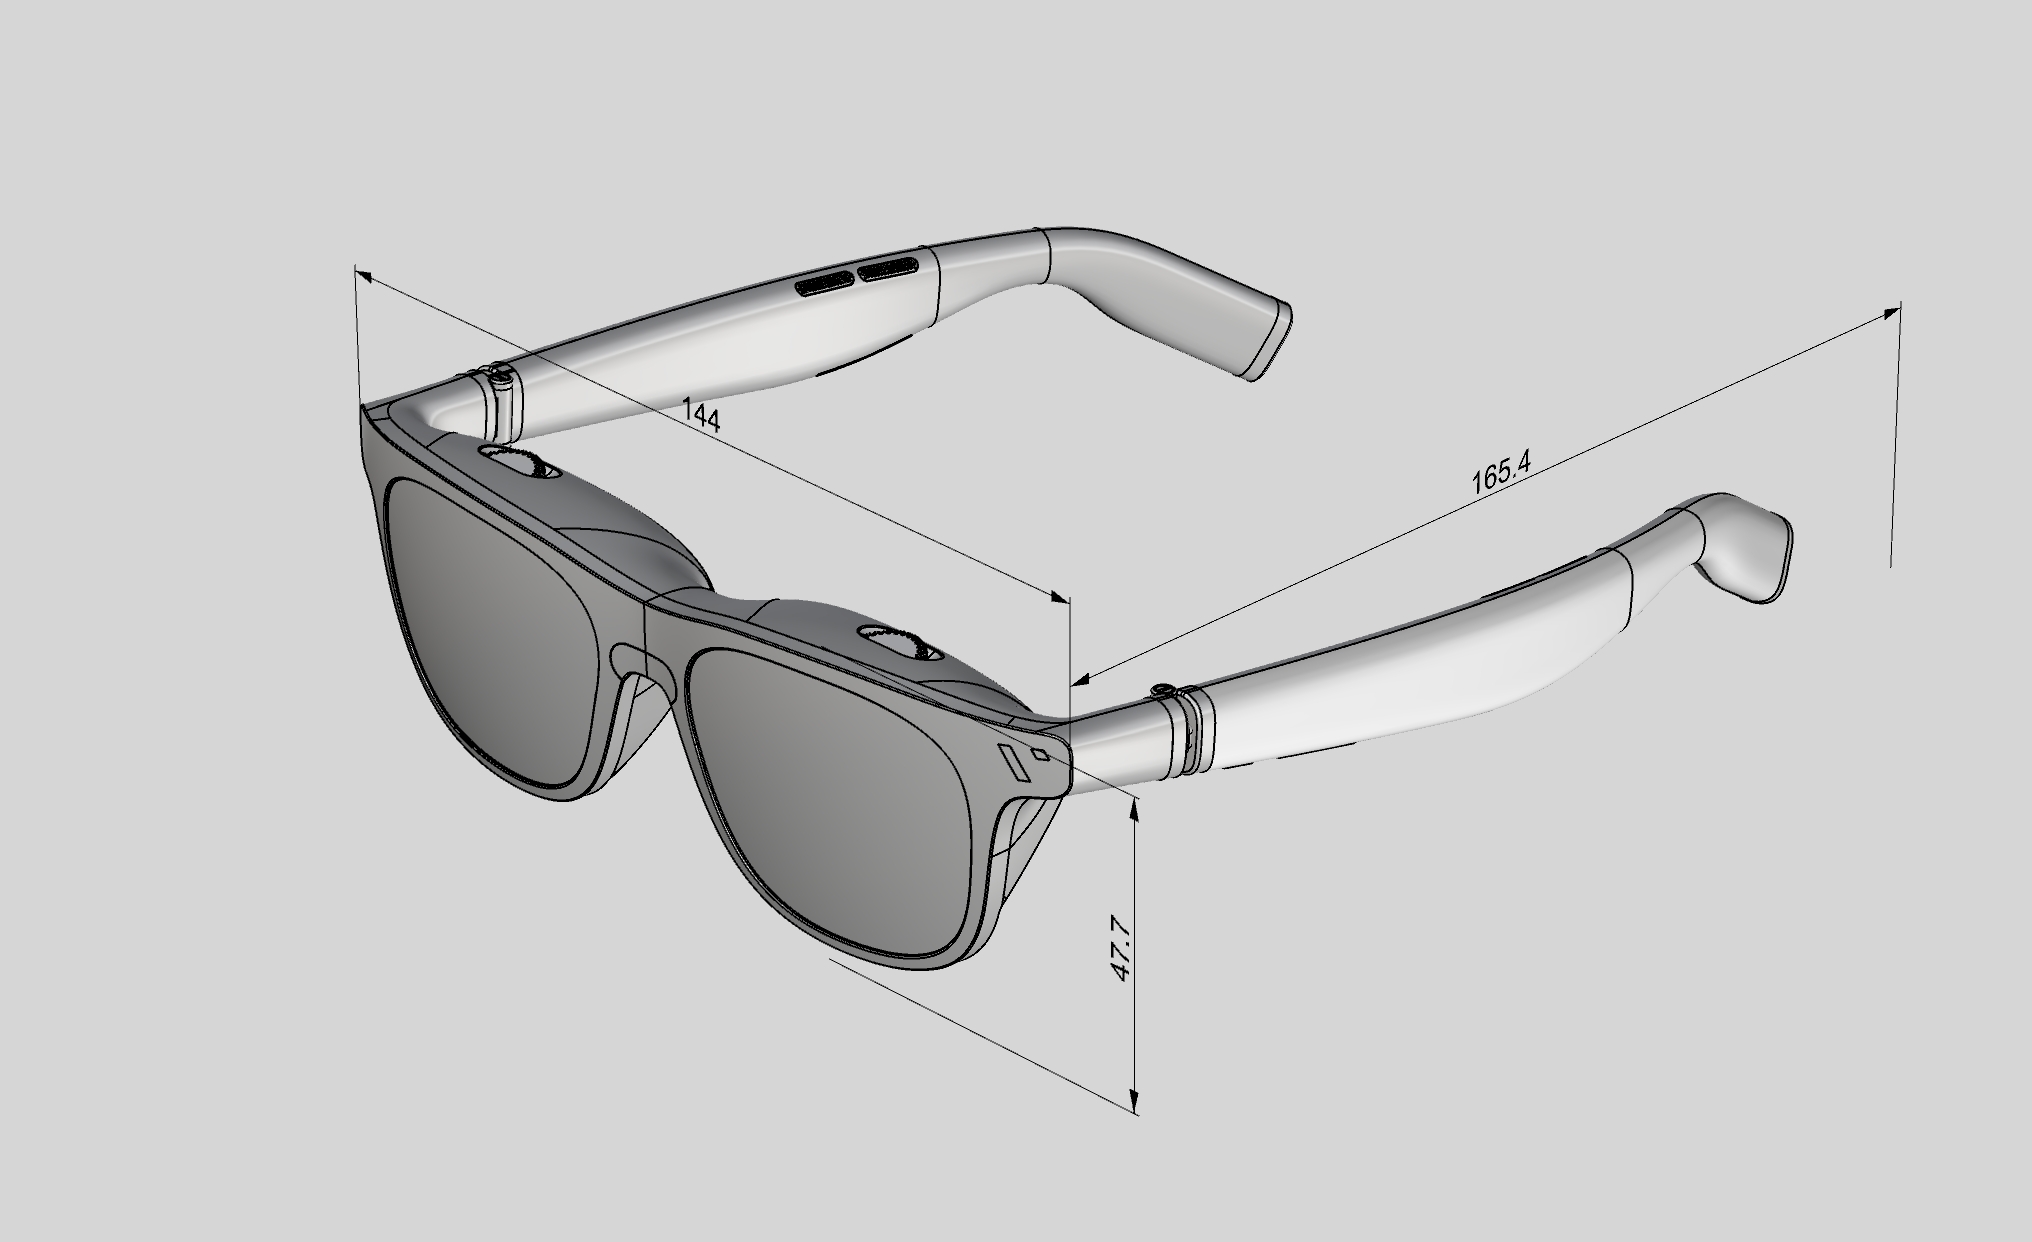
Verify the size of VITURE XR Glasses when unfolded in the image below.
| VITURE Pro XR Glasses | VITURE One XR Glasses | VITURE One Lite XR Glasses | |
|---|---|---|---|
| Dimensions of Glasses Case | 186.0 × 76.0 × 76.0 (mm) | 186.0 × 76.0 × 76.0 (mm) | 186.0 × 76.0 × 76.0 (mm) |
| Weight of XR Glasses | 77g | 78g | 76g |
| Weight of Glasses Case | 280g | 280g | 280g |
| Myopia adjustments | 0.0D to -5.0D | 0.0D to -5.0D | 0.0D to -5.0D |
| Resolution | 1920 × 1080 per eye | 1920 × 1080 per eye | 1920 × 1080 per eye |
| Refresh Rate | 120Hz, 90Hz, 60Hz | 60Hz | 60Hz |
| Contrast ratio | 100,000:1 | 50,000:1 | 50,000:1 |
| Colors | 108% sRGB | 129% sRGB | 129% sRGB |
| PPD | 49 | 55 | 55 |
| IPD | 56.5-70.5mm | 57.5-69.5mm | 57.5-69.5mm |
| FOV | 46° | 43° | 43° |
| Brightness | 4,000 nits | 1,800 nits | 1,800 nits |
| Brightness control | 7 levels | 7 levels | 7 levels |
| Speakers | Built-in spatial sound | Built-in spatial sound | Built-in spatial sound |
| Fundamental frequency (F0) | 270 Hz ± 40 | 270 Hz ± 40 | 270 Hz ± 40 |
| Optical transmittance | 0.5-40% | 3-40% | 23% |
| Haze | < 1% | < 3% | < 1% |
| Discoloration time | 0.1 seconds | 0.3 seconds | N/A |
| Wearing time suggested | 3-4 hours | 3-4 hours | 3-4 hours |